Beginner Guide
Trovo 101: Elixir, Mana & Gifts System
Elixir: Paid Platform Currency
Elixir is purchased with real money. Users buy it to send gifts during streams.
| Price (USD) | Elixir Amount |
|---|---|
| $0.99 | 100 Elixir |
| $4.99 | 500 Elixir |
| $9.99 | 1,000 Elixir |
| $49.99 | 5,000 Elixir |
| $99.99 | 10,000 Elixir |
| $249.99 | 25,000 Elixir |
Mana: Free Viewer Currency
Mana is earned by watching live streams. It is free and accumulative.
- Earn Rate: 20 Mana every 5 minutes of active viewing.
- Daily Cap: 960 Mana (4 hours of viewing).
- Carryover: Unused Mana from previous days adds to the current total.
Mana Progress Bar
Shows the 5-minute cooldown. When full, 20 Mana is auto-claimed to your wallet.
Cast Spells Button
Requires subscription eligibility. Full rules in the official Discord:
Streamer Earnings from Gifts
| Gift Type | Streamer Revenue Split |
|---|---|
| Elixir Gifts | 50% to 1,000 Elixir = $5 USD |
| Mana Gifts | No direct cash split |
Mana Gift Rewards
- Boosts banner recommendation algorithm in real time.
- Top Mana receivers earn cash bonuses and platform rewards in recurring events.
- Future interactive features allow Mana use in channels.
Gift Income Payout
- Schedule: Monthly settlement (end of each calendar month).
- Processing Time: Same as subscription payouts.
- Future: Real-time revenue dashboard and self-service cash-out system.
Gift History (Streamers)
Coming soon: Dedicated section in Creator Studio to view all received gifts.
Is everything clear?
Please read the content above carefully. If you have any questions, contact your Regional Admin via Discord.
Back to Top Continue to Next SectionUse Mana to grow engagement. Use Elixir to earn income. Both build your channel.
Trovo Space Developer Blog
Multilingual Resources
- [Spanish] Blog para desarrolladores de Trovo Space
- [Portuguese] Blog dos Desenvolvedores - Trovo Space
- [Russian] Блог Trovo Space
- [Albanian] Trovo Space Developer Blog
- [Greek] Trovo Space Developer Blog
A New Era Starts Today
Trovo launched in 2020 as a live-streaming product. After two years, creators requested video content tools and stronger fan connections. Trovo reconstructed its base layer to support live broadcasts, videos, and community management.
Trovo Space is the first upgrade step. It lets users showcase content, create without limits, find friends, and gain recognition. In this stage, Space rooms extend live-streaming. Users stay LIVE off-stream. It combines live broadcasts, videos, posts, and fan management for ongoing creator-fan links.
Future updates include public communities for gamers to chat, watch, game, and trade in customizable scenes. Trovo plans PK gameplay, creator stores, posts, and services for monetization.
These changes help creators build careers and fan bases across content types.
Trovo Space Feature Intro
Build a habitat in the Troverse. Invite followers to chatrooms, exchange ideas in marketplaces, squad up with teammates, and explore more in Trovo Space.
Everyone can create an ultimate playground with endless options.
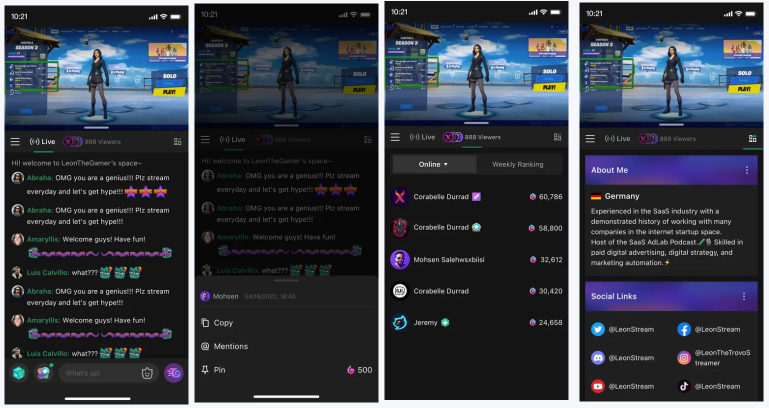
Trovo Space & Room Features (Web)
1. Space
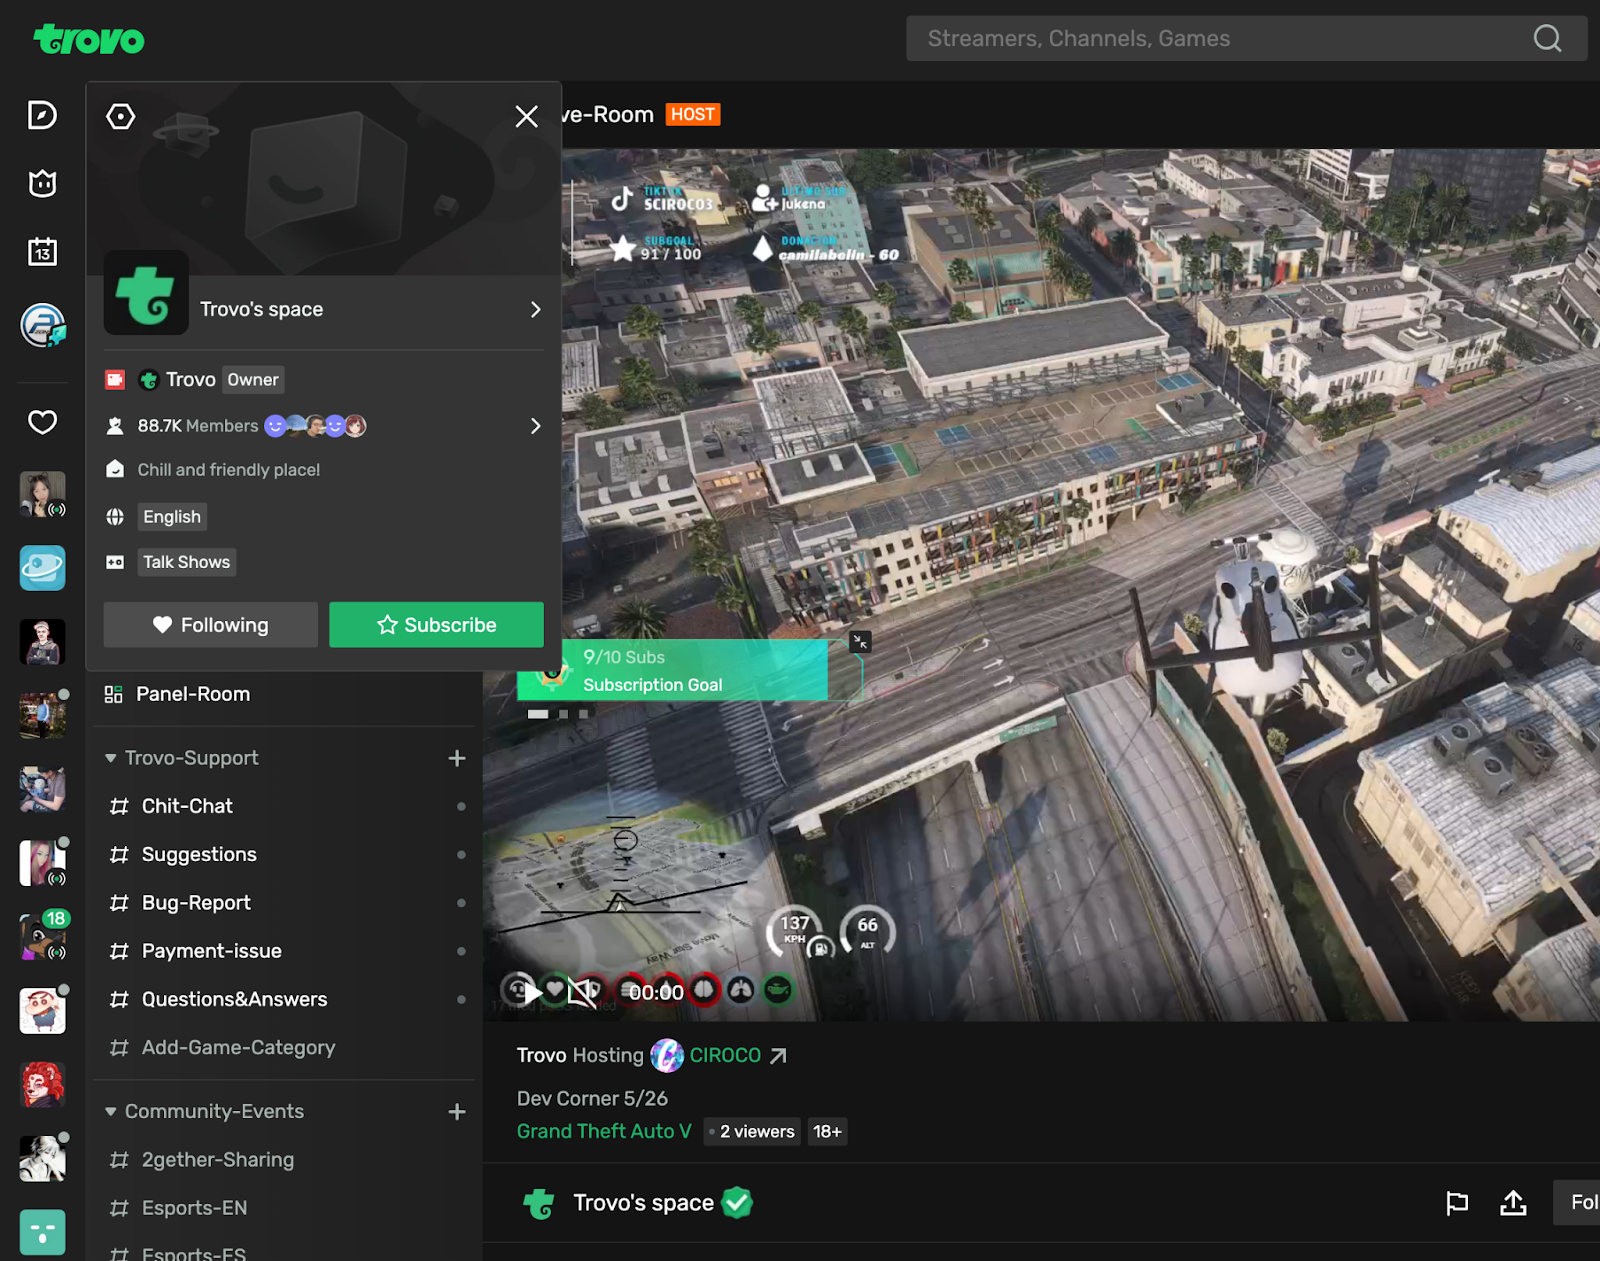
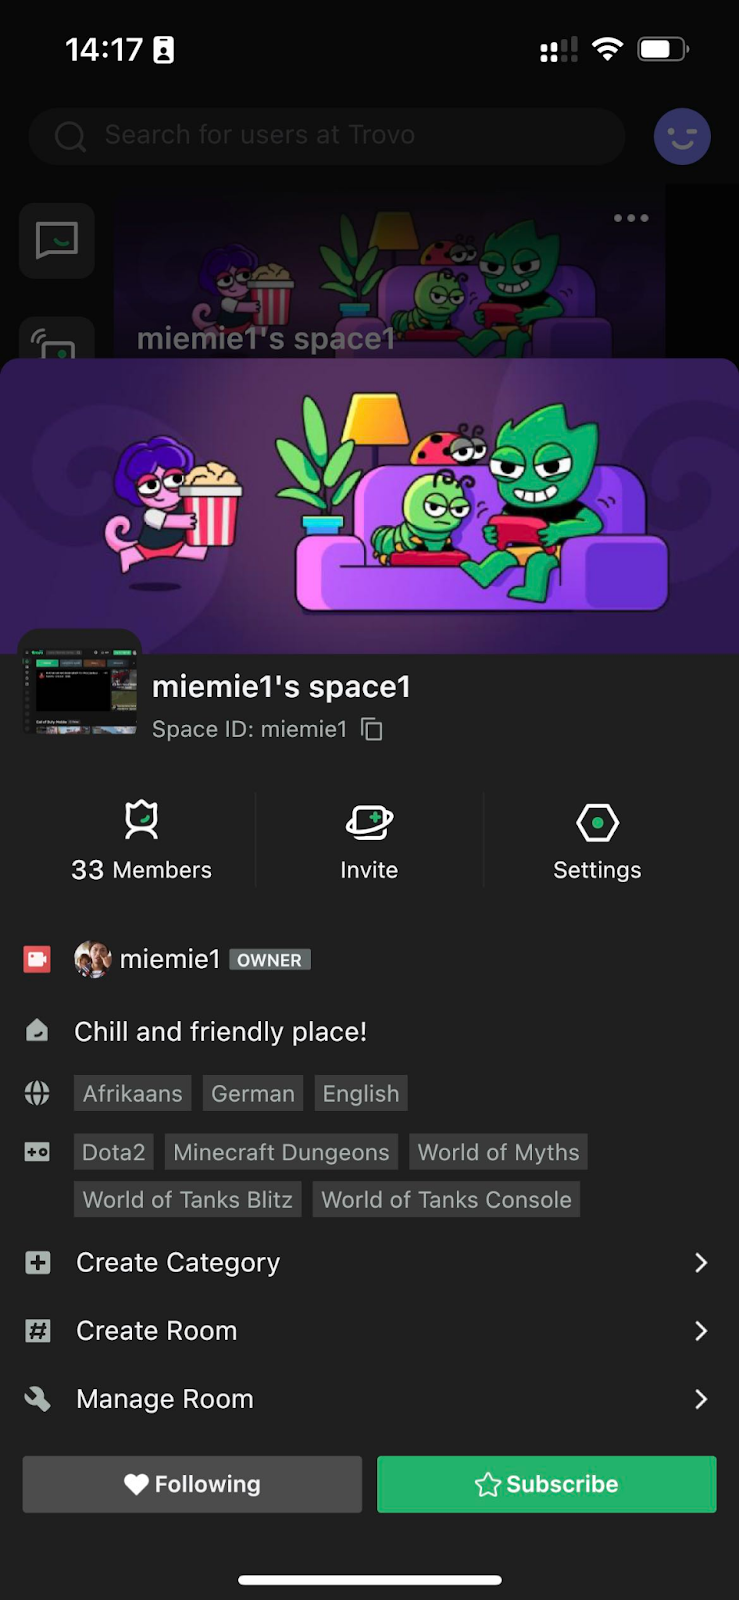
How to Create Space: Every channel upgraded to Space automatically.
How to Set Up Space:
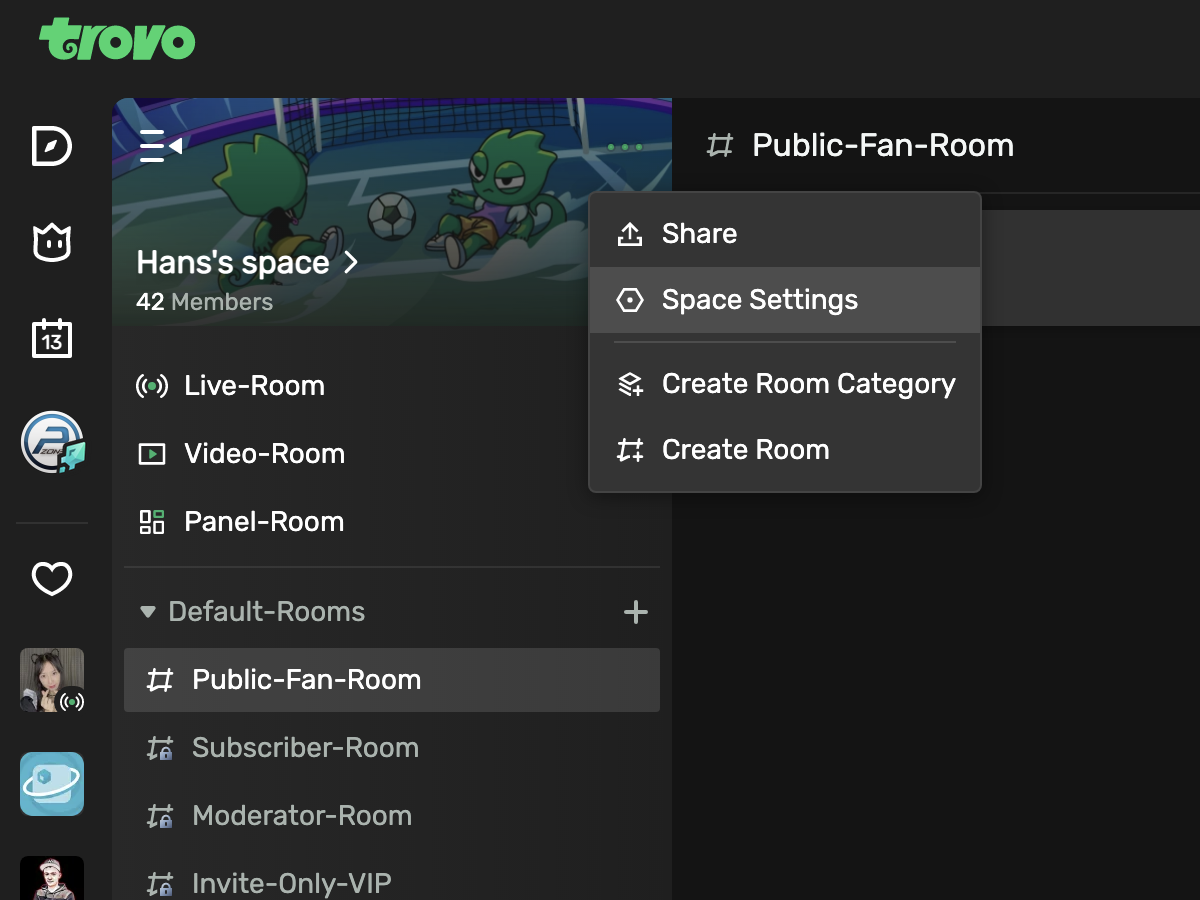
Click "More" in the top-right of Space Navigation.
- Share: Share your Space to increase visibility.
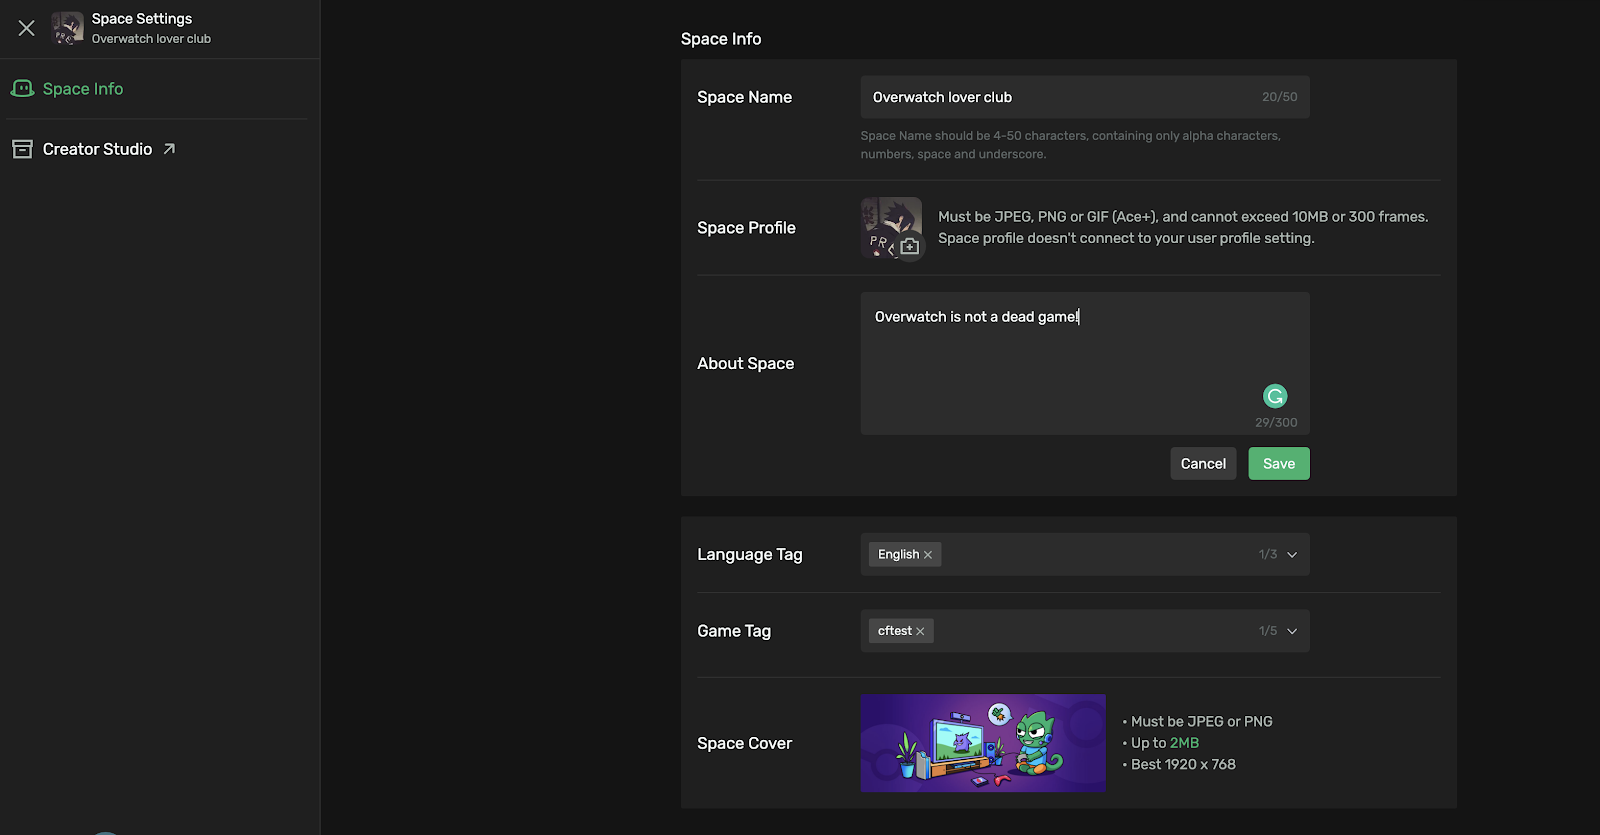
- Space Settings: Set name, description, profile picture (separate from personal profile). More options coming soon.
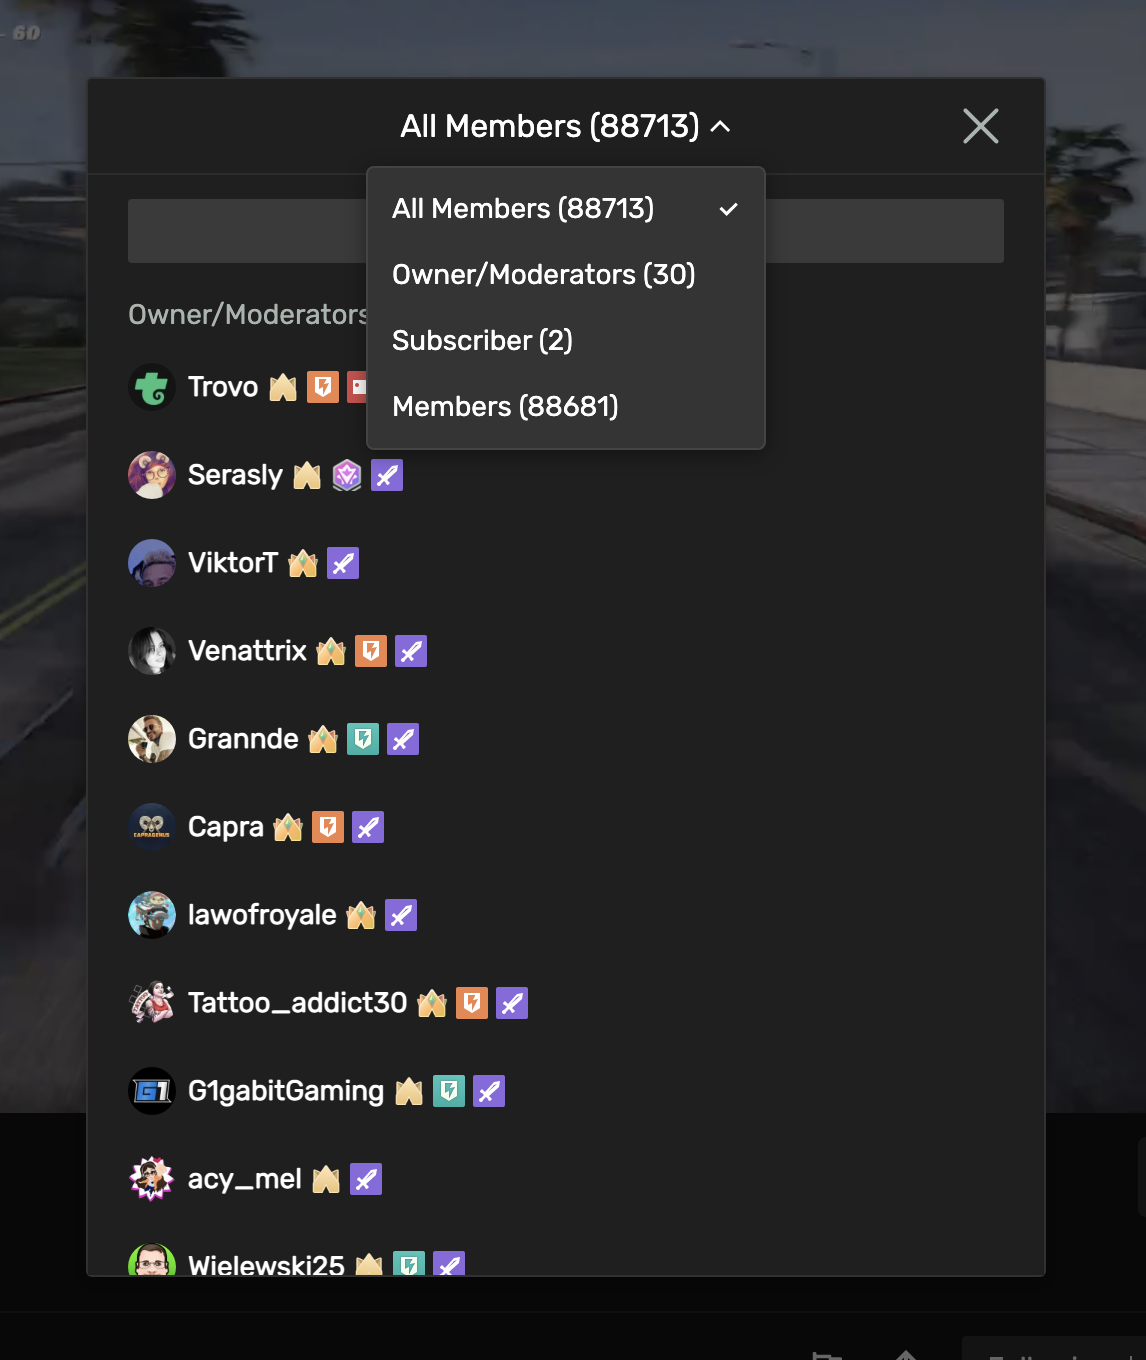
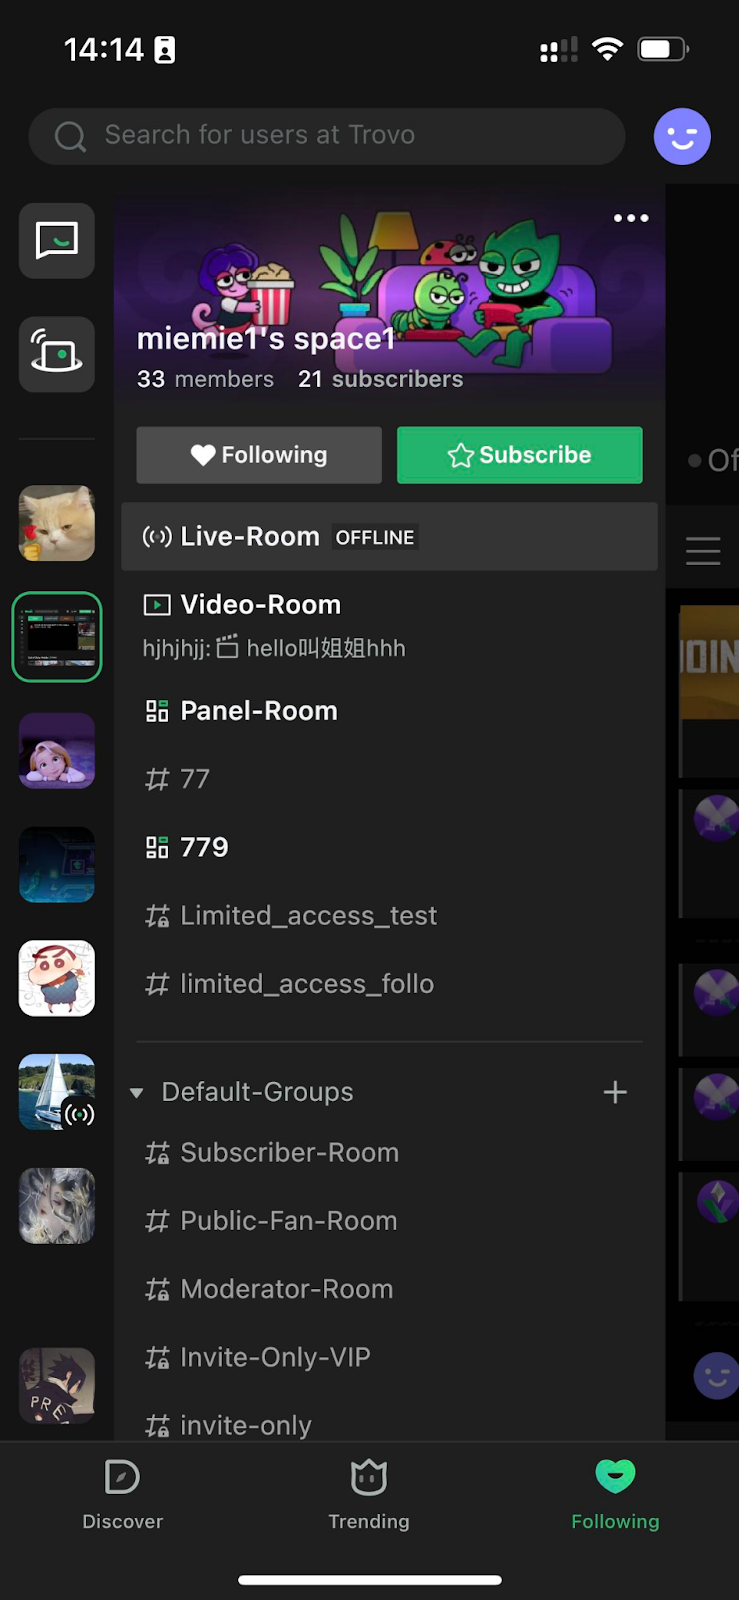
Space Members: Followers become members. Access list sorted by roles: mods, custom roles, subs.
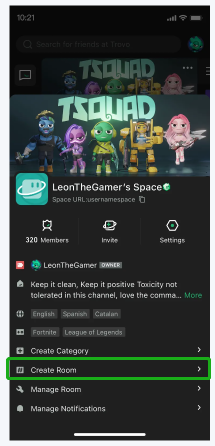
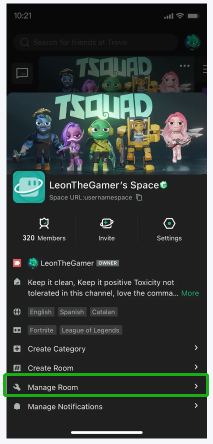
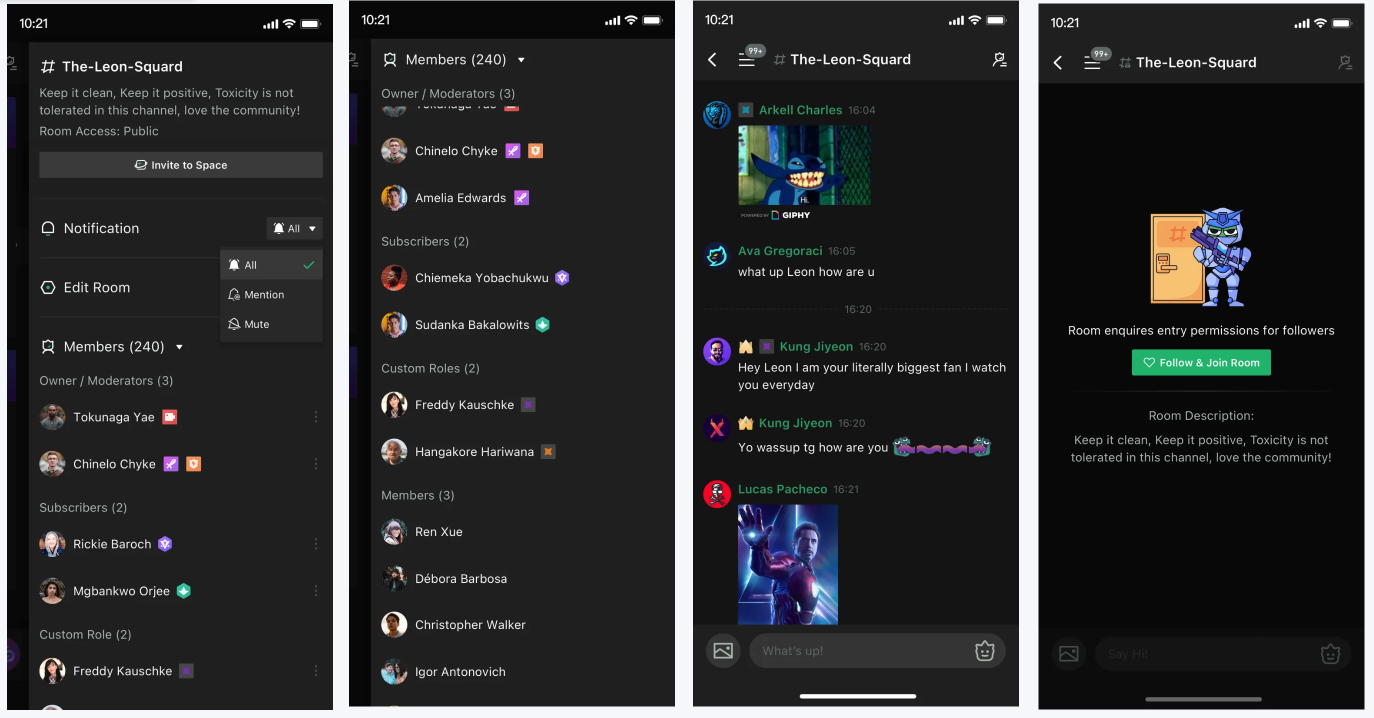
2. Room
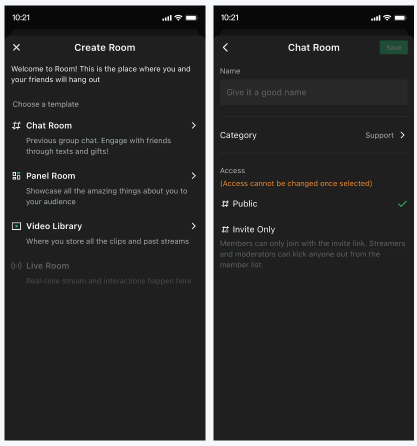
Create Room:
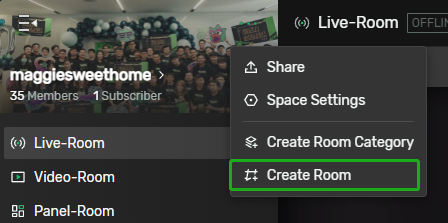
Step 1: Click "More" > Create Room.
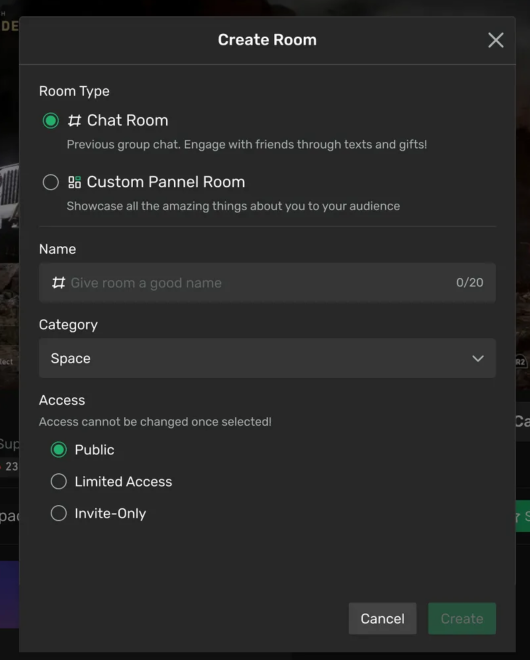
Step 2: Set name, category, access. Types: Chat Room, Custom Panel Room (Live/Video rooms not yet creatable). Room appears in list after creation.
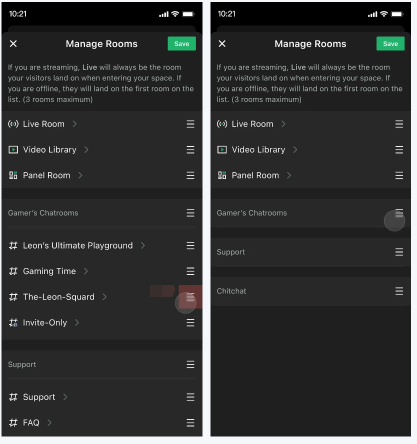
Organize Room List:
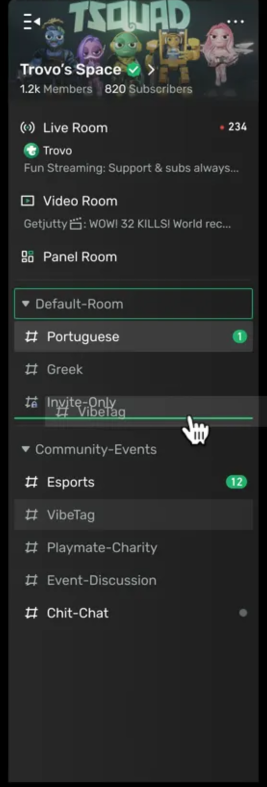
Create categories, move rooms, pin to top.
Live Room:

Stream here. Retains channel functions, more organized. During live, it becomes default landing with Live icon. Room list collapses.
Video Room:
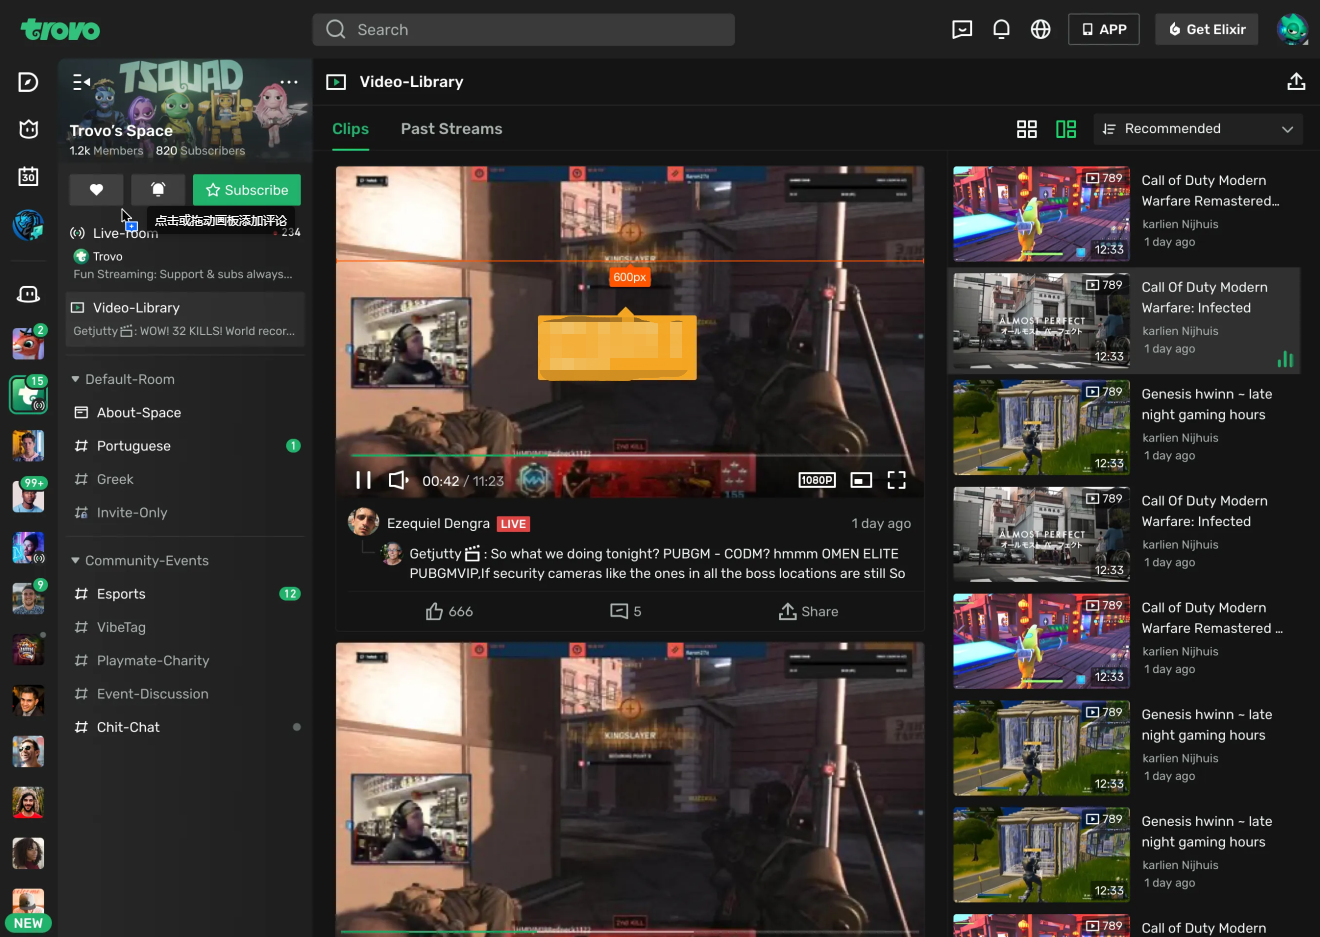
Modes: Feed (auto-play previews), Catalog (full-screen previews of clips/past streams). Video upload in whitelist testing in select regions.
Chat Room:
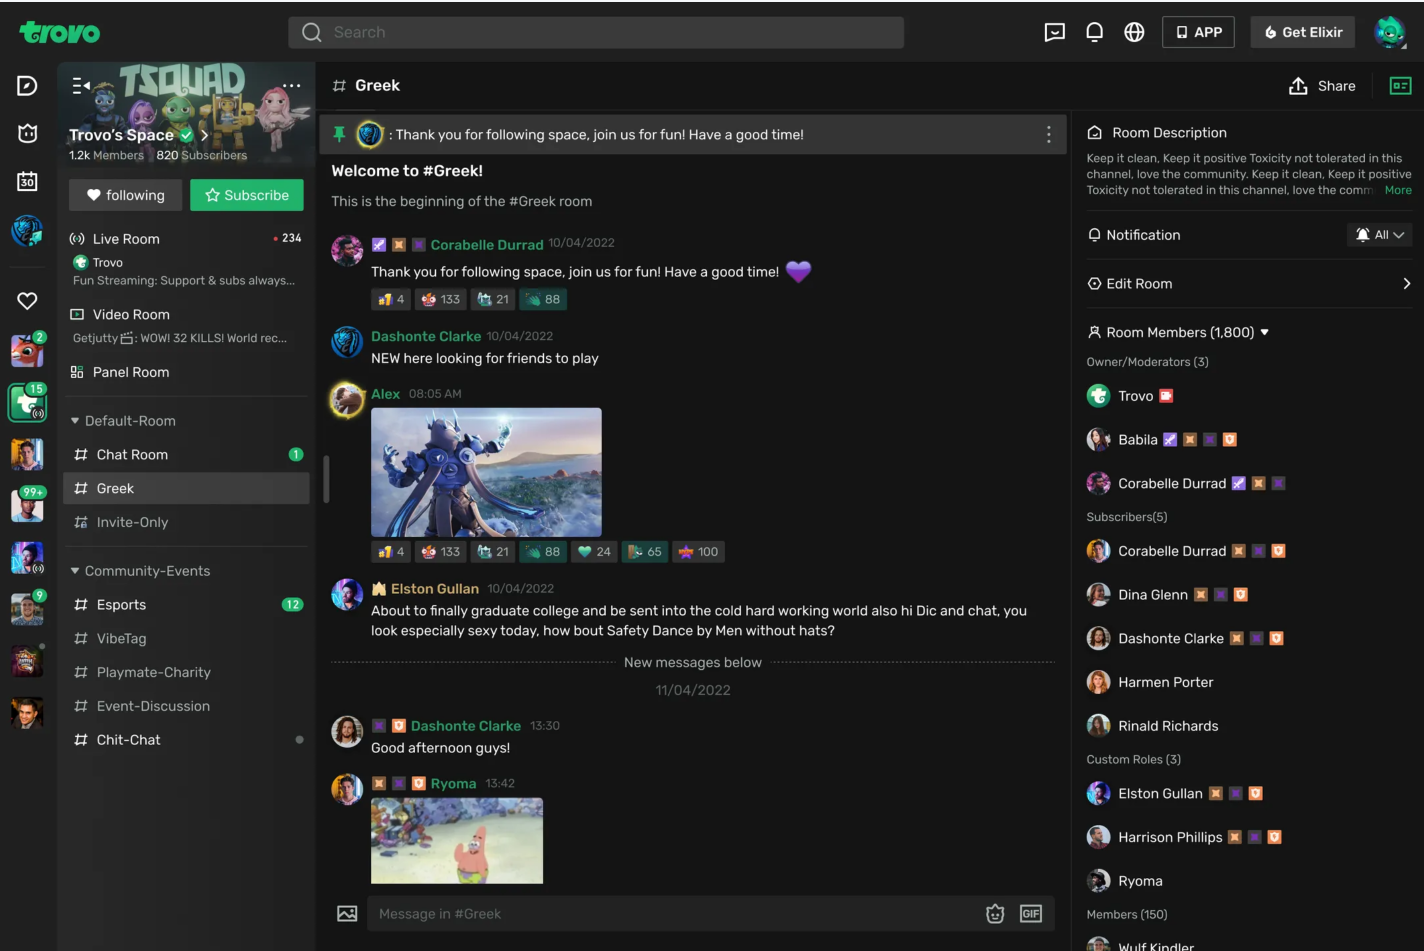
Full-screen chat. Easy notifications, member list, description access.
Panel Room:
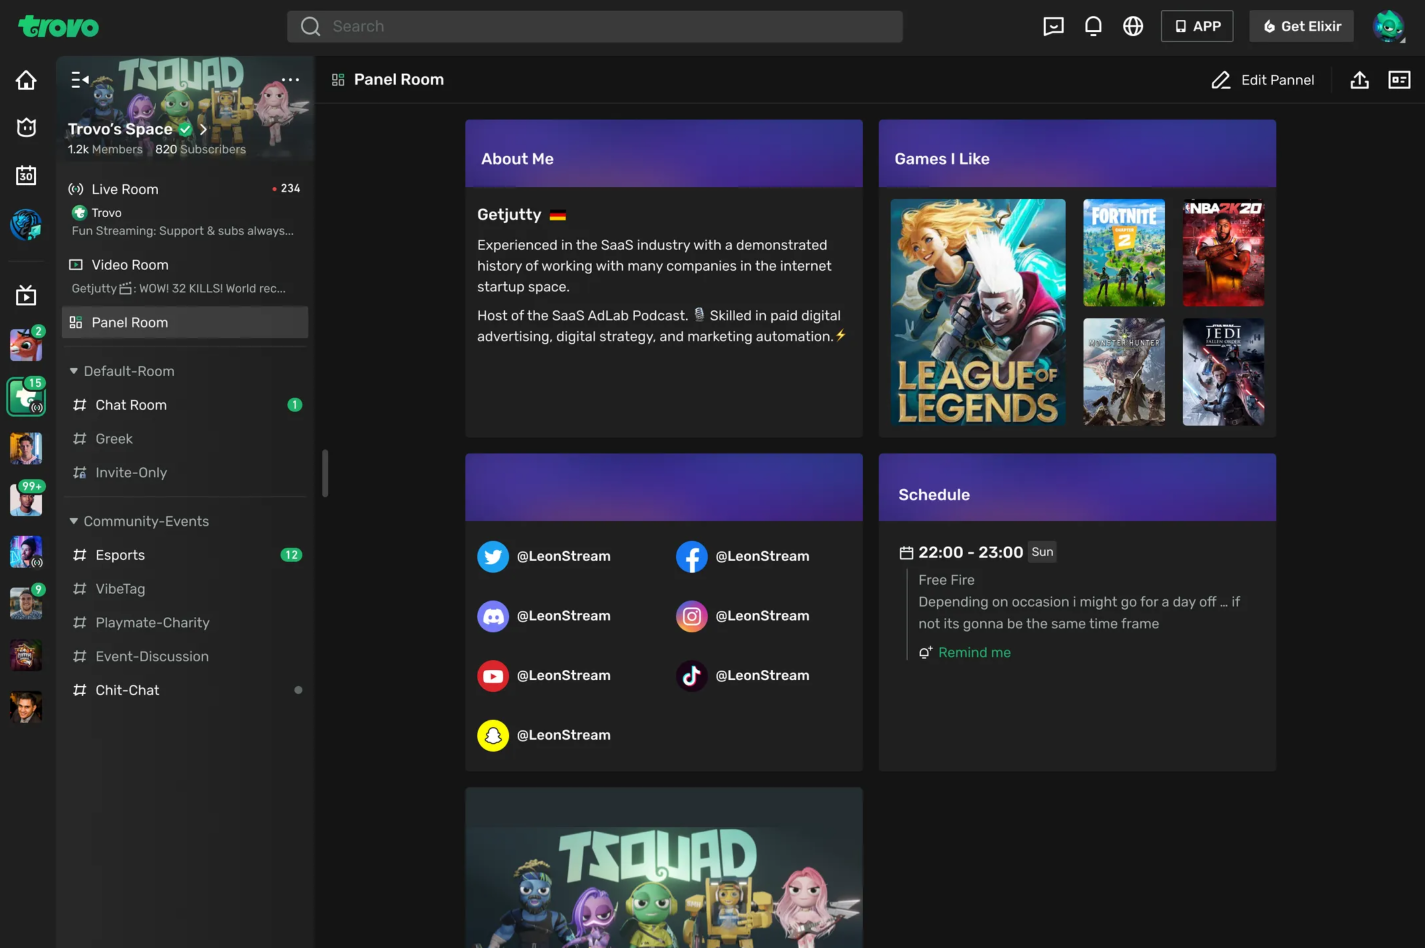
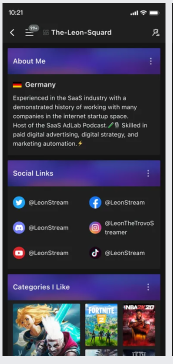
Create panels: Intro, Games I Like, Social Links, Schedule, custom text/image. Customize size, background color.
Trovo Space & Room Features (App)
1. Space
How to Create Space: Every channel upgraded to Space automatically.
How to Set Up Space: Click the Space card in app.

Access members (mods, subs), invite friends, set name/description.
2. Room
Create Room:
Step 1: Click "More" > Create Room.
Step 2: Set name, category, access. Types: Chat Room, Custom Panel Room.
Organize Room List:
Create categories, move rooms, pin to top.
Live Room:
Stream here. Default landing during live with icon. List collapses.
Video Room:
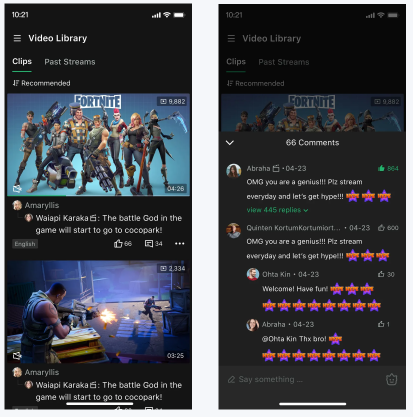
Modes: Feed (auto-play), Catalog (full-screen). Upload in testing.
Chat Room:
Full-screen chat, notifications, members, description.
Panel Room:
Panels: Intro, Games, Links, Schedule, custom. Customize size/color.
Is everything clear?
Please read the content above carefully. If you have any questions, contact your Regional Admin via Discord.
Back to Top Continue to Next SectionTrovo Space extends live streaming into persistent communities for creators and fans.
Trovo 101: How to Start Streaming
Hi dear Trover!
Thanks for your attention and welcome to our community!
On this page, we'll introduce the contents below:
- — Sign up and Log in
- — Set up your Channel in Creator Studio
- — Stream from Mobile iOS Devices
- — Stream from Mobile Android Devices
- — Stream from PC (Windows/macOS/Linux)
Hope you enjoy Trovo with this guidance. If you have any doubt, please feel free to contact us.
1. Sign up and Log in
If you're new to Trovo, please sign up first at: https://trovo.live
You can also sign up on the Trovo App.

Click the "APP" icon in the top-right of the webpage, and download the app.
Once your account is created, you can log in with your email address or phone number.
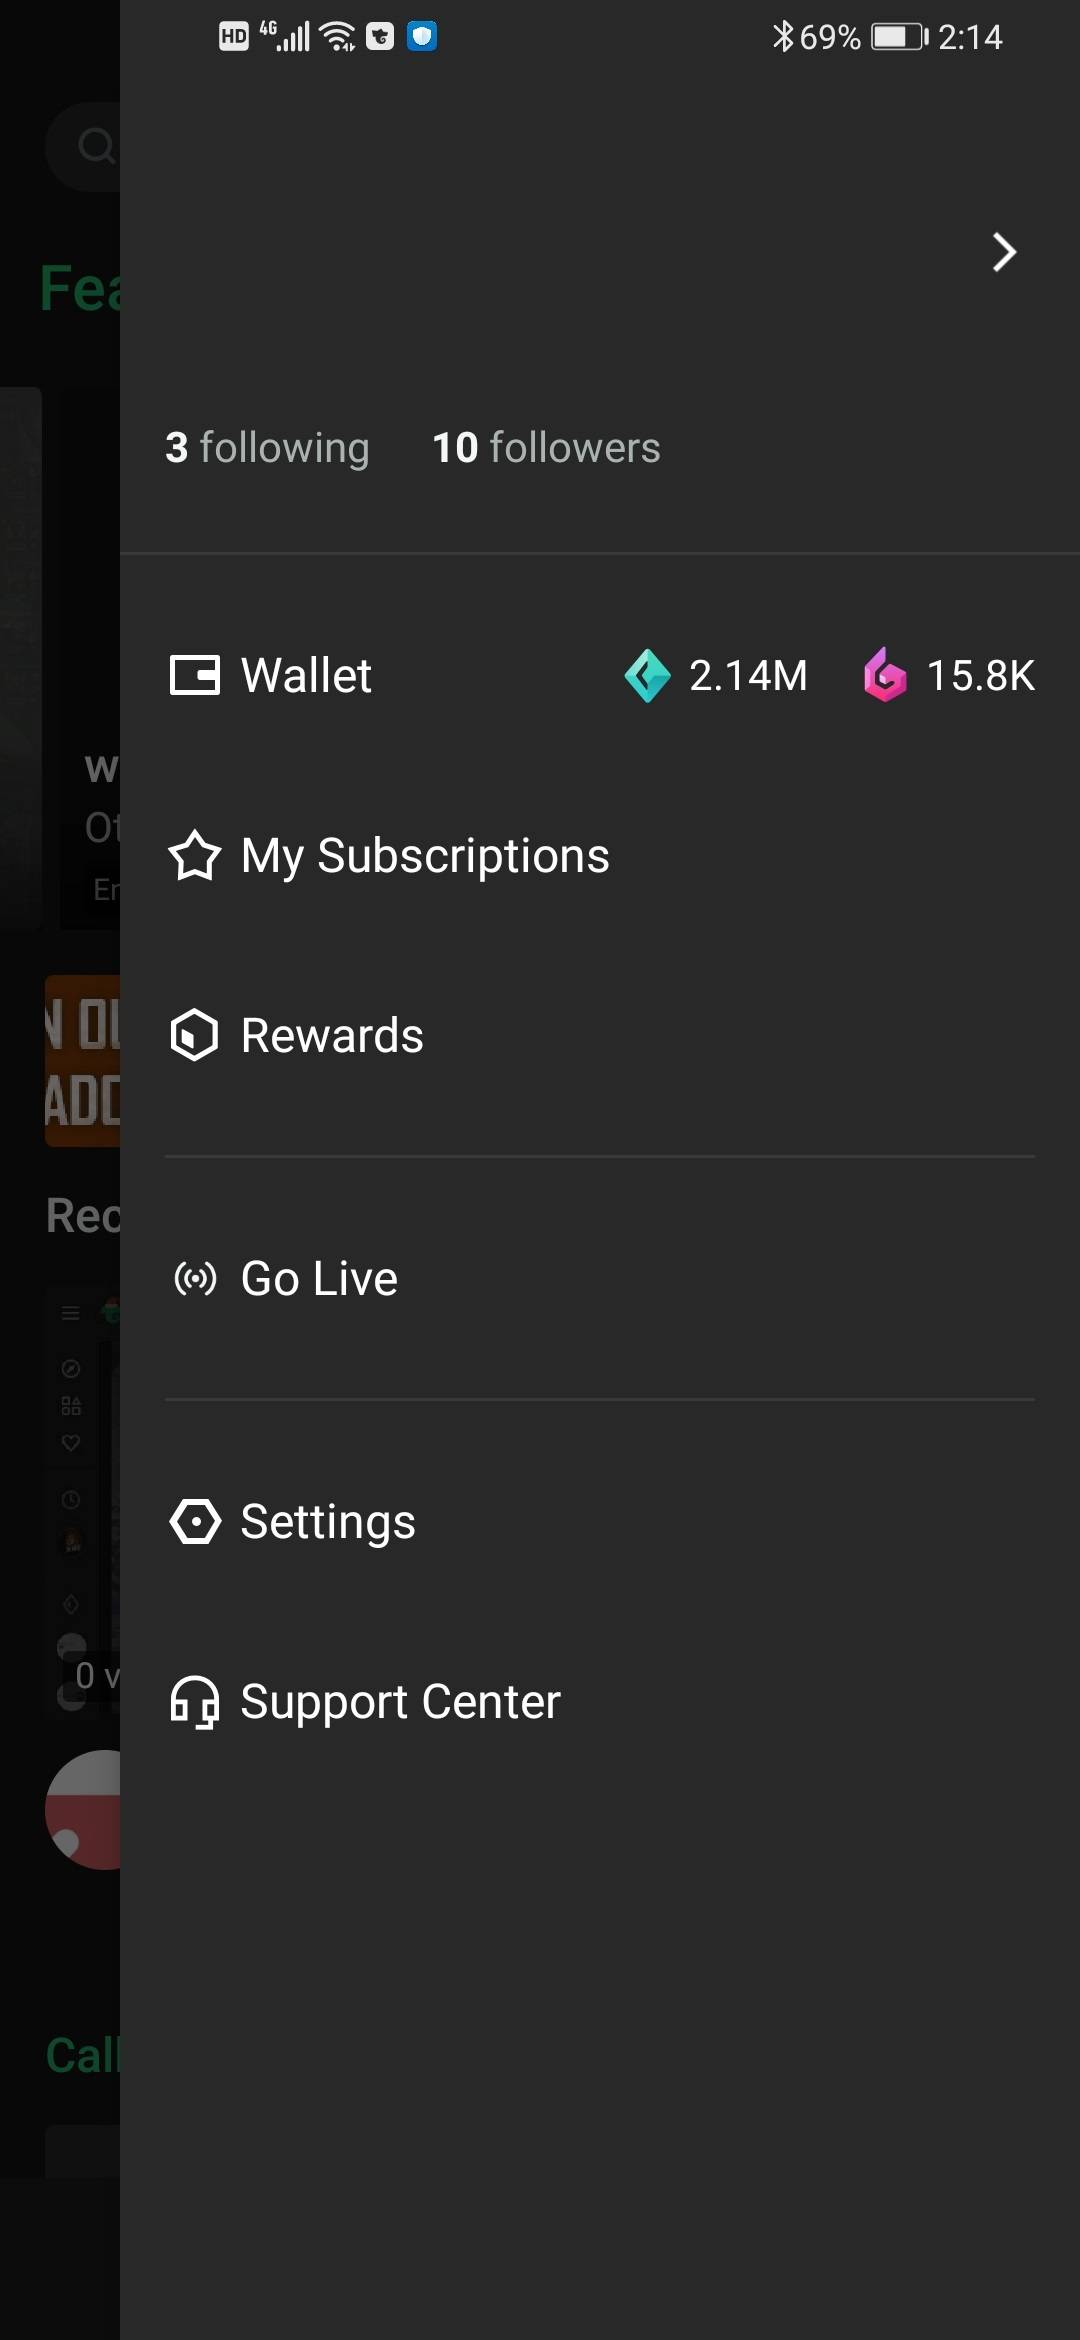
2. Set up Your Channel in Creator Studio
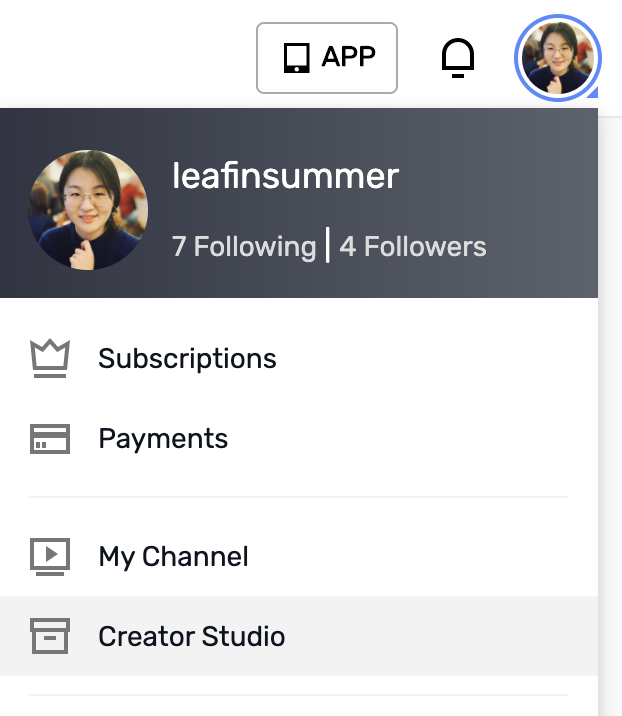
1) Go to Creator Studio (only available on the website).
- — Mouse over your profile picture and click "Creator Studio".
- — Or through link: https://studio.trovo.live
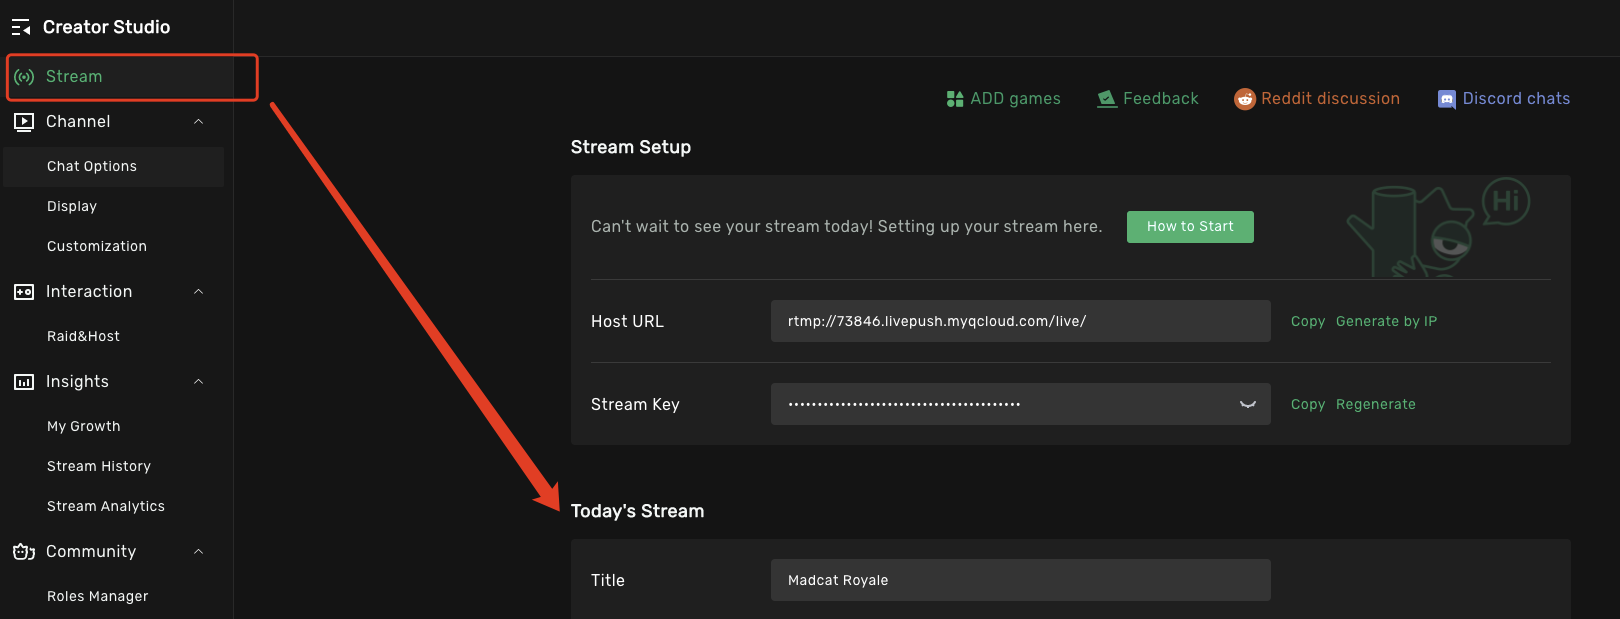
2) Go to the “Stream” page in Creator Studio.
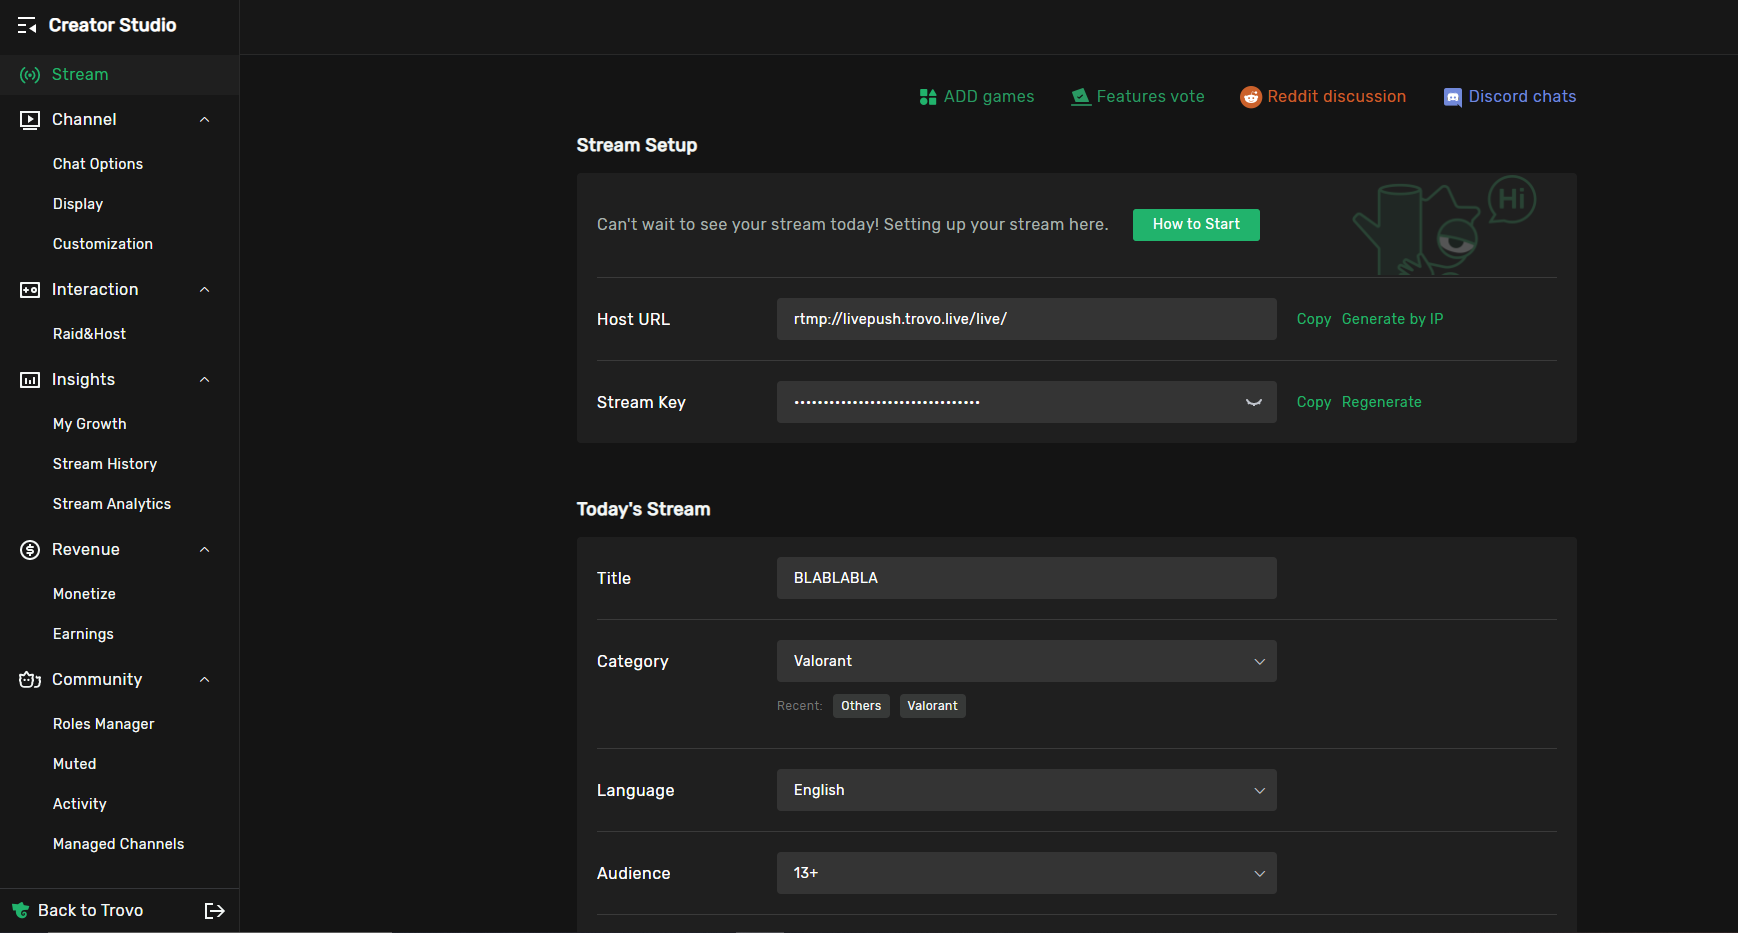
3) Go to the 'Today’s stream' section and set up your stream info.
- Title: Name your stream.
- Category: Select one of the content categories from the dropdown menu.
- Language: Select your stream language.
- Audience: Select your target audience.
(Note: You can change the settings anytime, even during streaming.)
3. Stream from Mobile iOS Devices
You may stream from the mobile app or 3rd-party OBS.
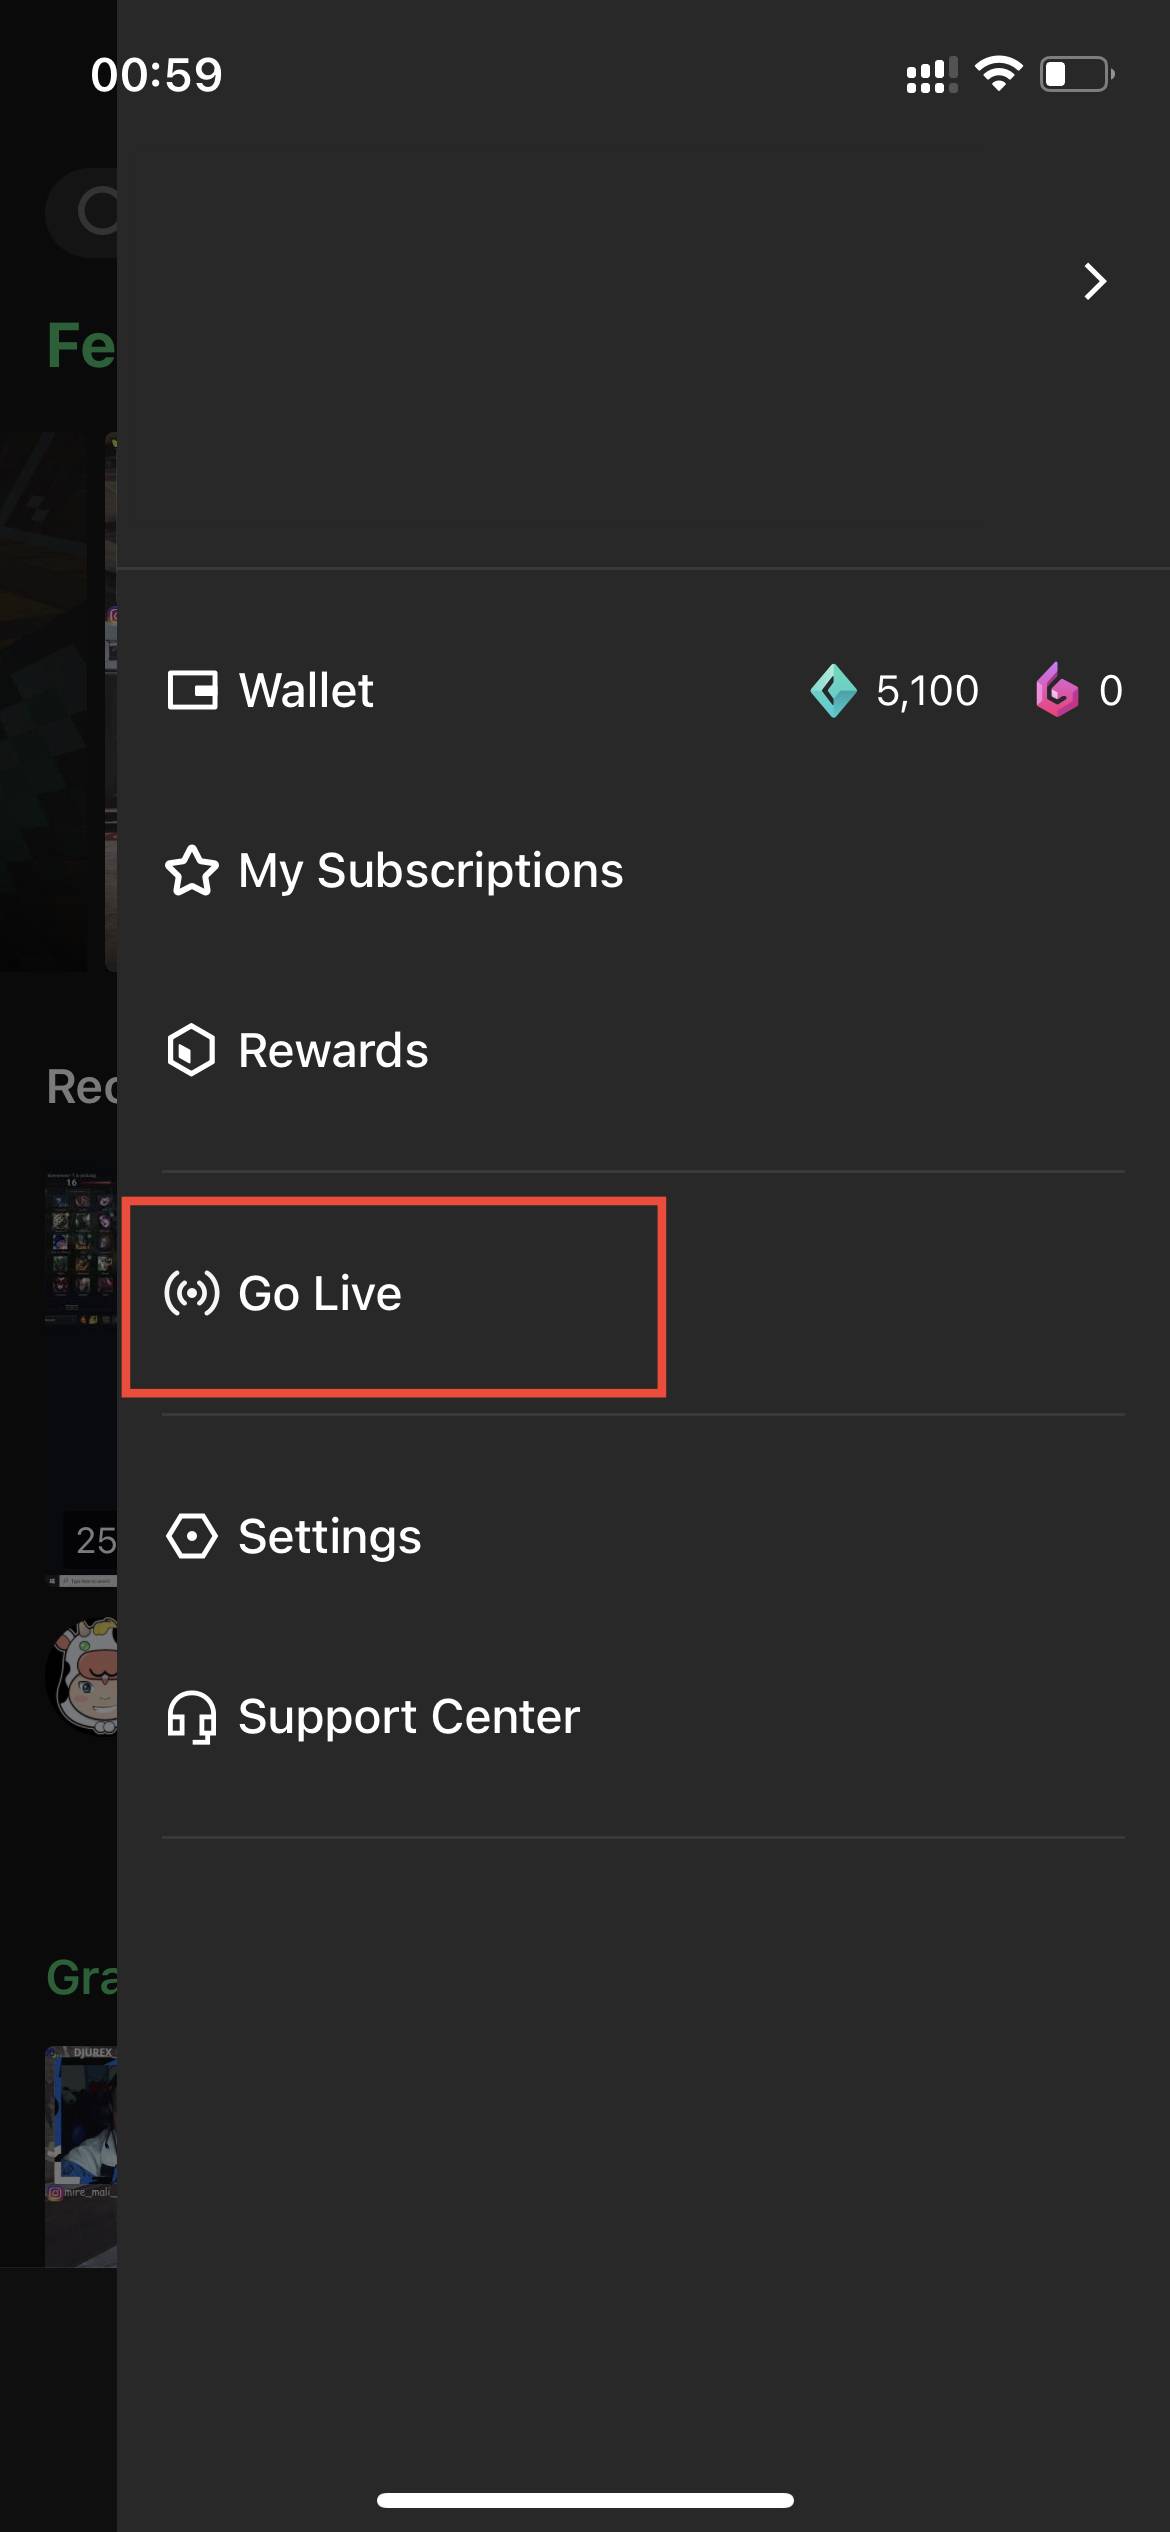
1) Trovo App
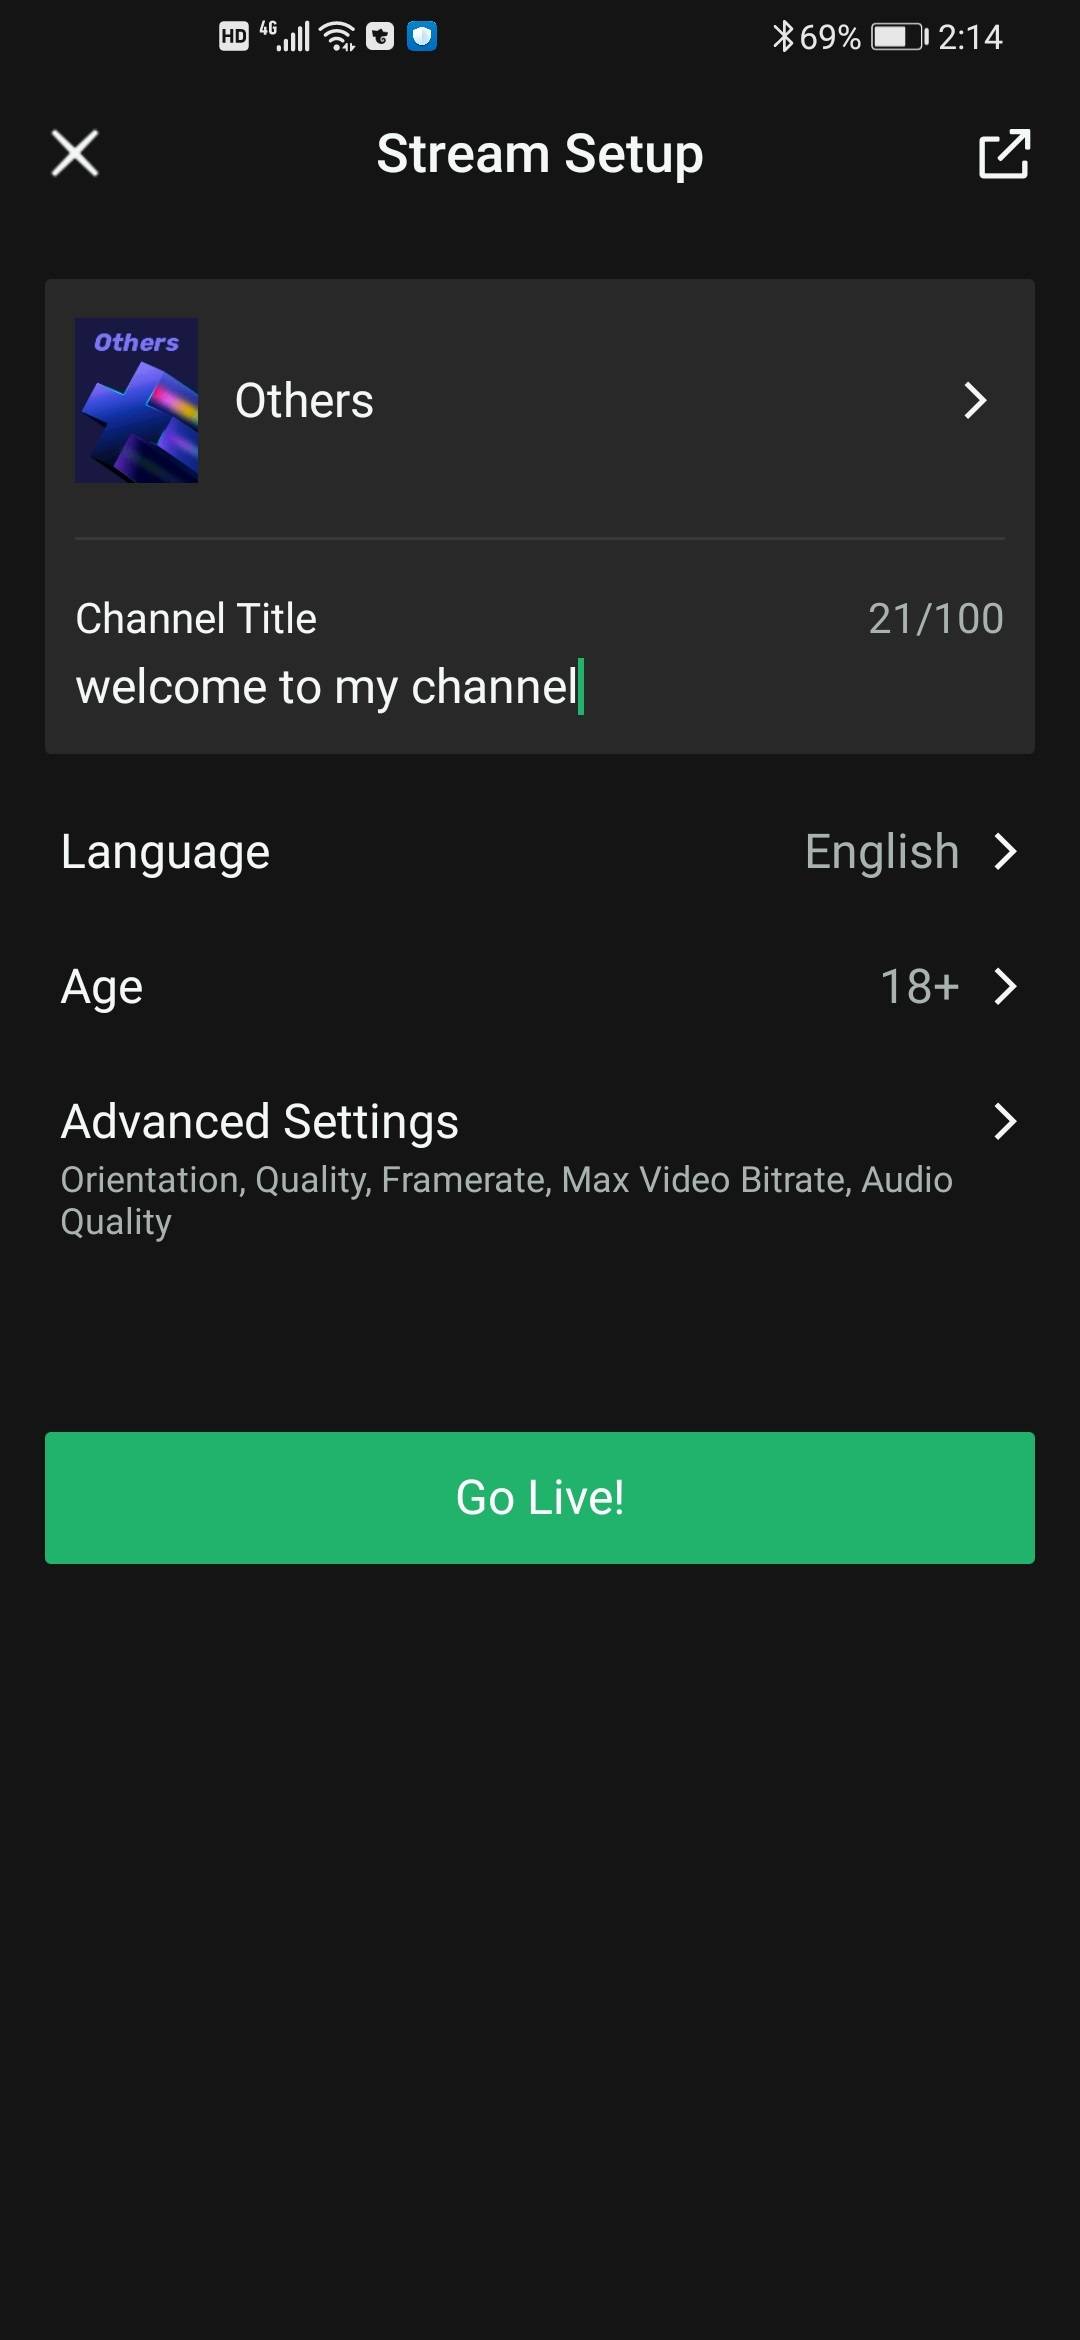
a) Open the Trovo App, click the avatar in the top-right corner, and find 'Go Live'.
b) Fill in the 'Stream Setup' page
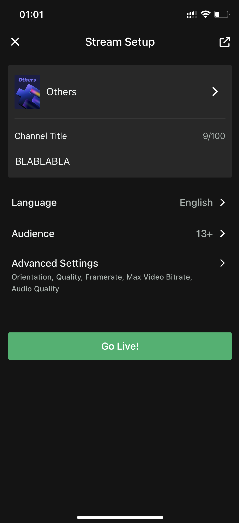
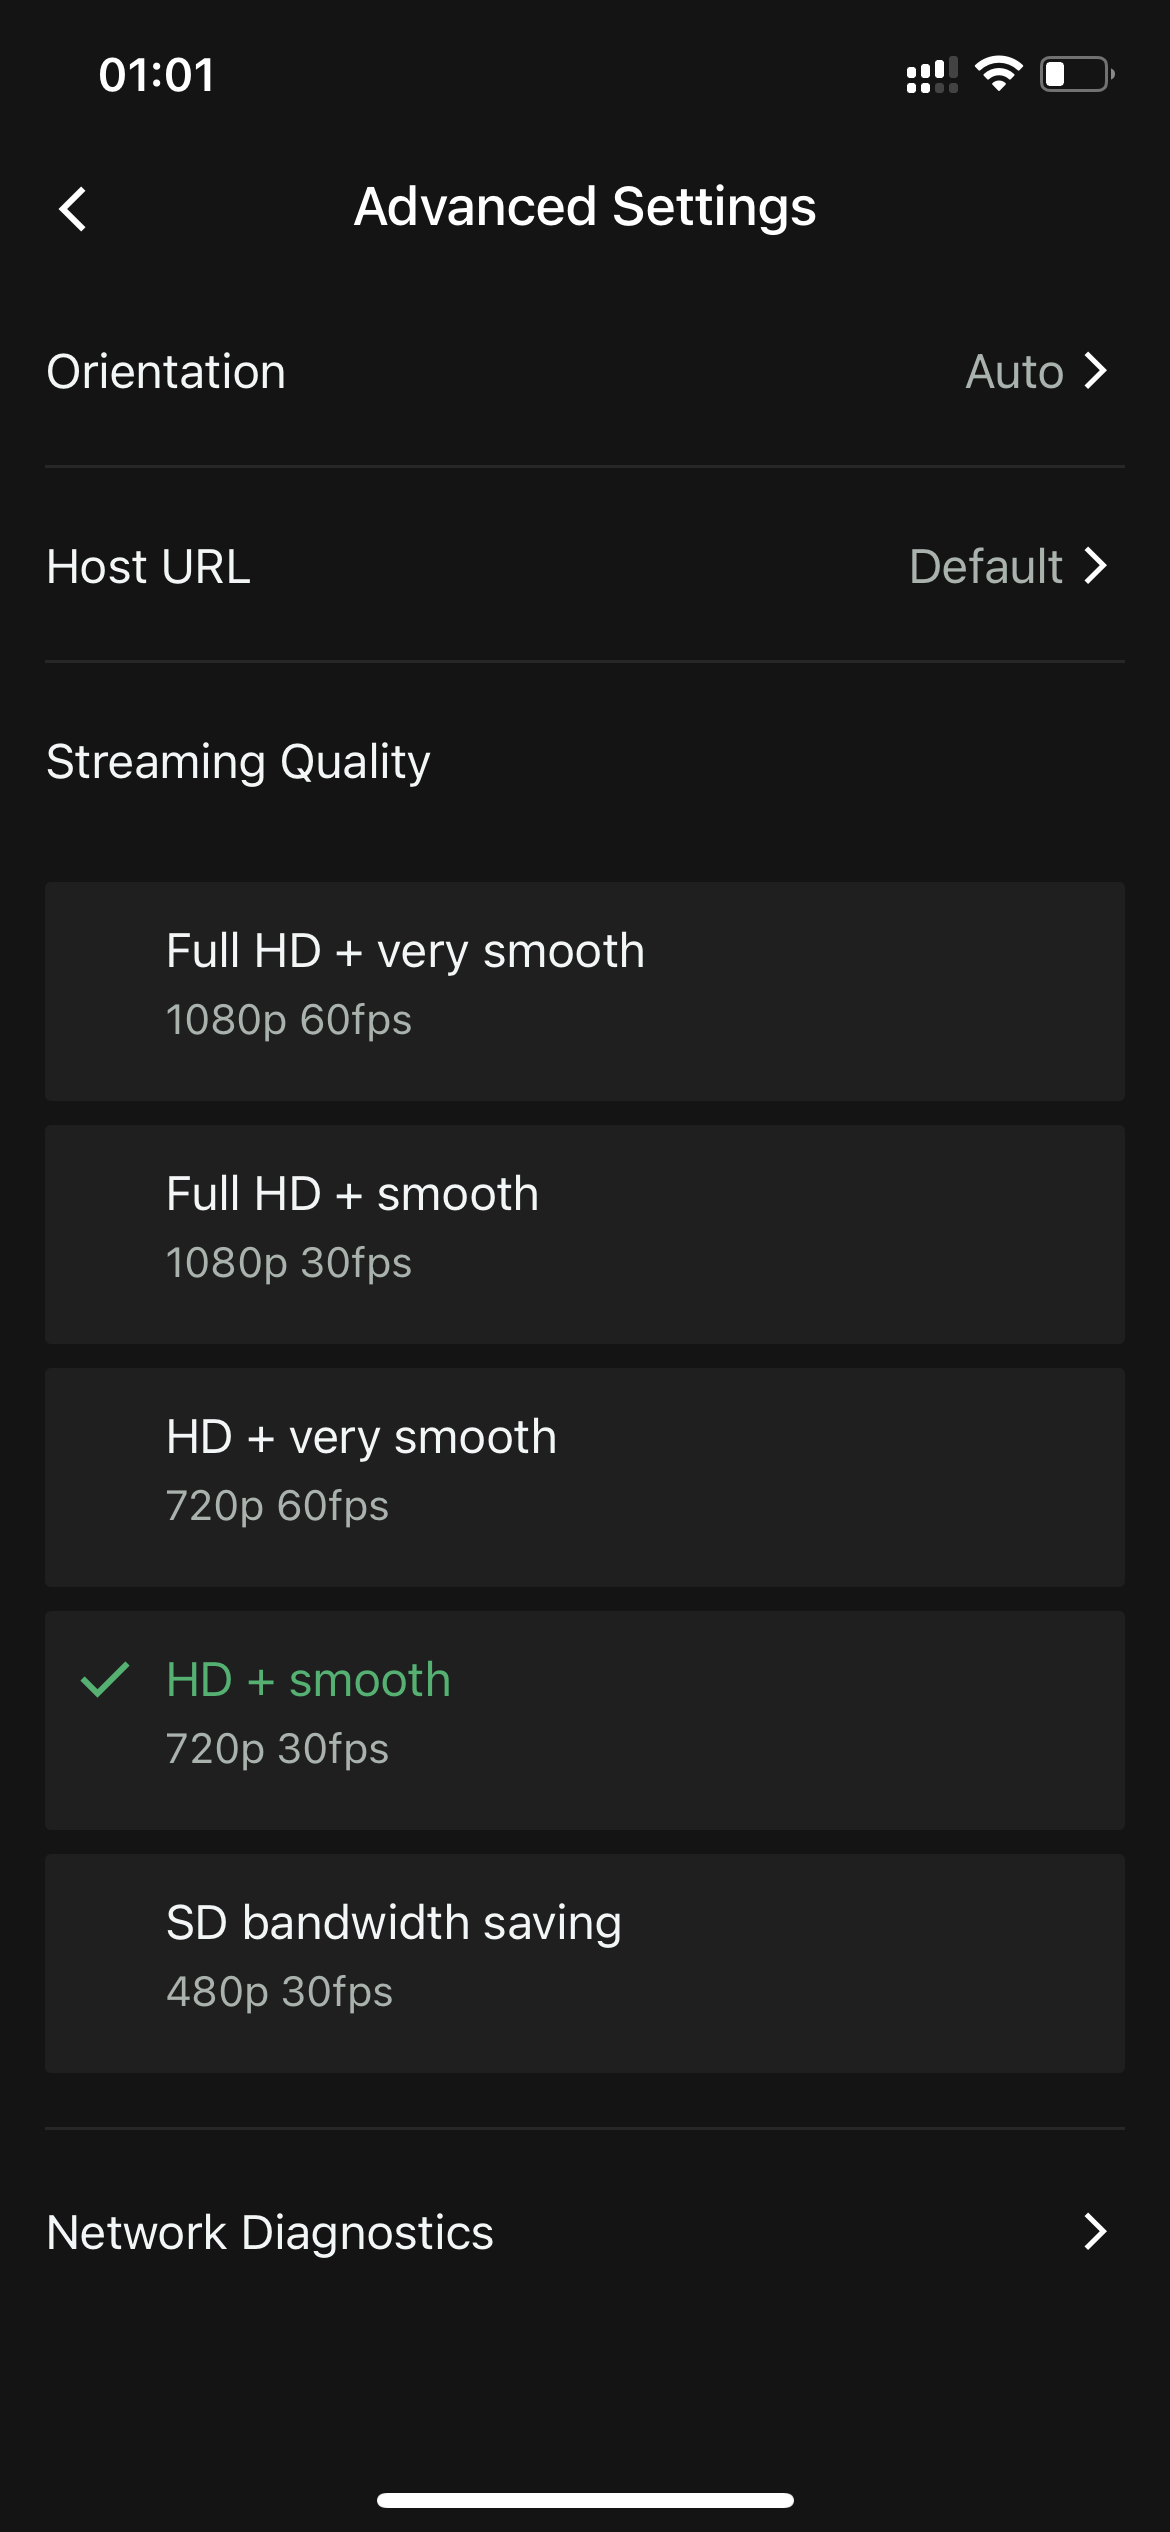
c) You can adjust the Orientation, Host URL, and Streaming Quality in the Advanced Settings, and check network connection before streaming.
d) After clicking Go Live!, you will see step-by-step instructions.

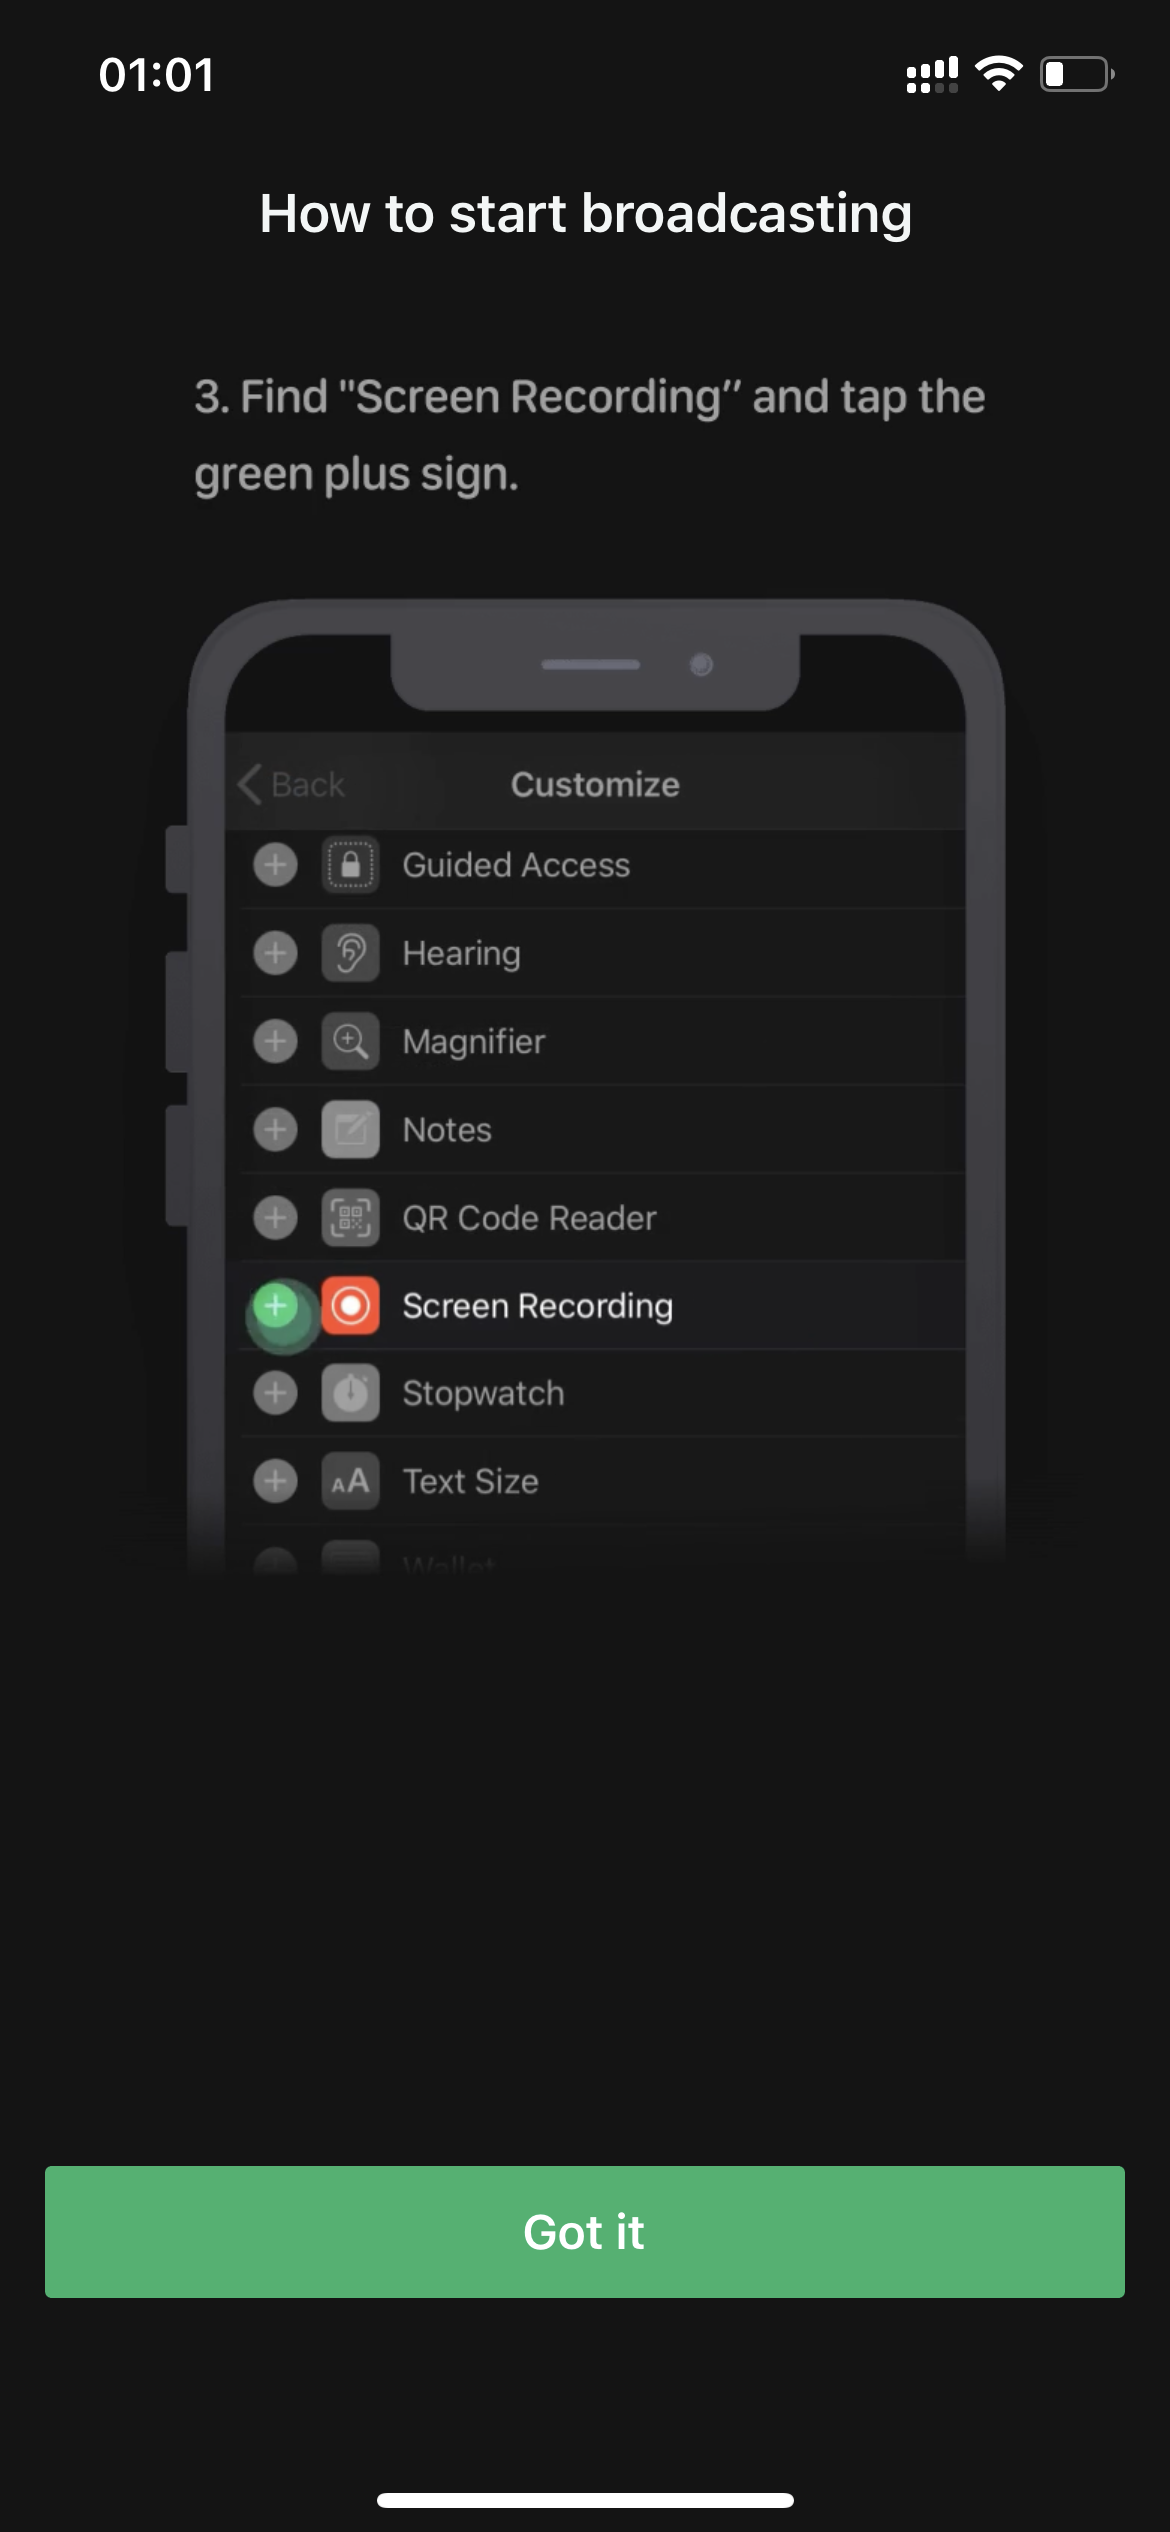
e) Click Go Live! again to start live streaming through system screen recording. Note: Turn on the microphone if you need voice/game audio.

f) If you cannot find the screen recording button, click 'How to start broadcasting in system control' in step d).
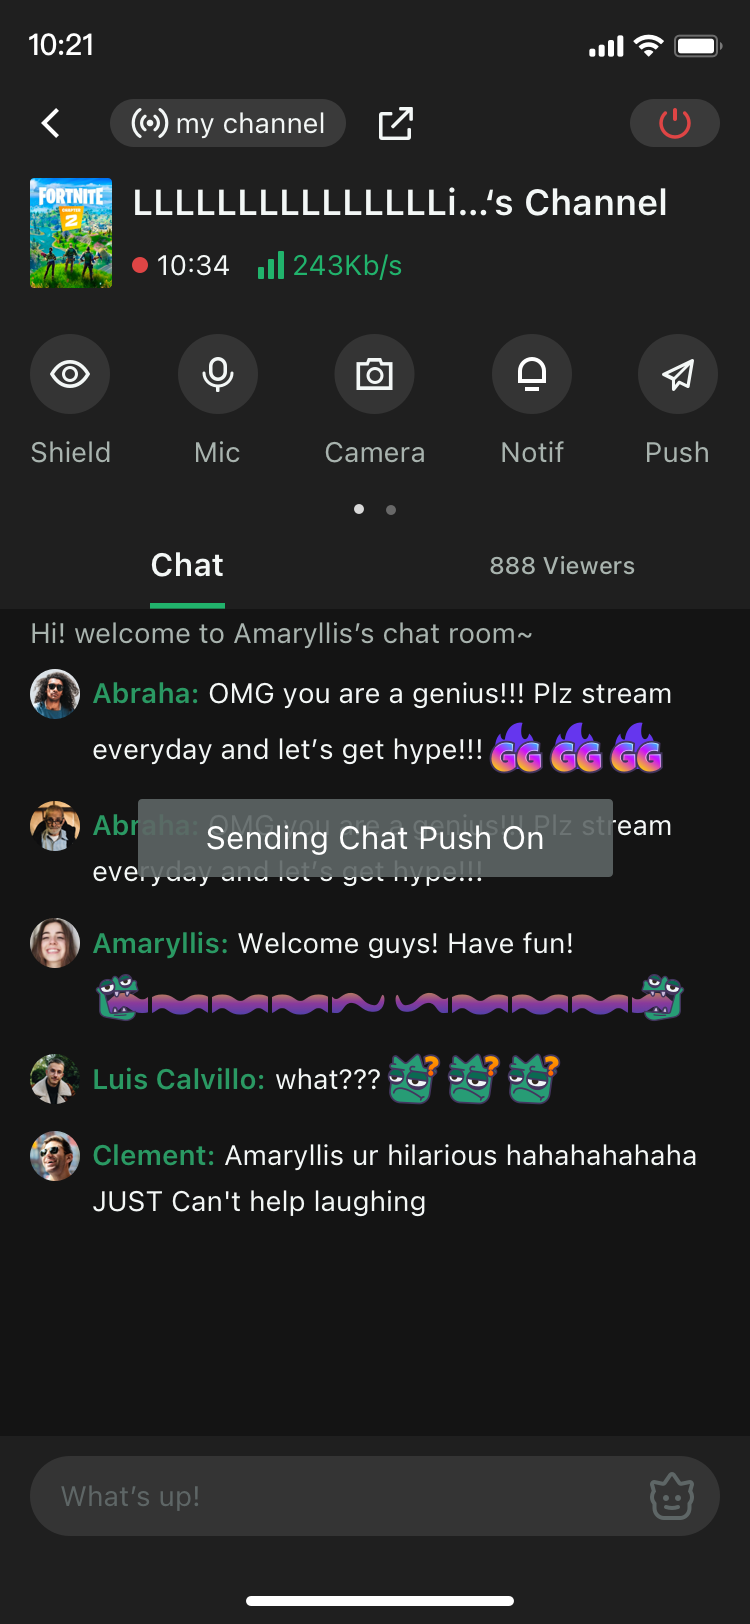
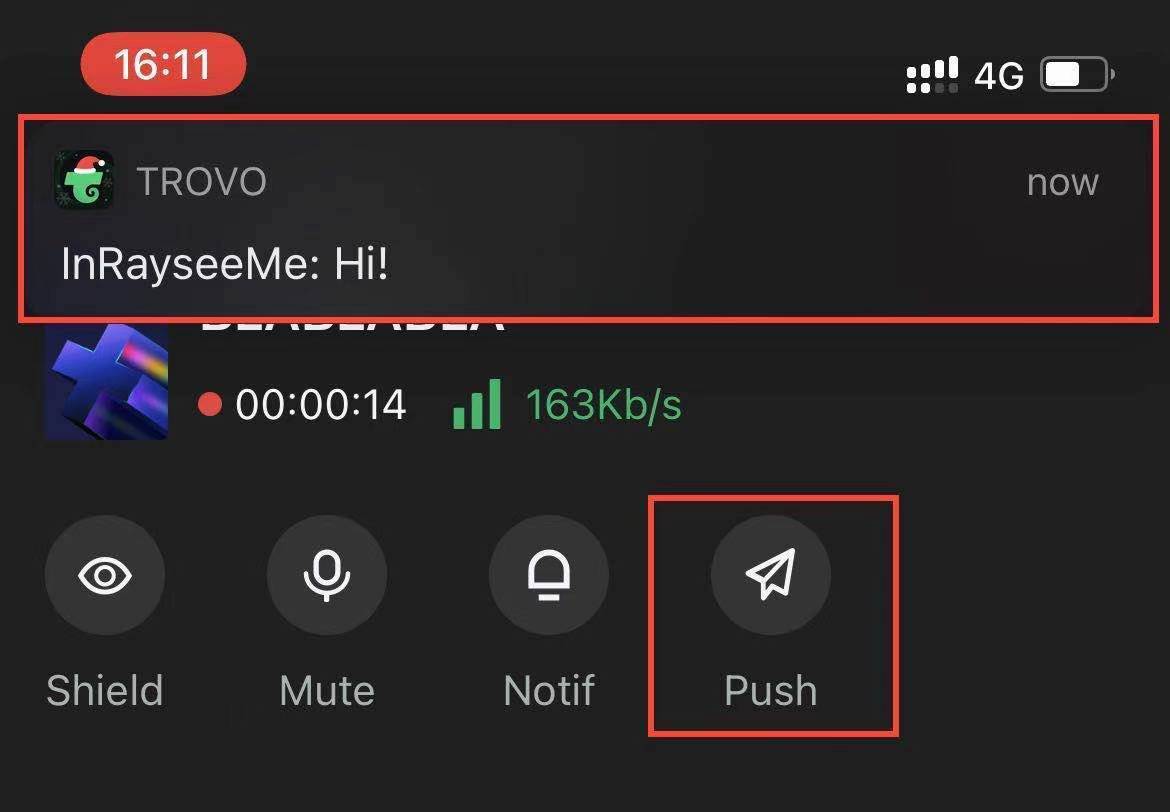
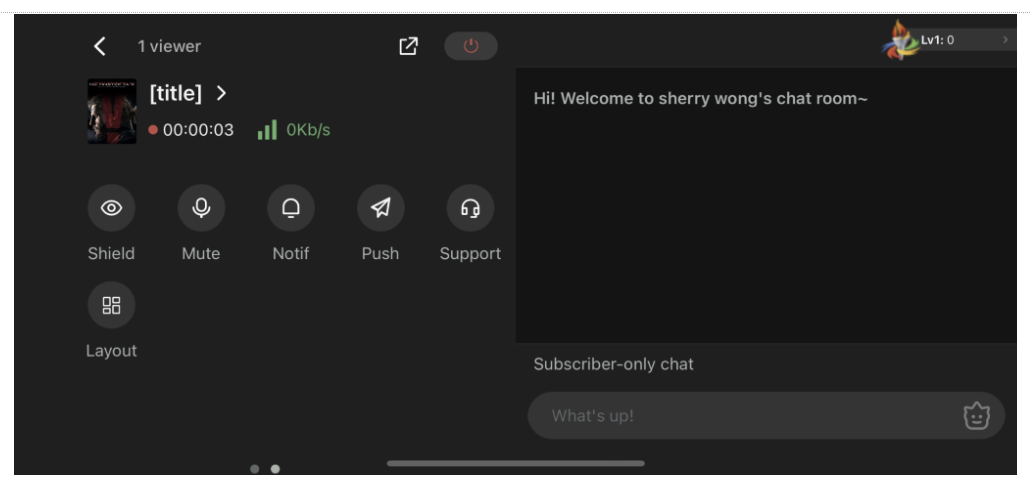
g) On iOS devices, you can receive new chat messages by turning on the 'Push' functions (messages sent by streamer yourself will not be pushed).


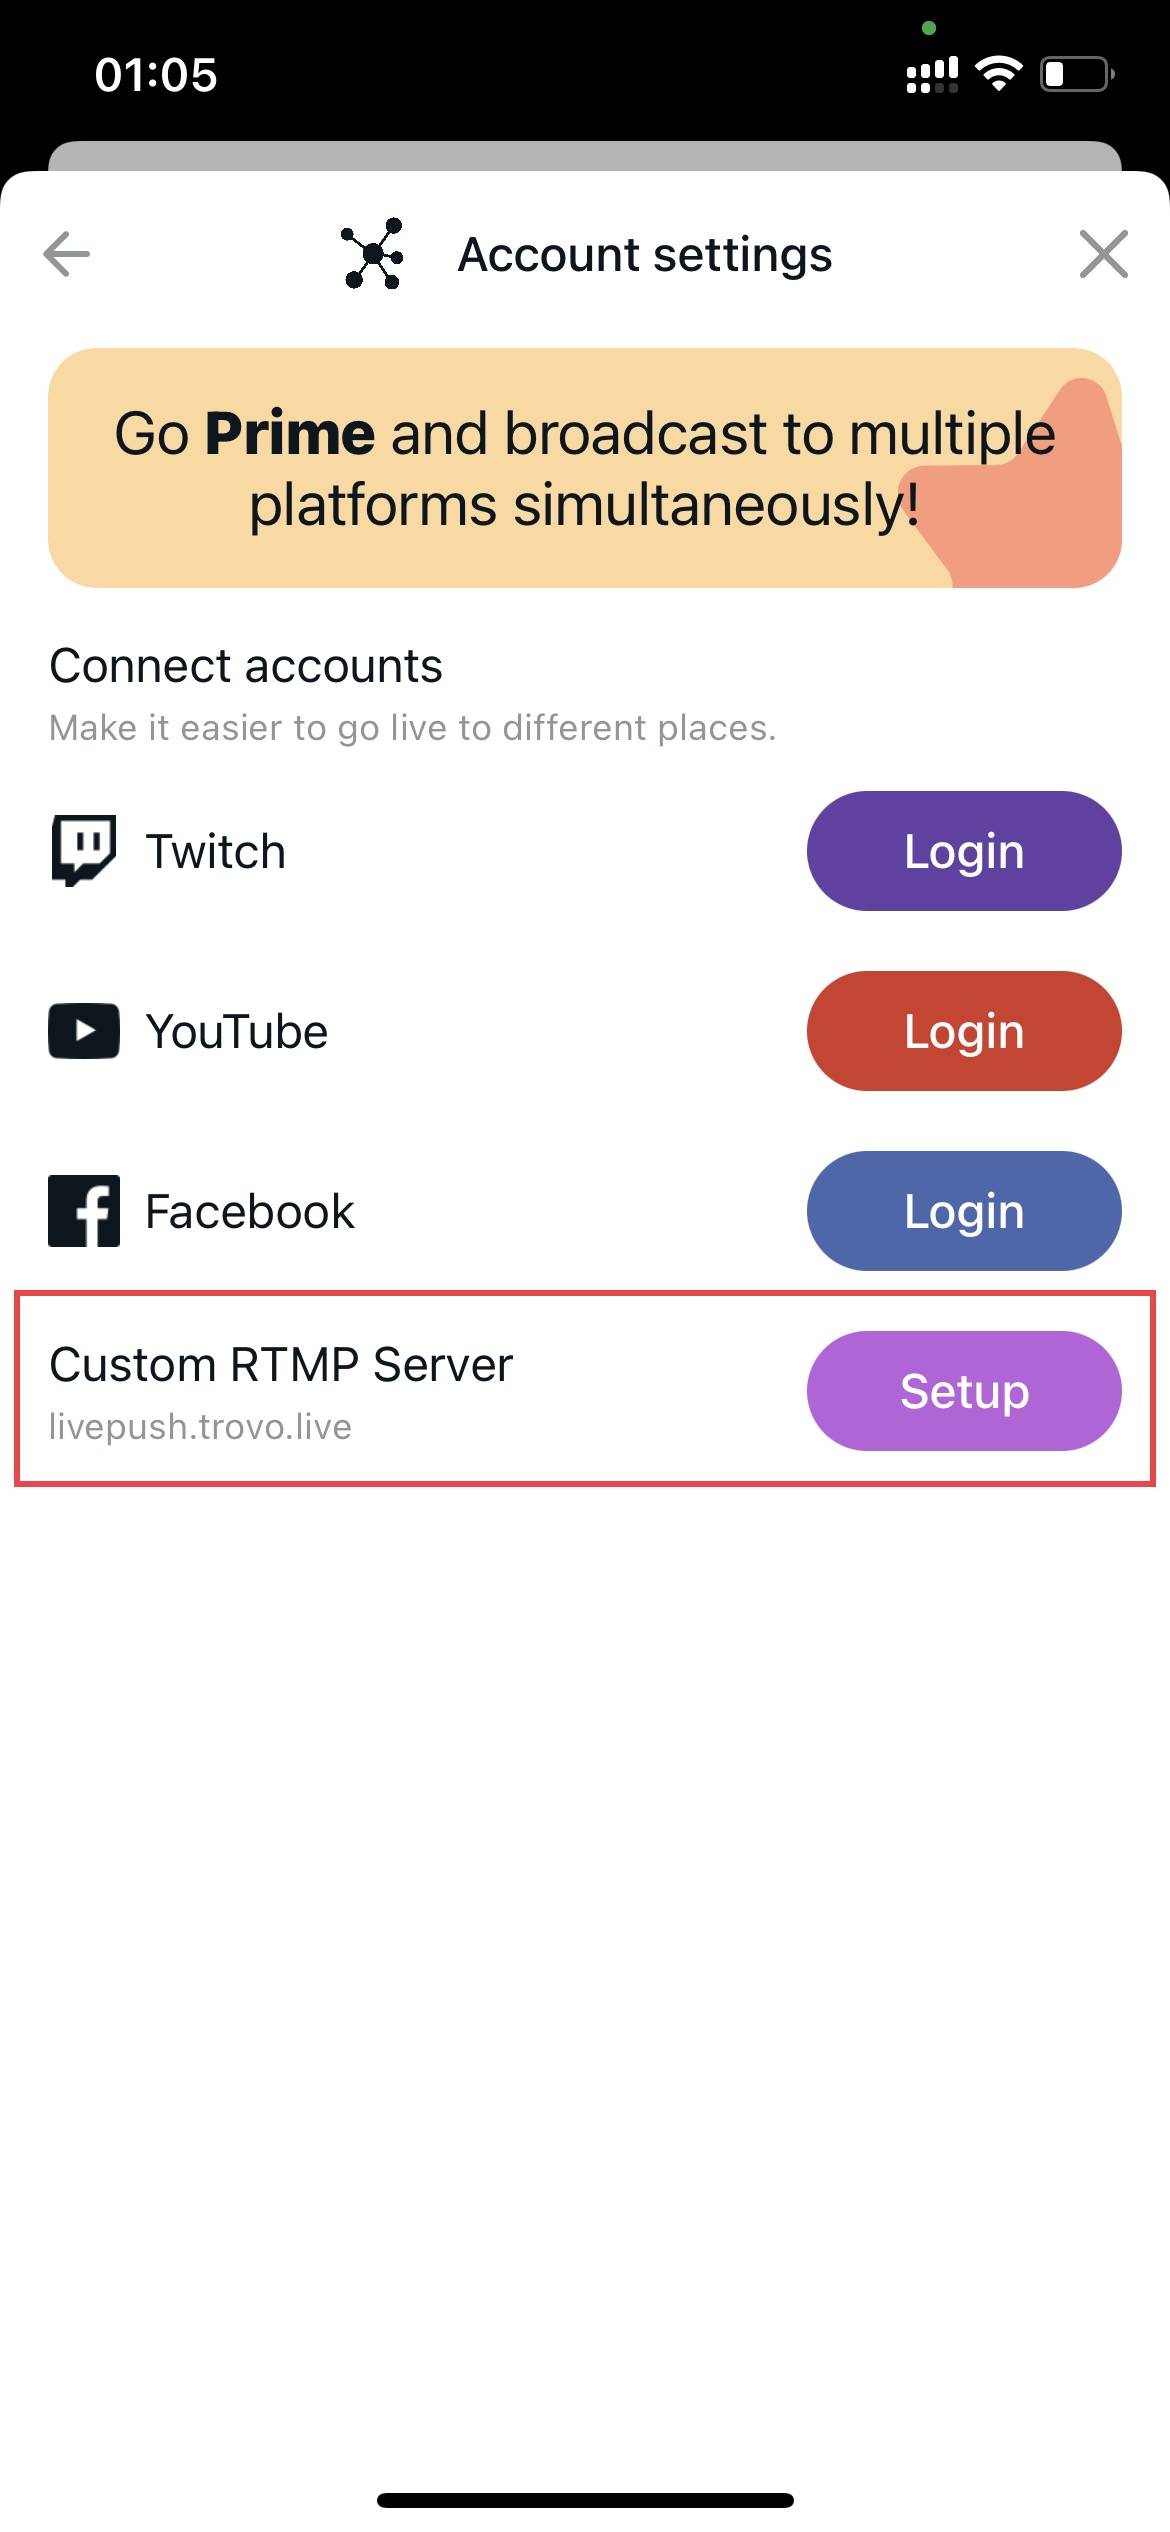
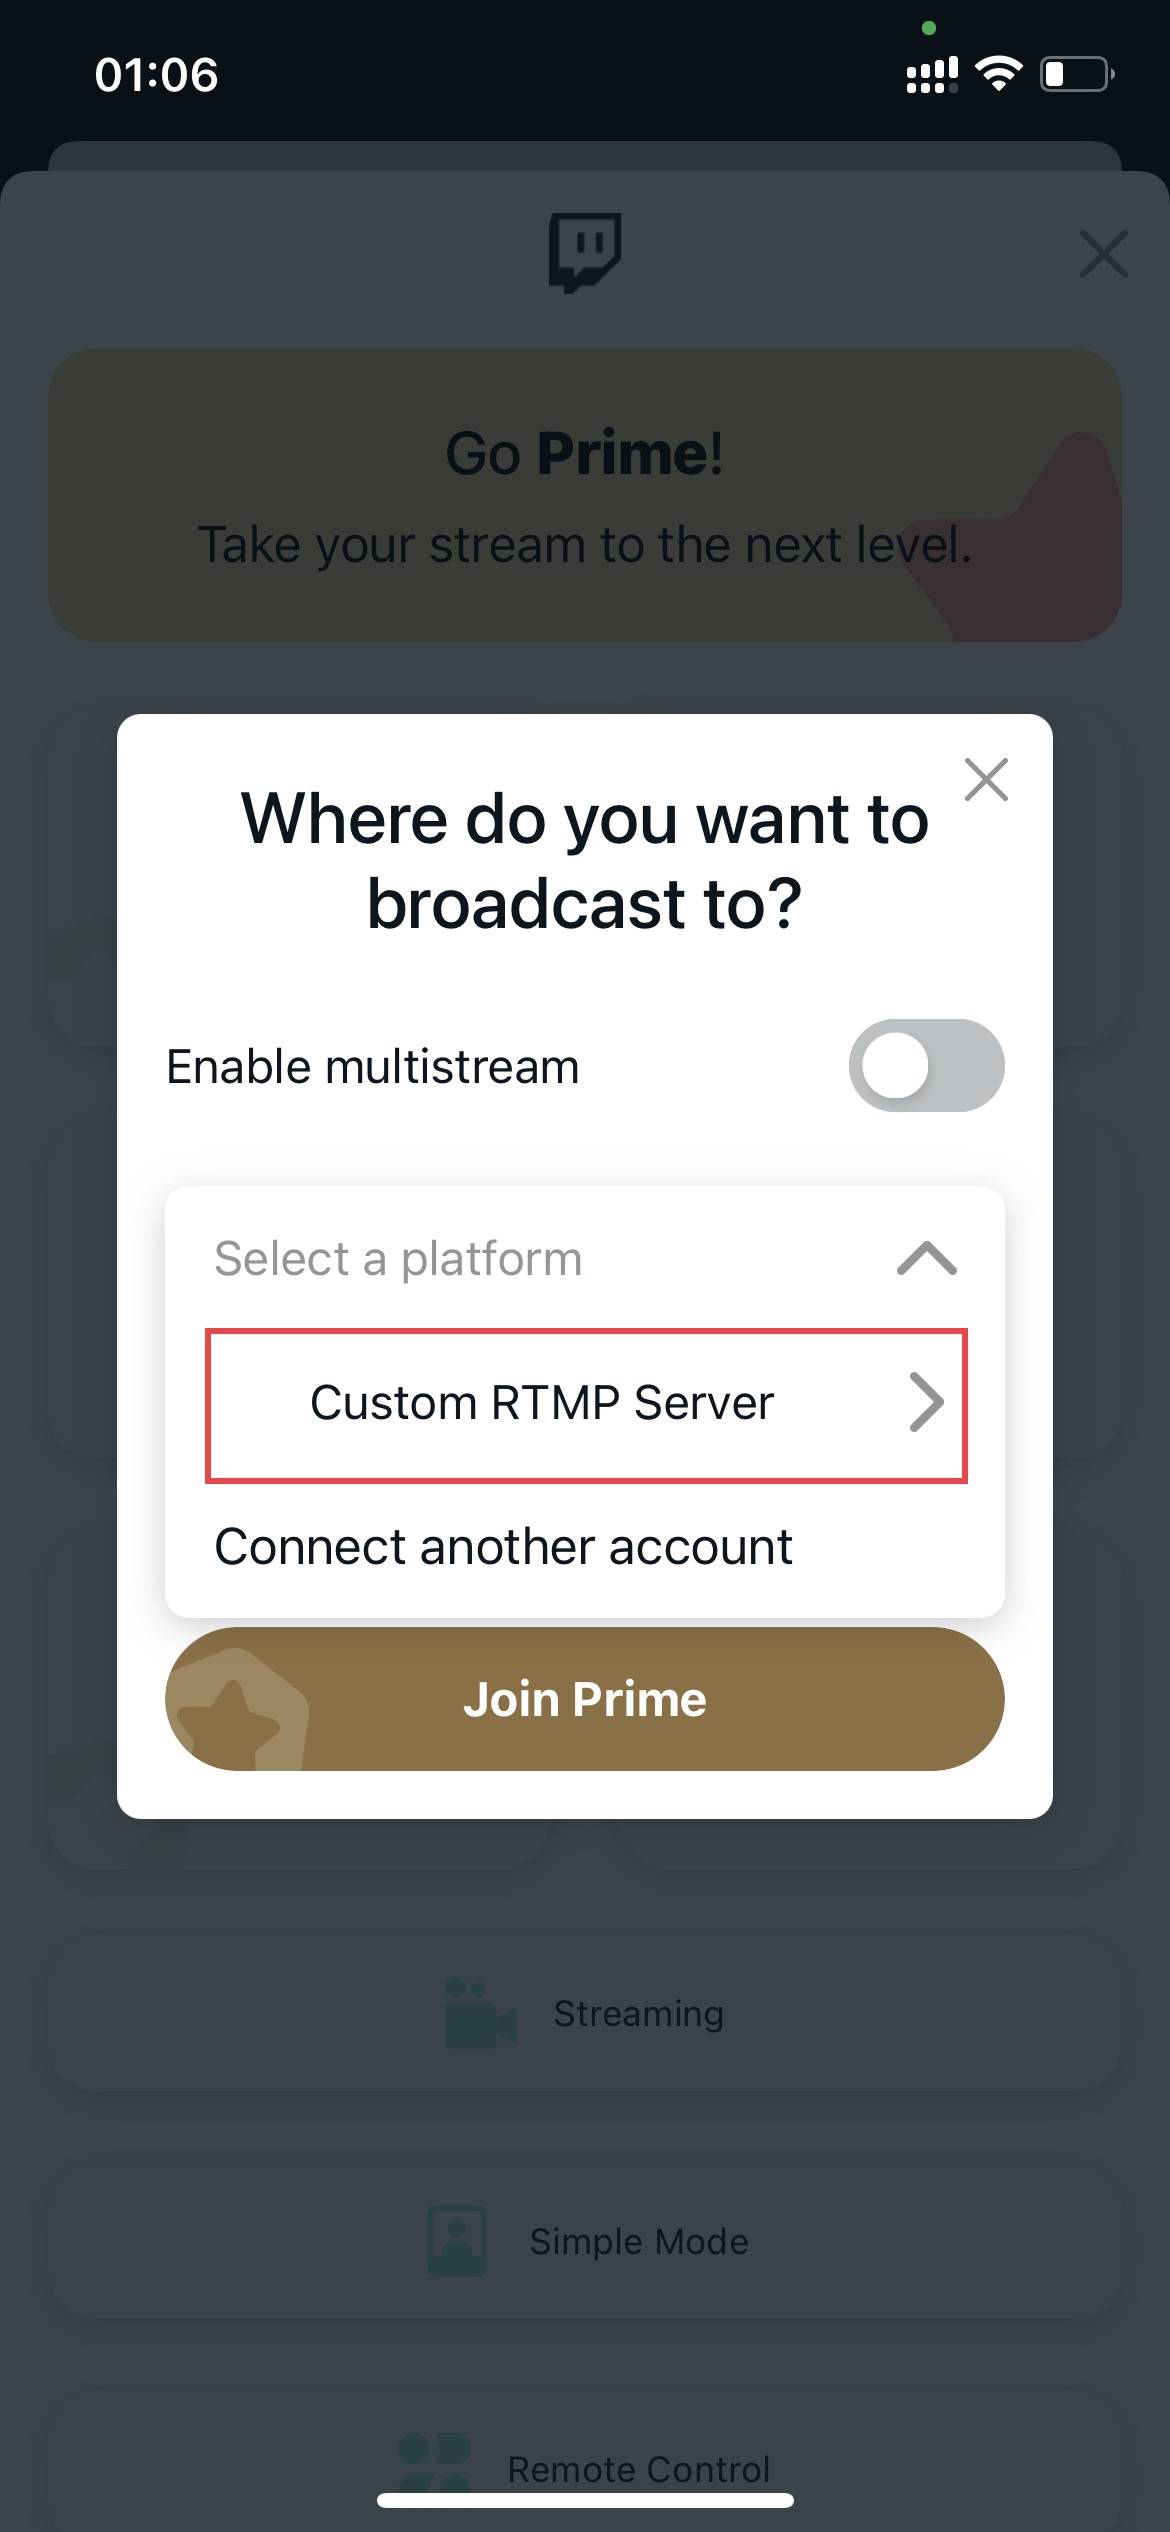
2) 3rd-Party OBS (Streamlabs Example)
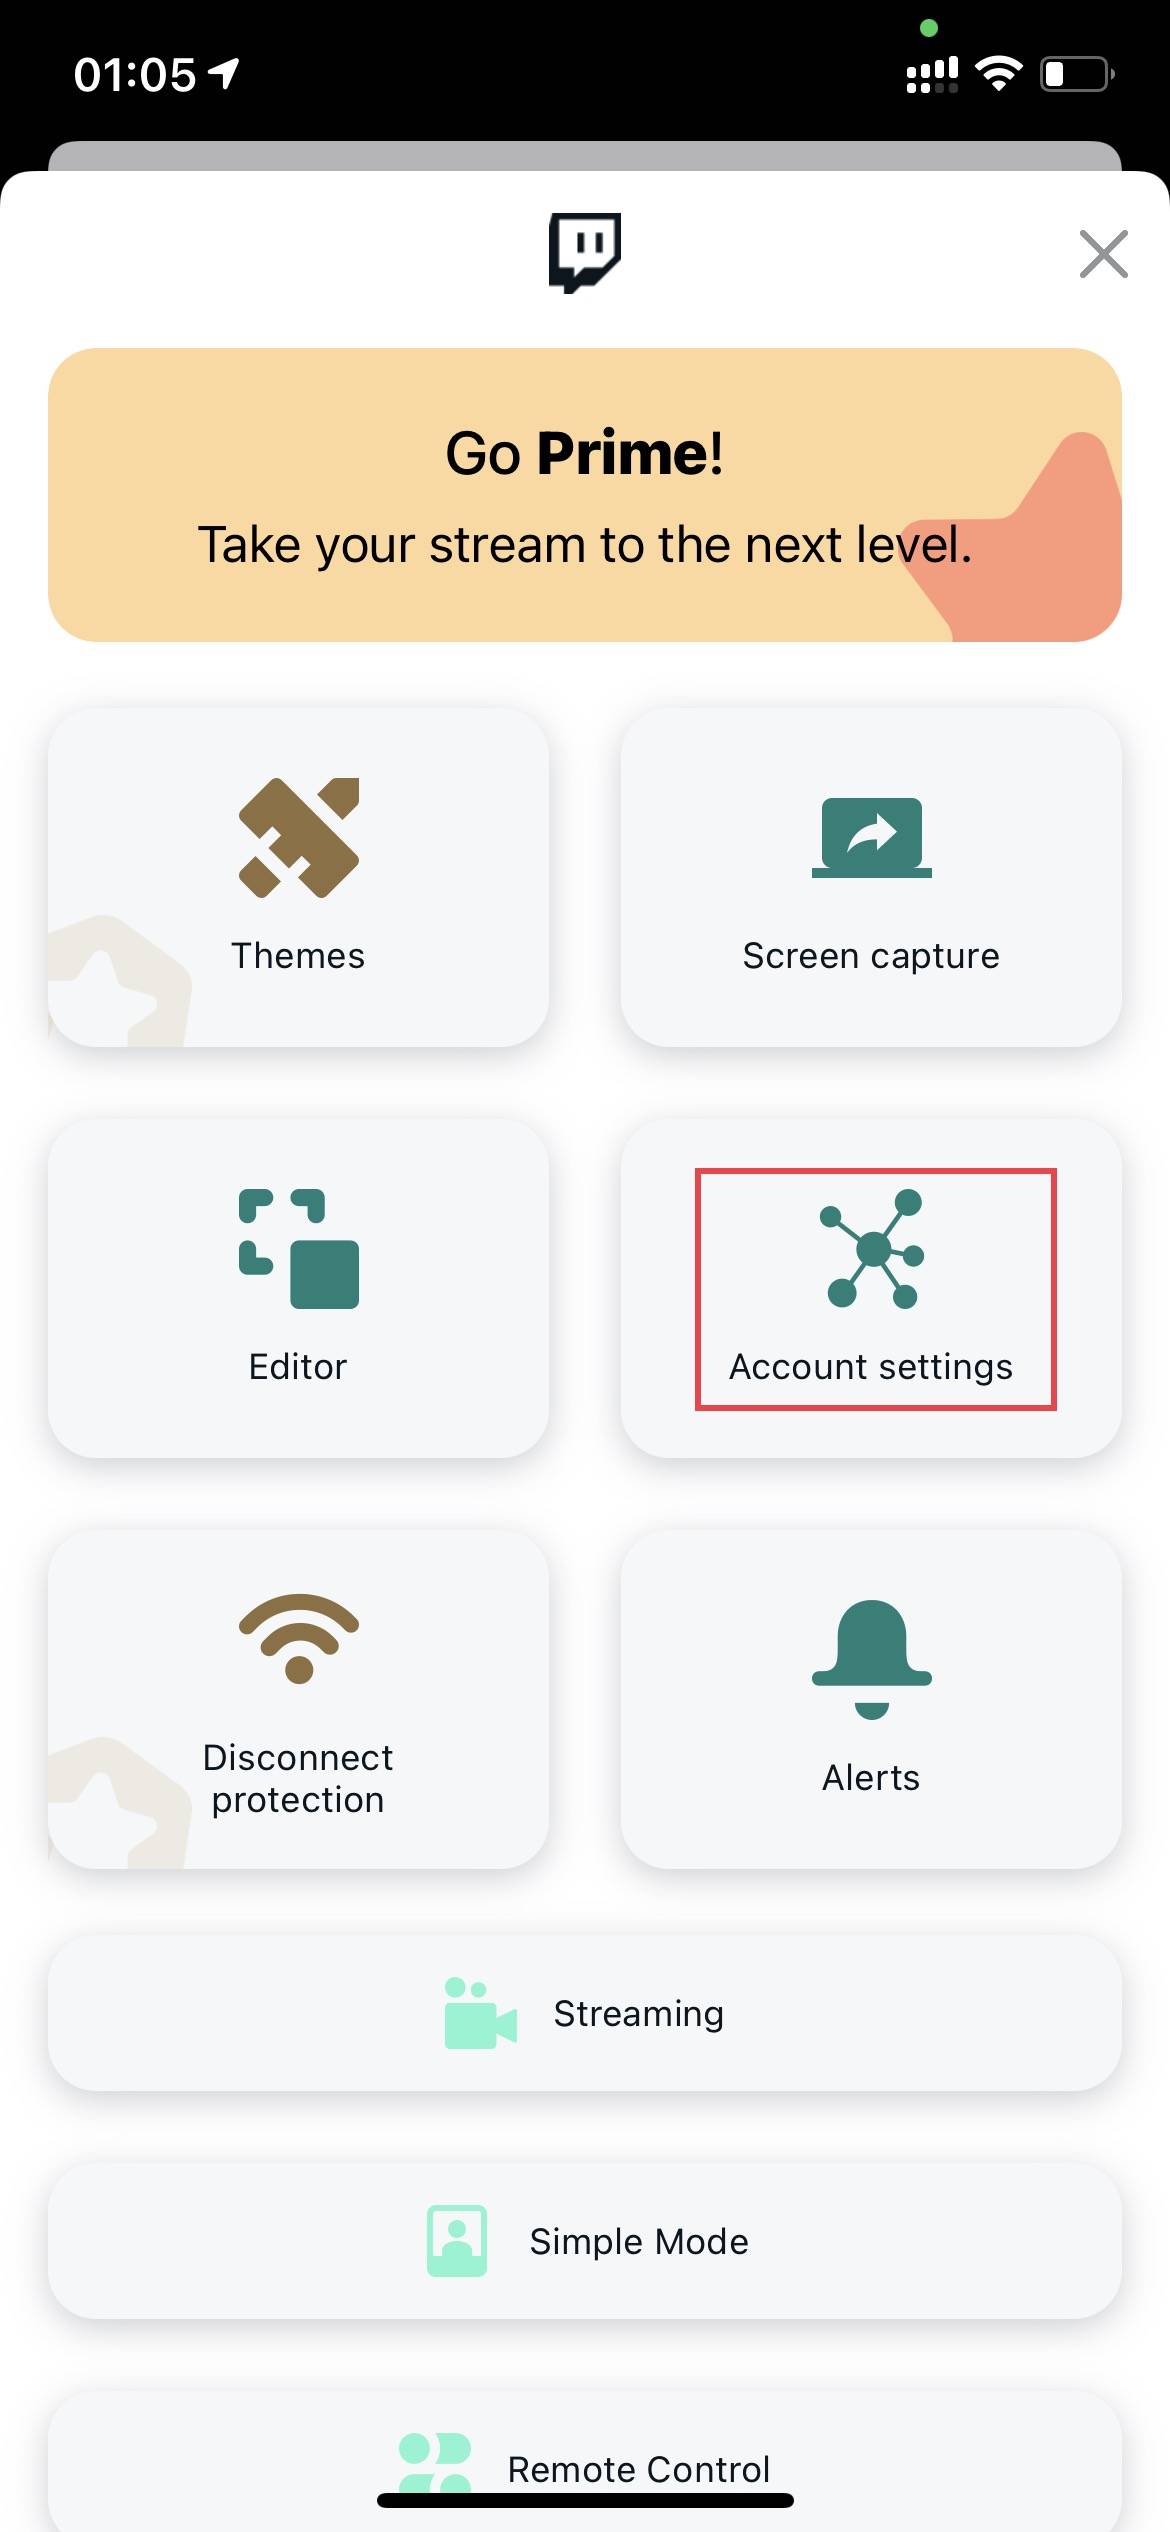
a) Open Streamlabs → Menu → Account Settings.

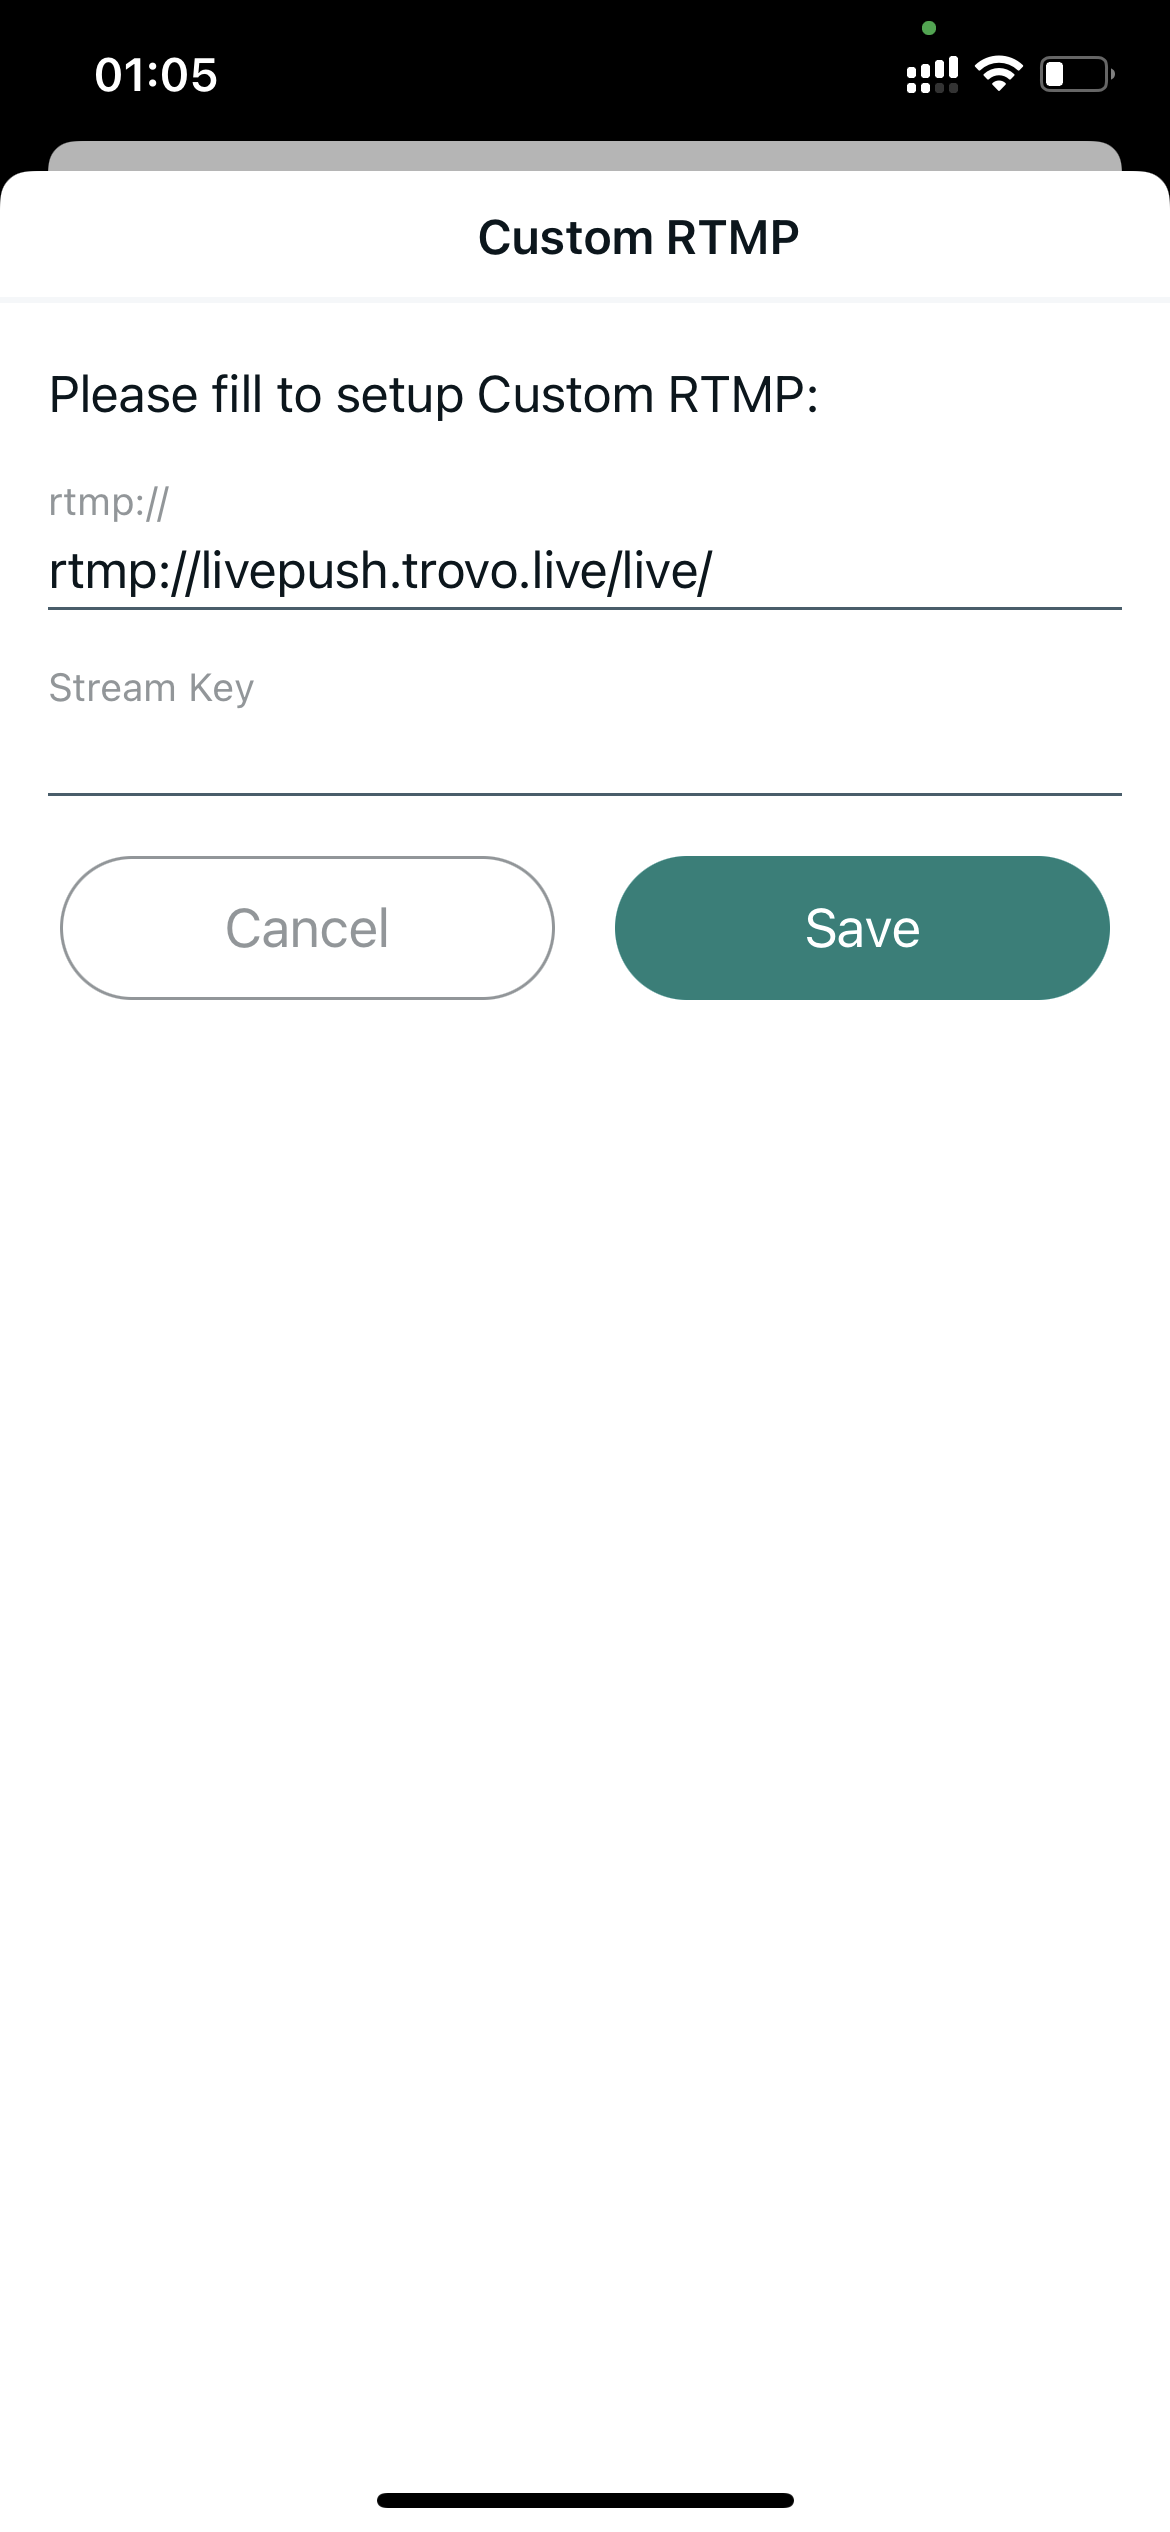
b) Go to Custom PTMP Server → Setup

c) Copy HostURL and Stream Key from Trovo Creator Studio → paste into Custom RTMP → Save.

d) Click 'Streaming' in the menu to view more settings.
e) Return to main interface → Click 'GO LIVE!' to start.

f) For screen recording: Open System Screen Recording → Select Streamlabs → Start broadcast. Turn on mic for audio.
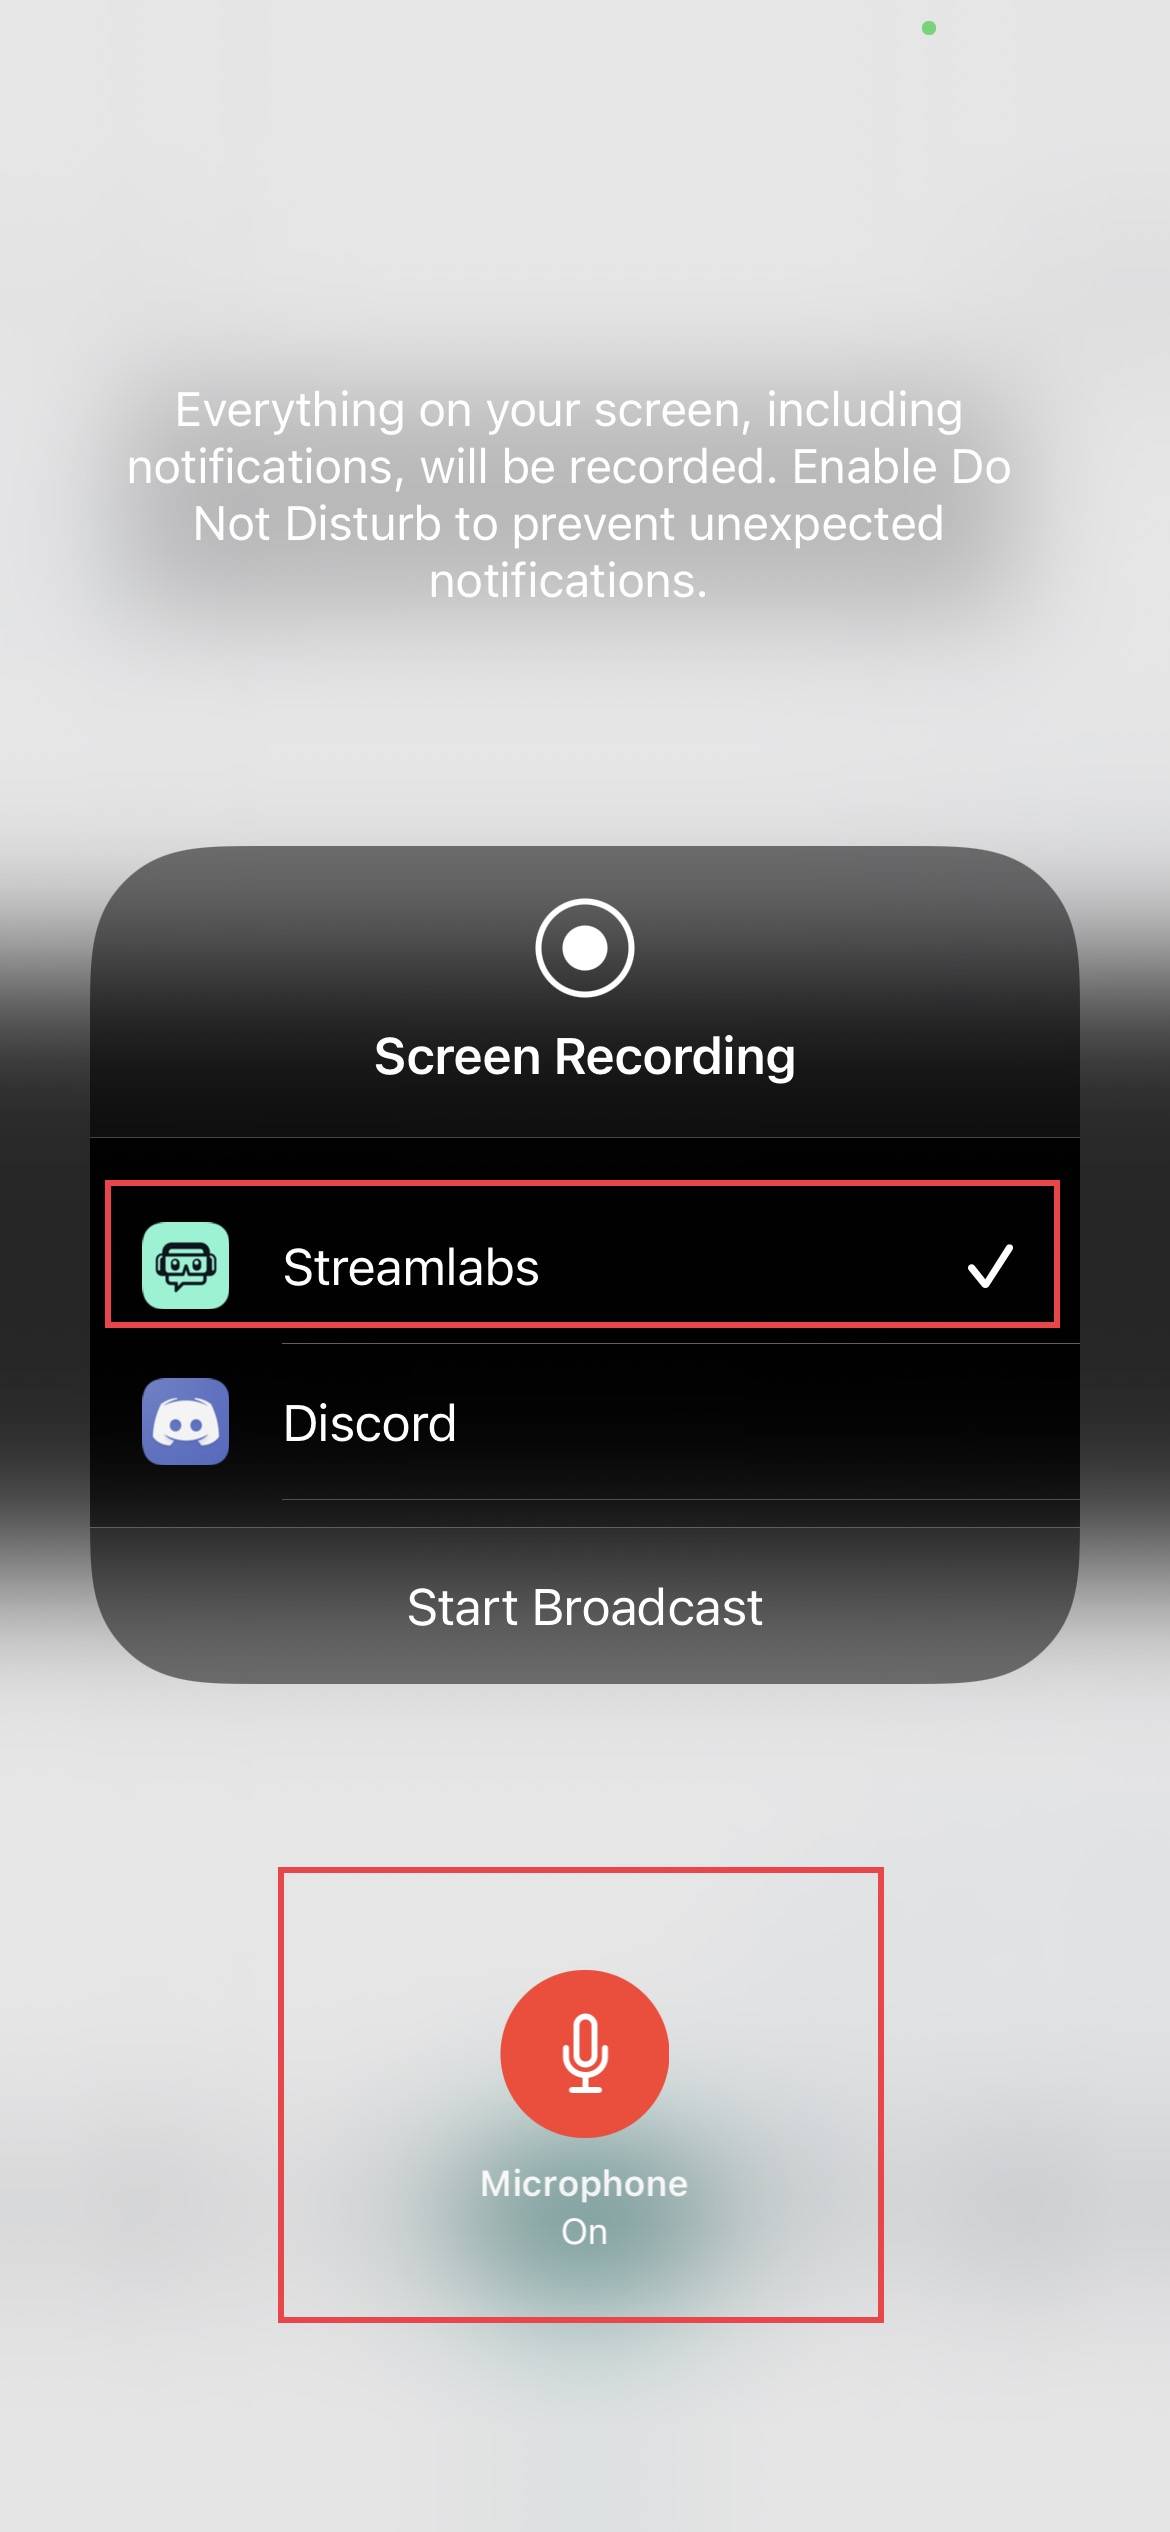
g) More guidance: Screen Capture → Custom RTMP Server → TUTORIAL.


4. Streaming from Android Devices
You may stream from your mobile App or 3rd-party OBS.
1) Trovo App
a) Open Trovo App → Avatar → Go Live.
b) Fill in 'Stream Setup' Page
c) Adjust Orientation, Host URL, Quality in Advanced Settings. Check network.

d) Click 'Go Live!' → Follow instructions. Turn on mic for audio.
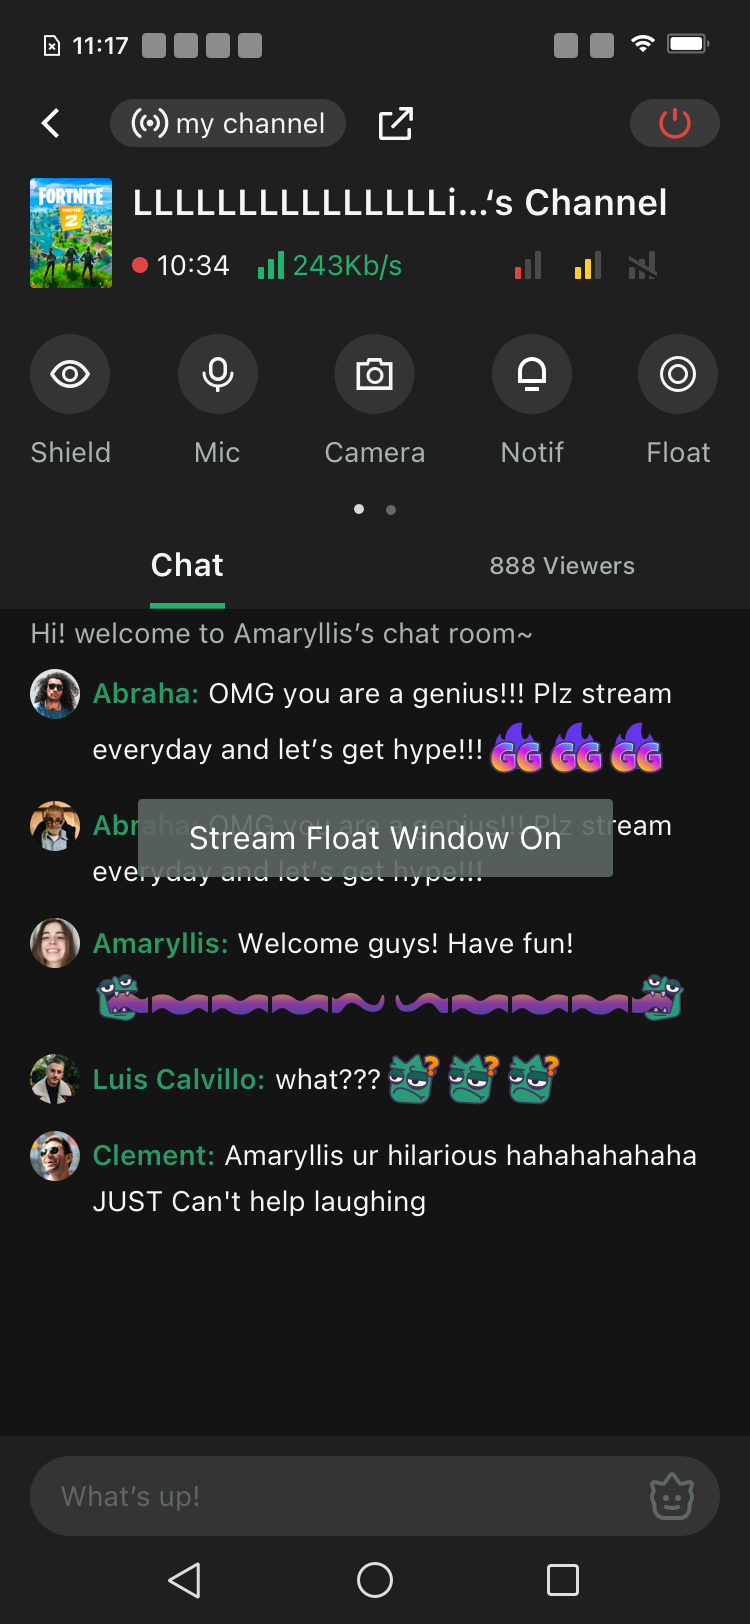
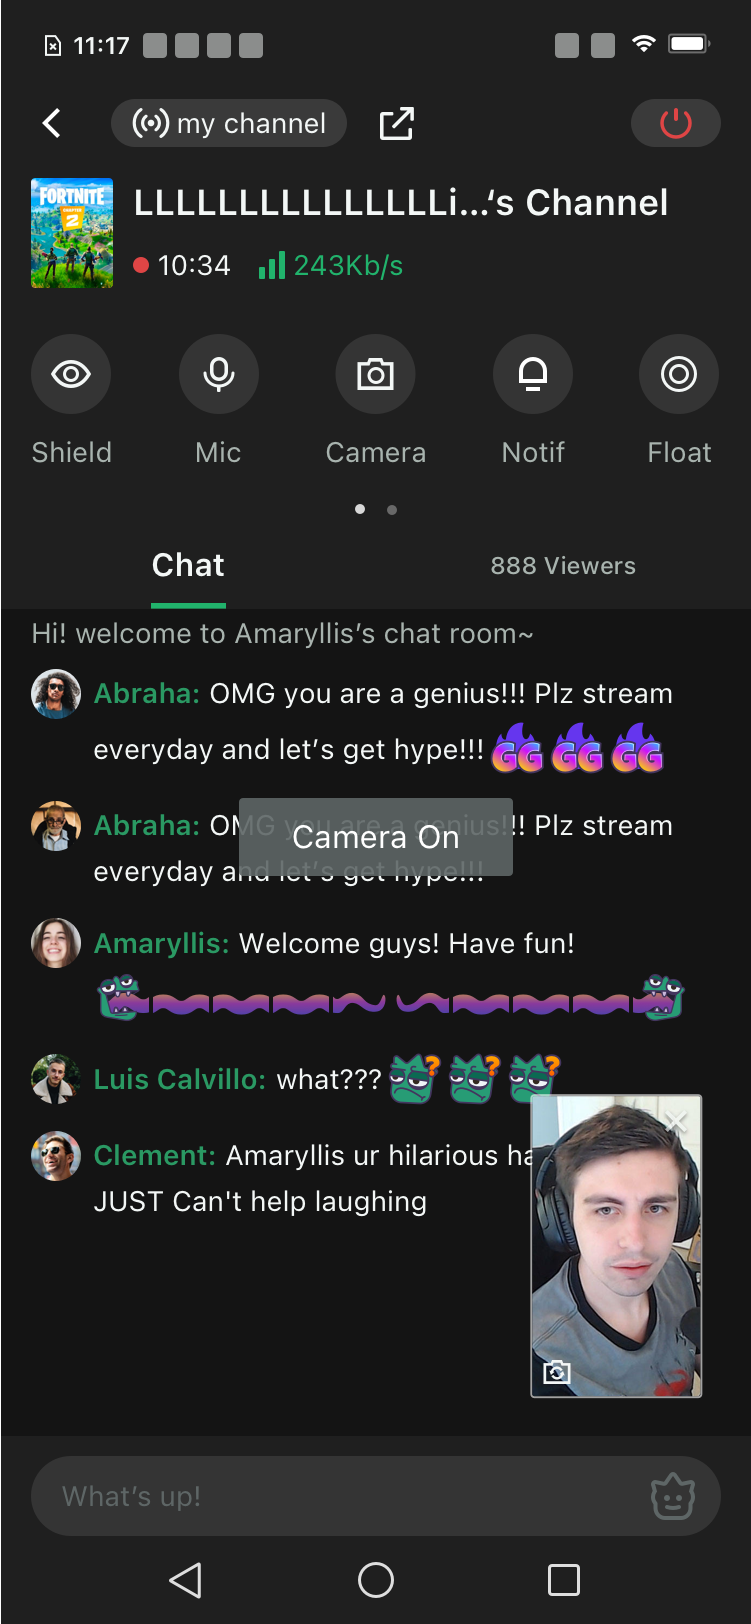
e) During stream: Click ‘Float’ for chat window. Use ‘Camera’ to capture.

2) 3rd-Party OBS (Streamlabs)
a) Open Streamlabs → Menu → Account Settings.

b) Go to 'Custom PTMP Server' → Setup
c) Copy HostURL + Stream Key from Trovo → Paste → Save.
d) Click 'Streaming' in menu for more settings.

e) Return to main → Click 'GO LIVE'.

f) For screen recording: System Menu → Streamlabs → Start Broadcast. Turn on mic.

g) More help: Screen Capture → Custom RTMP → TUTORIAL.


5. Streaming from PC (Windows/macOS/Linux)
Download and install a broadcasting tool such as OBS Studio, Streamlabs, etc.
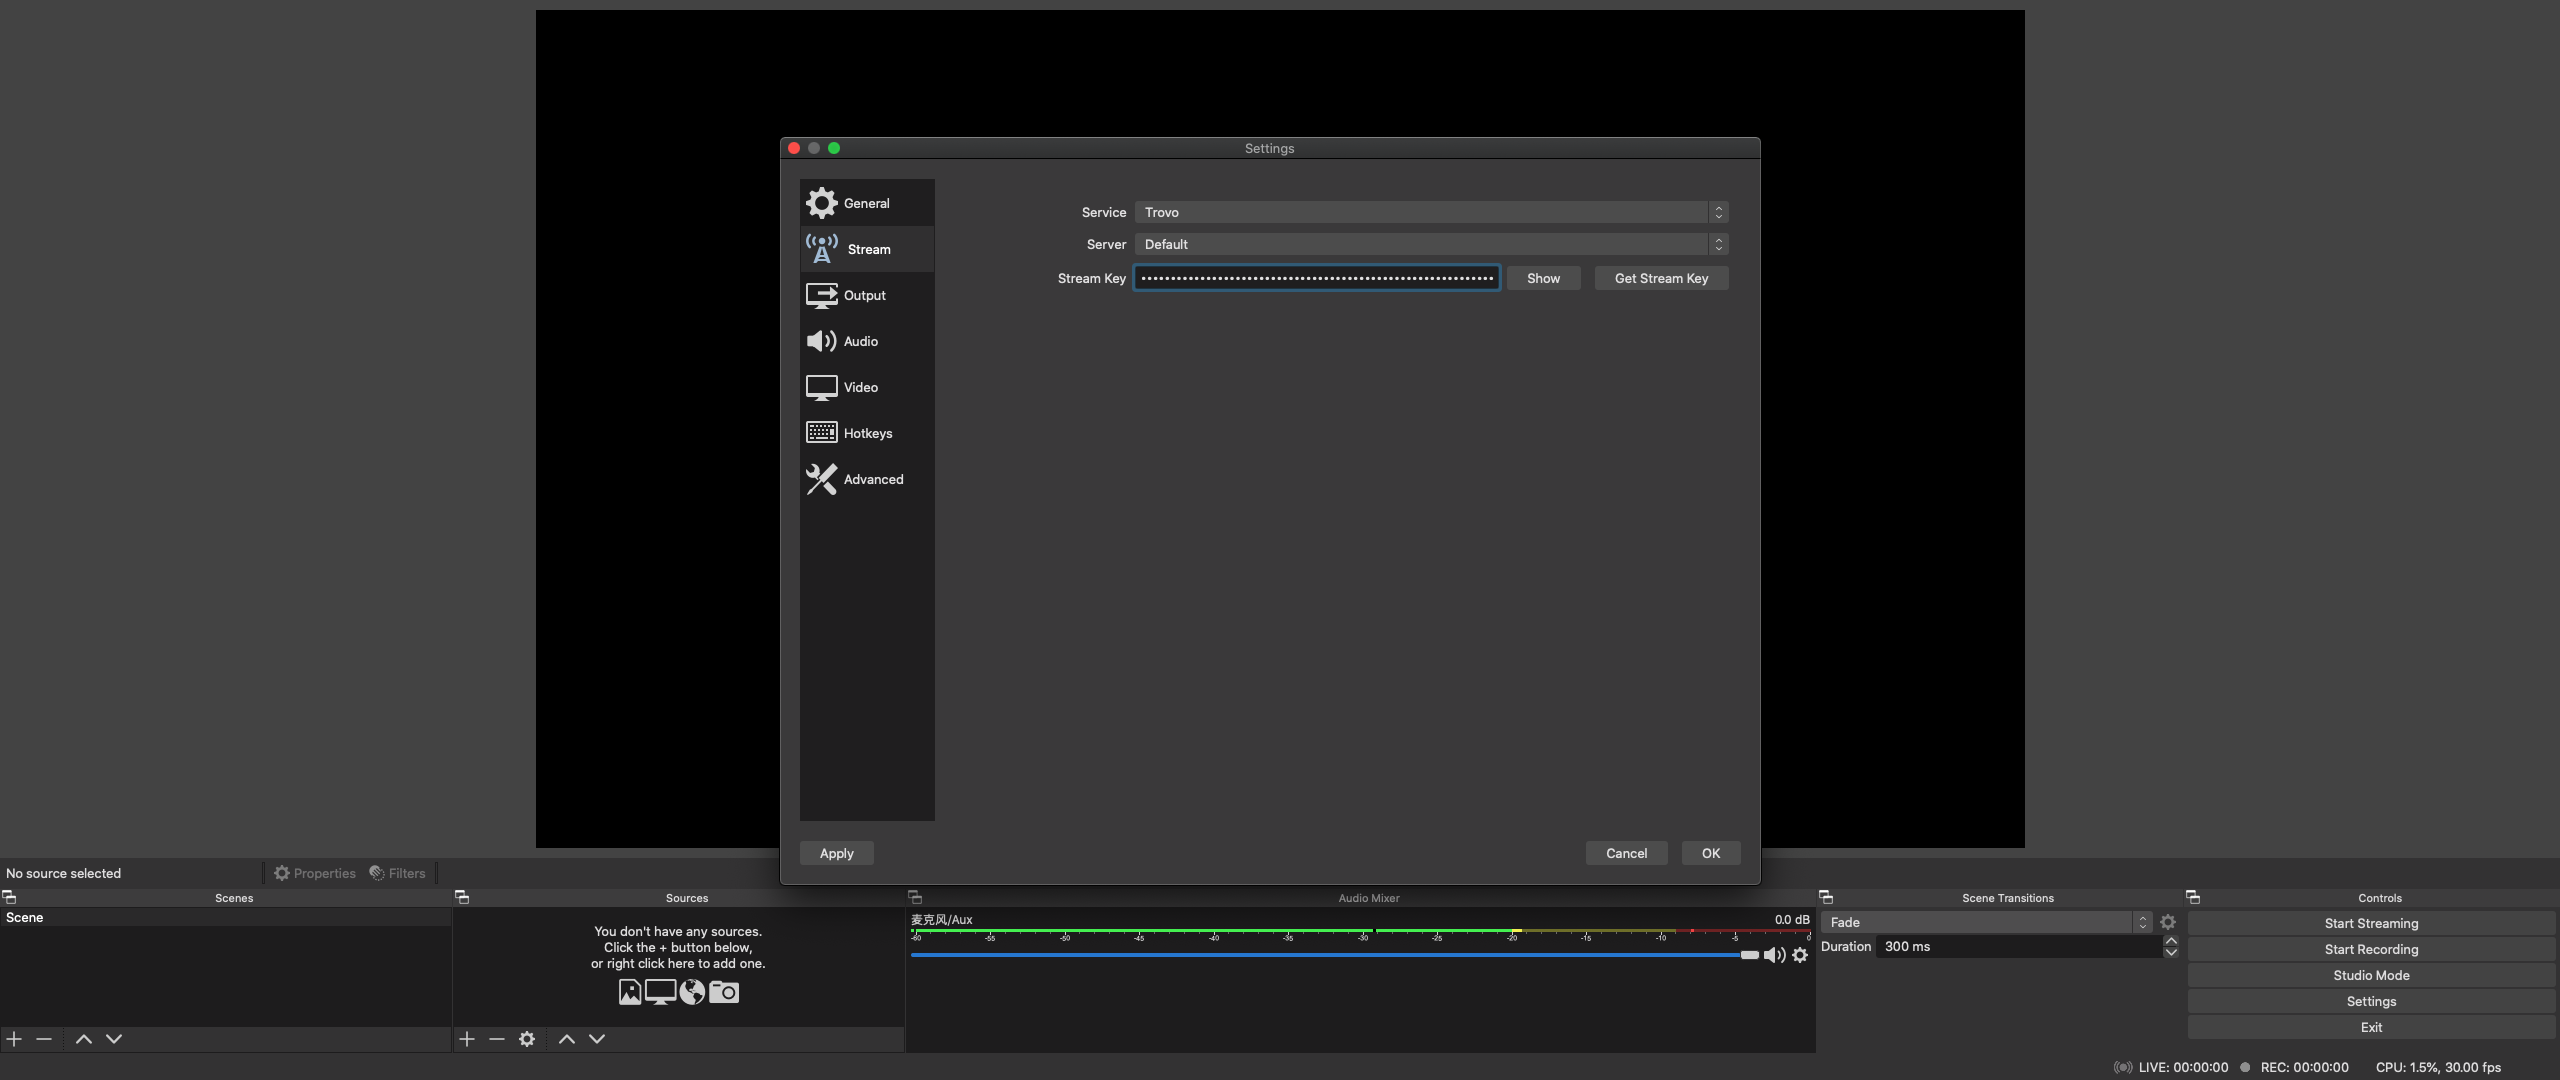
1) OBS Studio
Download: obsproject.com | Guidance: obsproject.com/help
a) Preferences → Stream → Select Trovo → Get Stream Key → Copy from Creator Studio → Paste → OK.
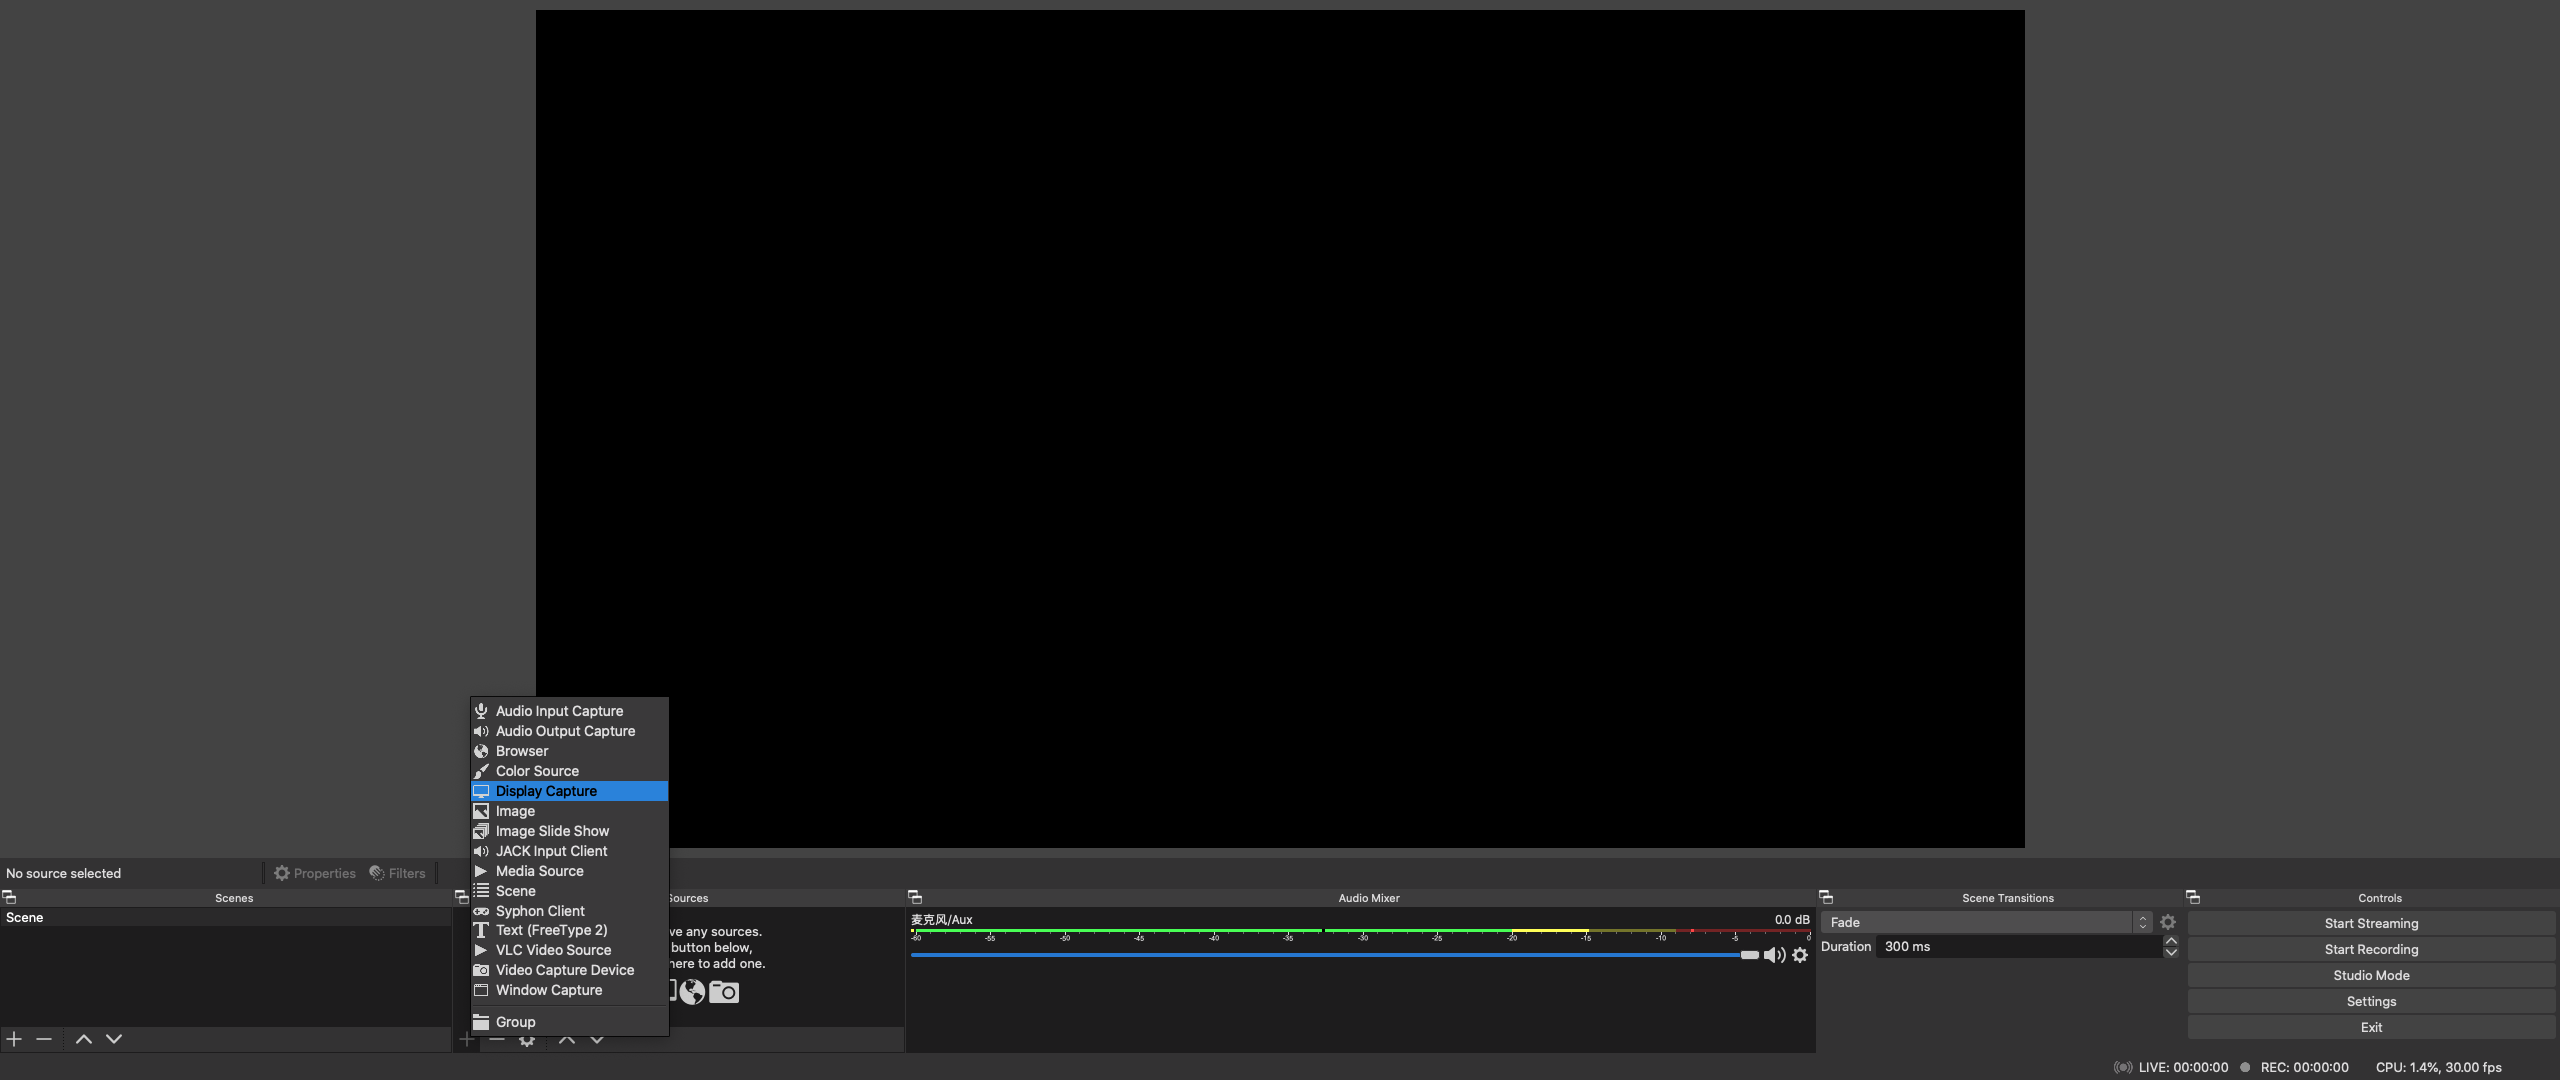
b) Sources → + → Display Capture
c) Click 'Start Streaming'
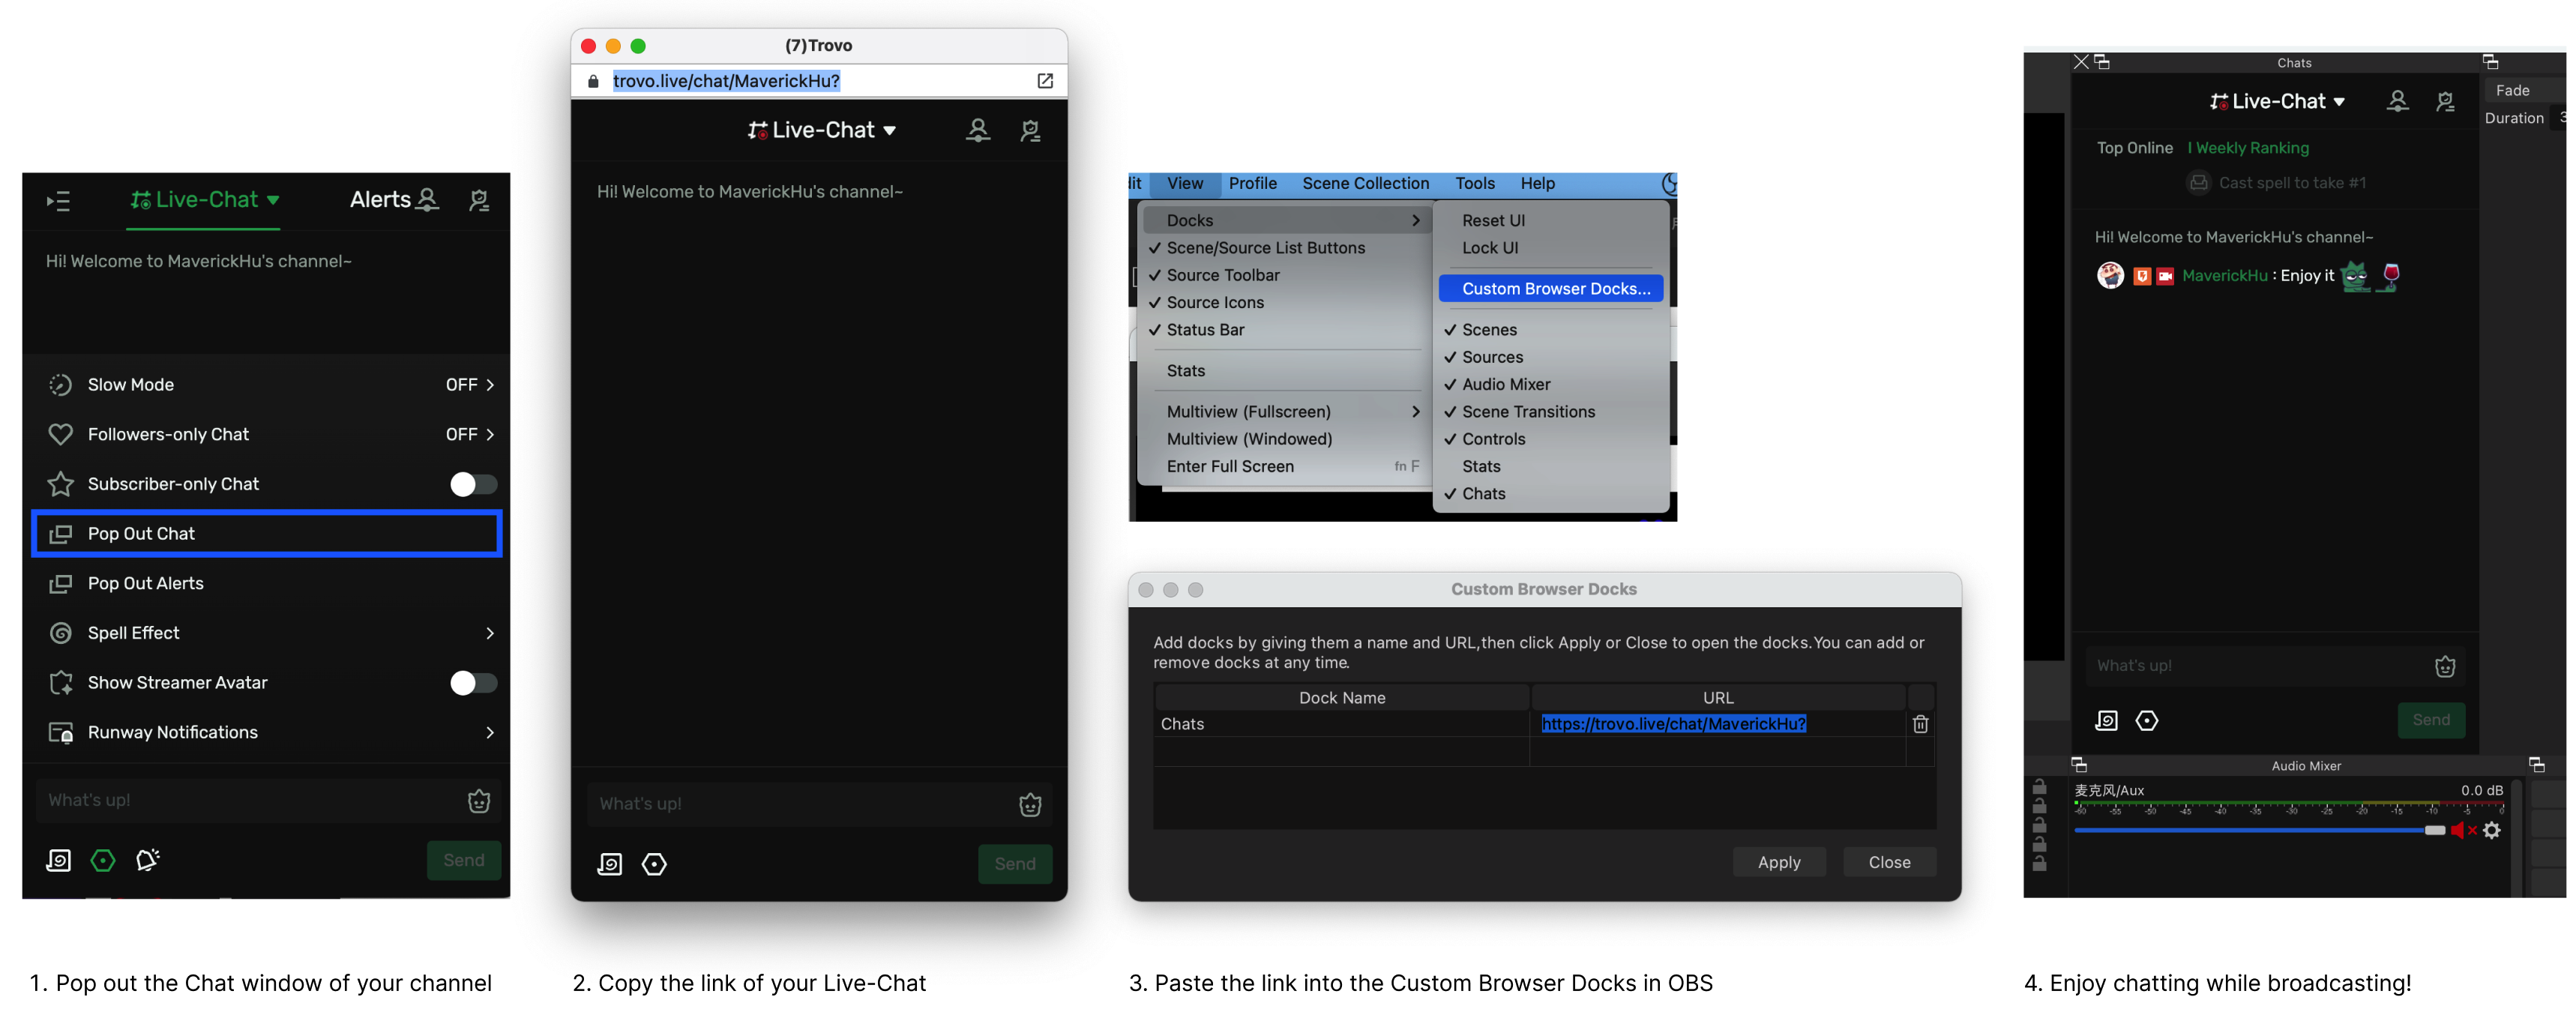
d) Add Live-Chat window to OBS
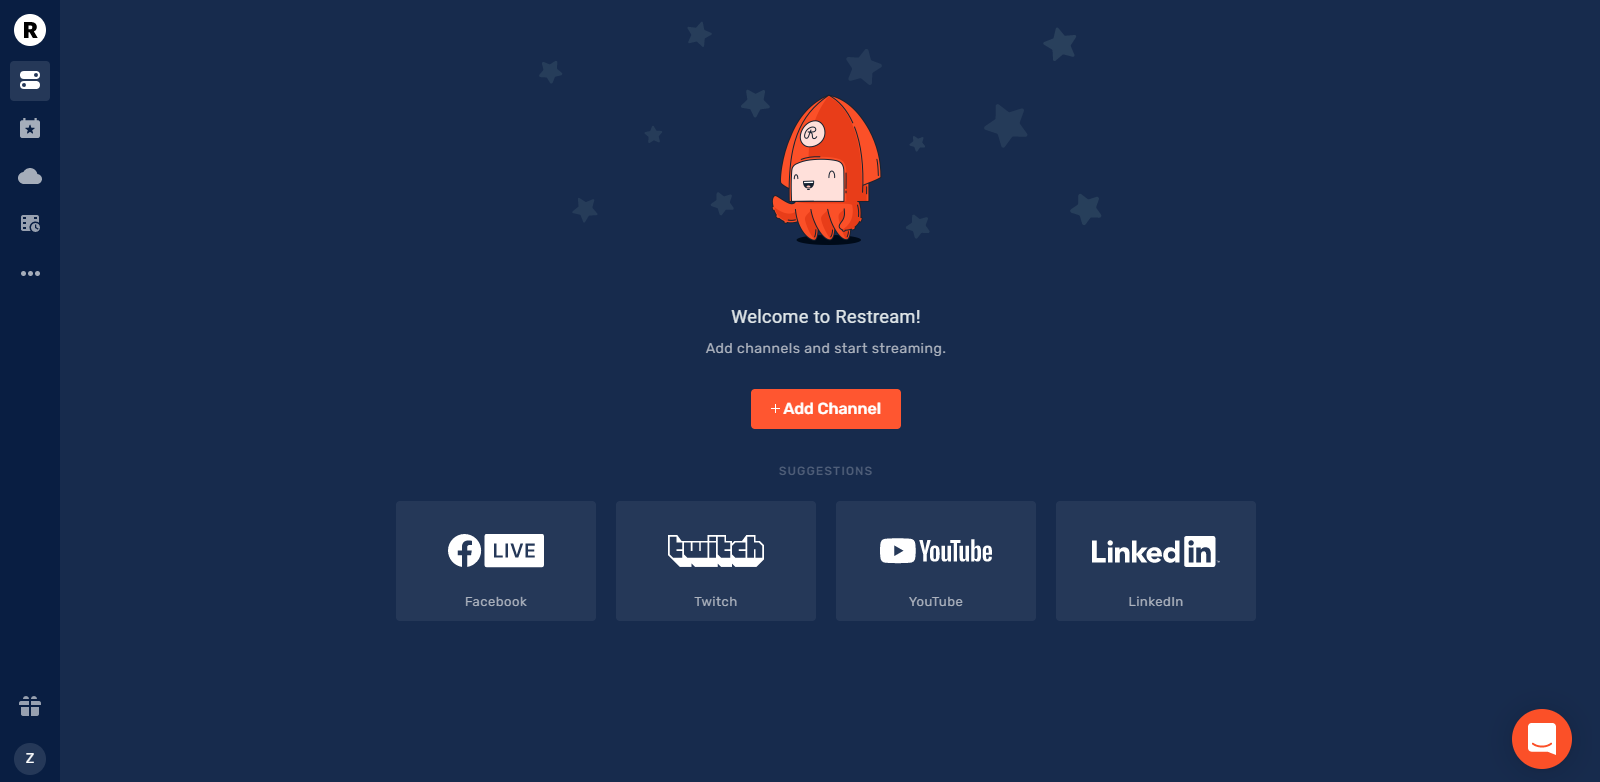
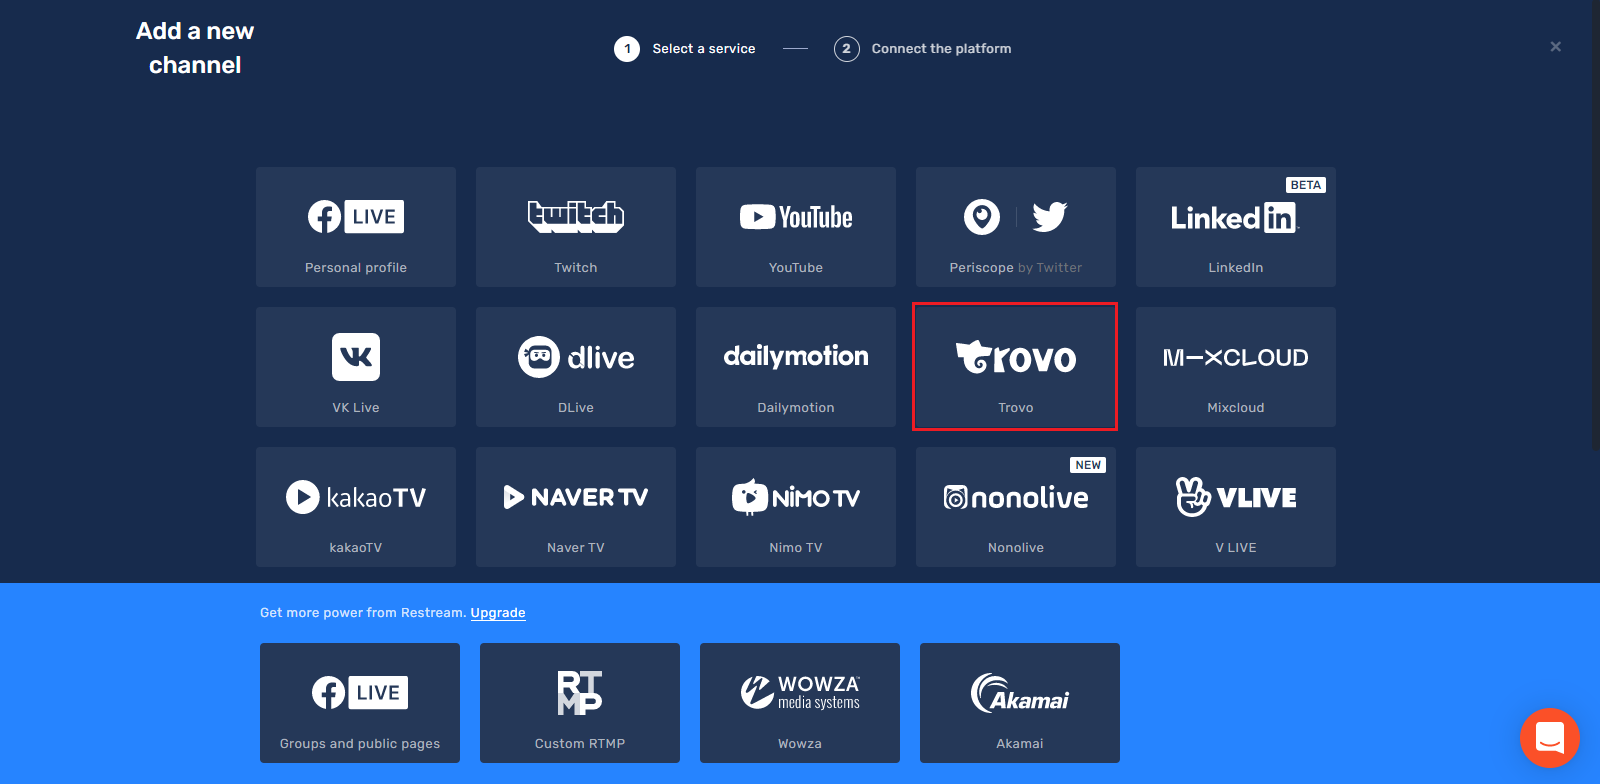
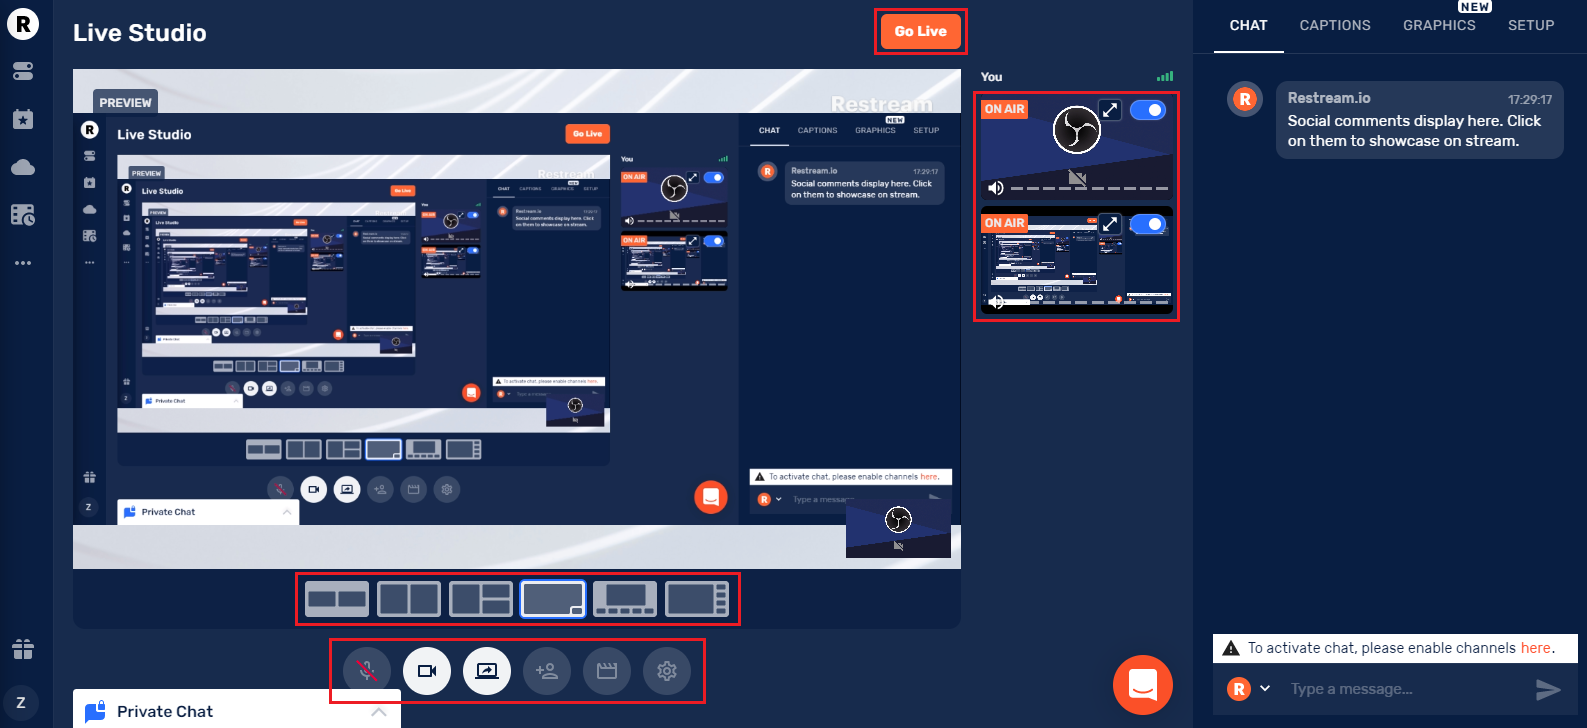
2) Restream.io (Web)
Website: restream.io
a) Dashboard → +Add Channel → Trovo → Login & Authorize
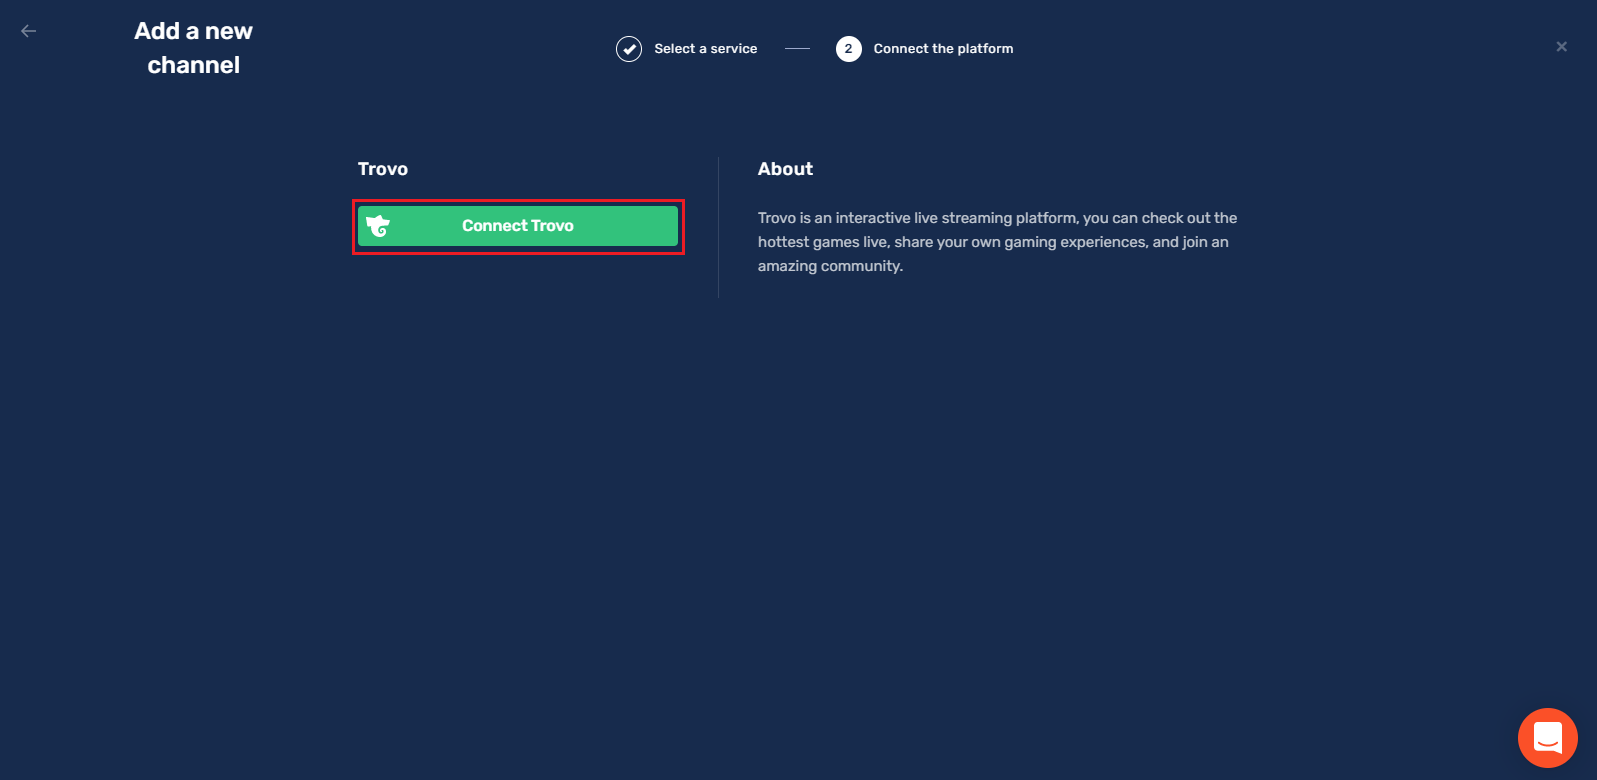

c) Turn ON Trovo → Enter Live Studio → Go Live

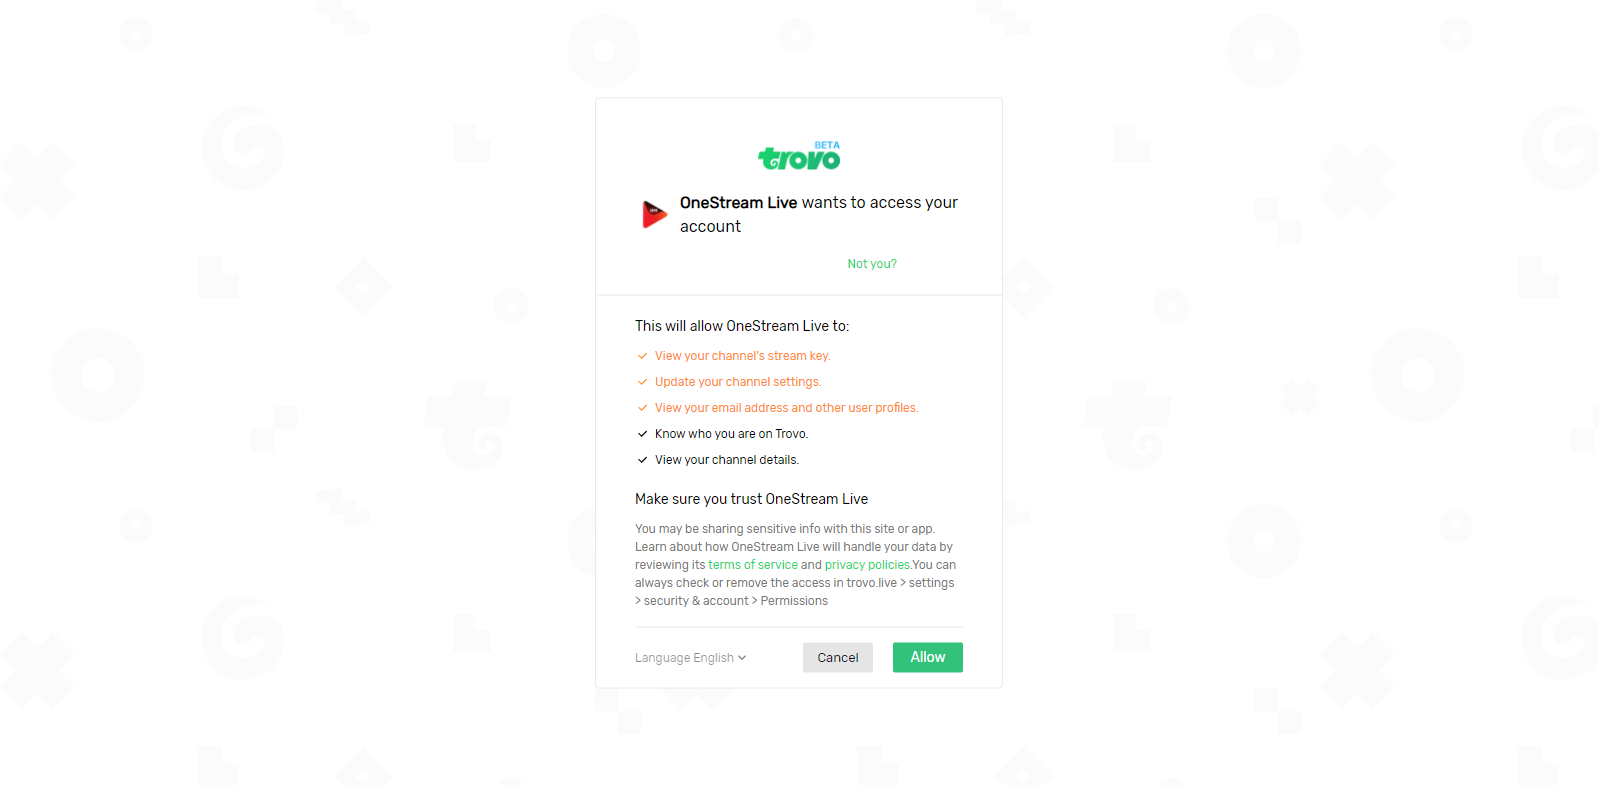
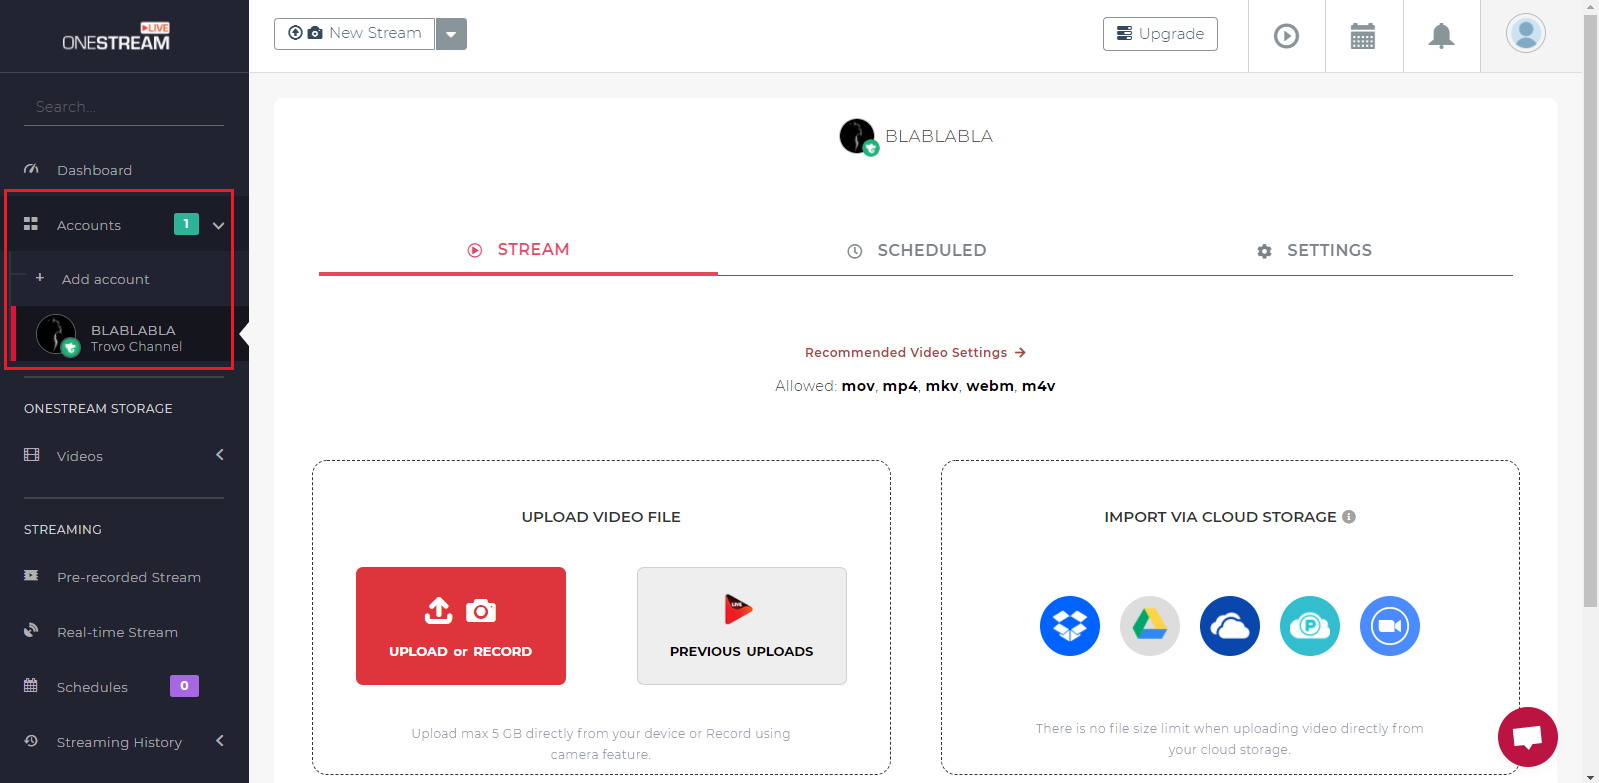
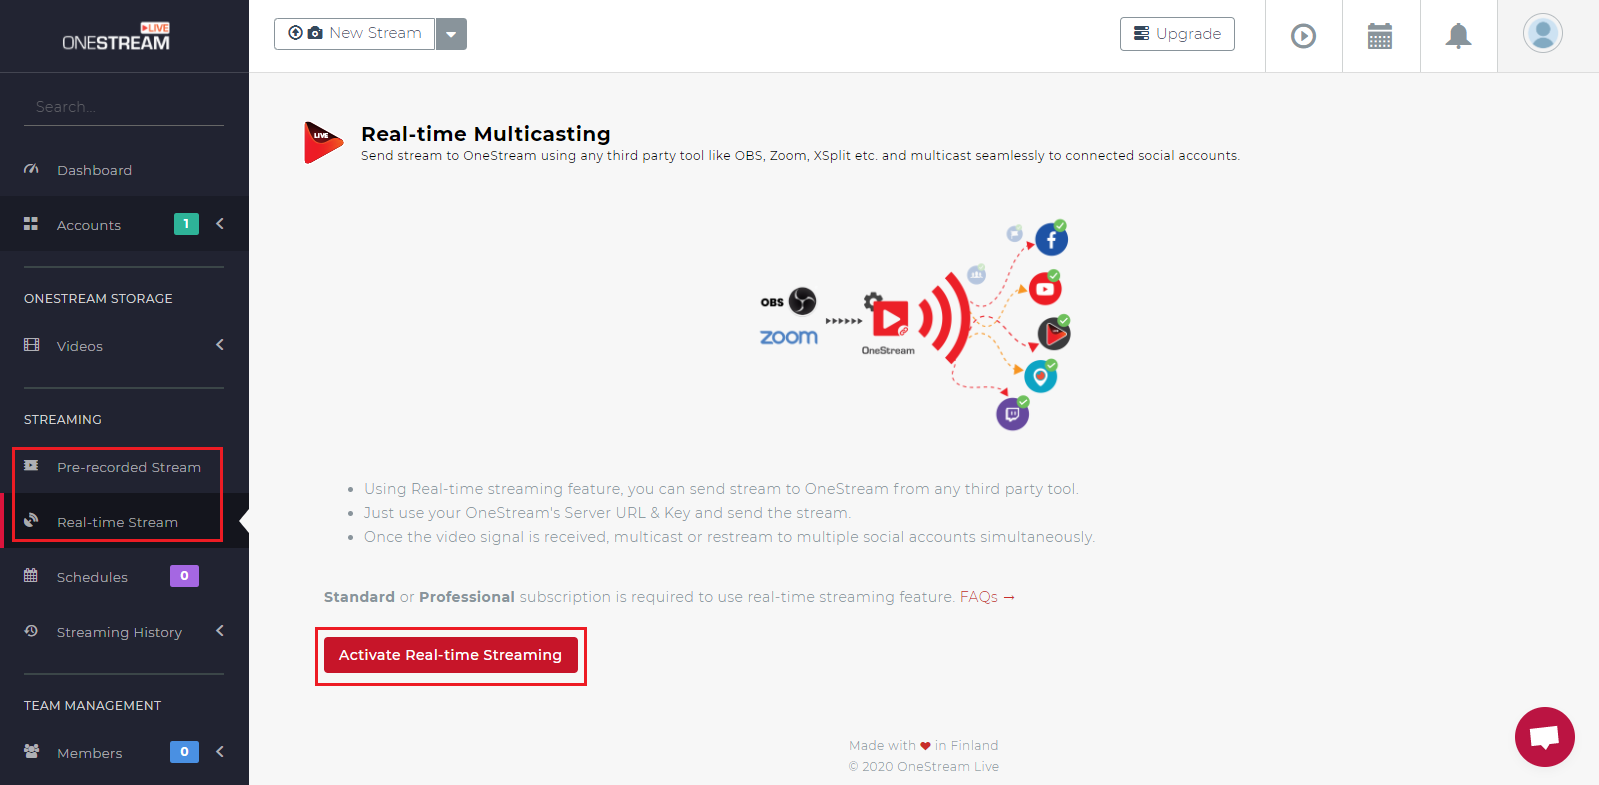
3) OneStream (Web)
Website: app.onestream.live
a) Dashboard → Trovo → Login & Authorize
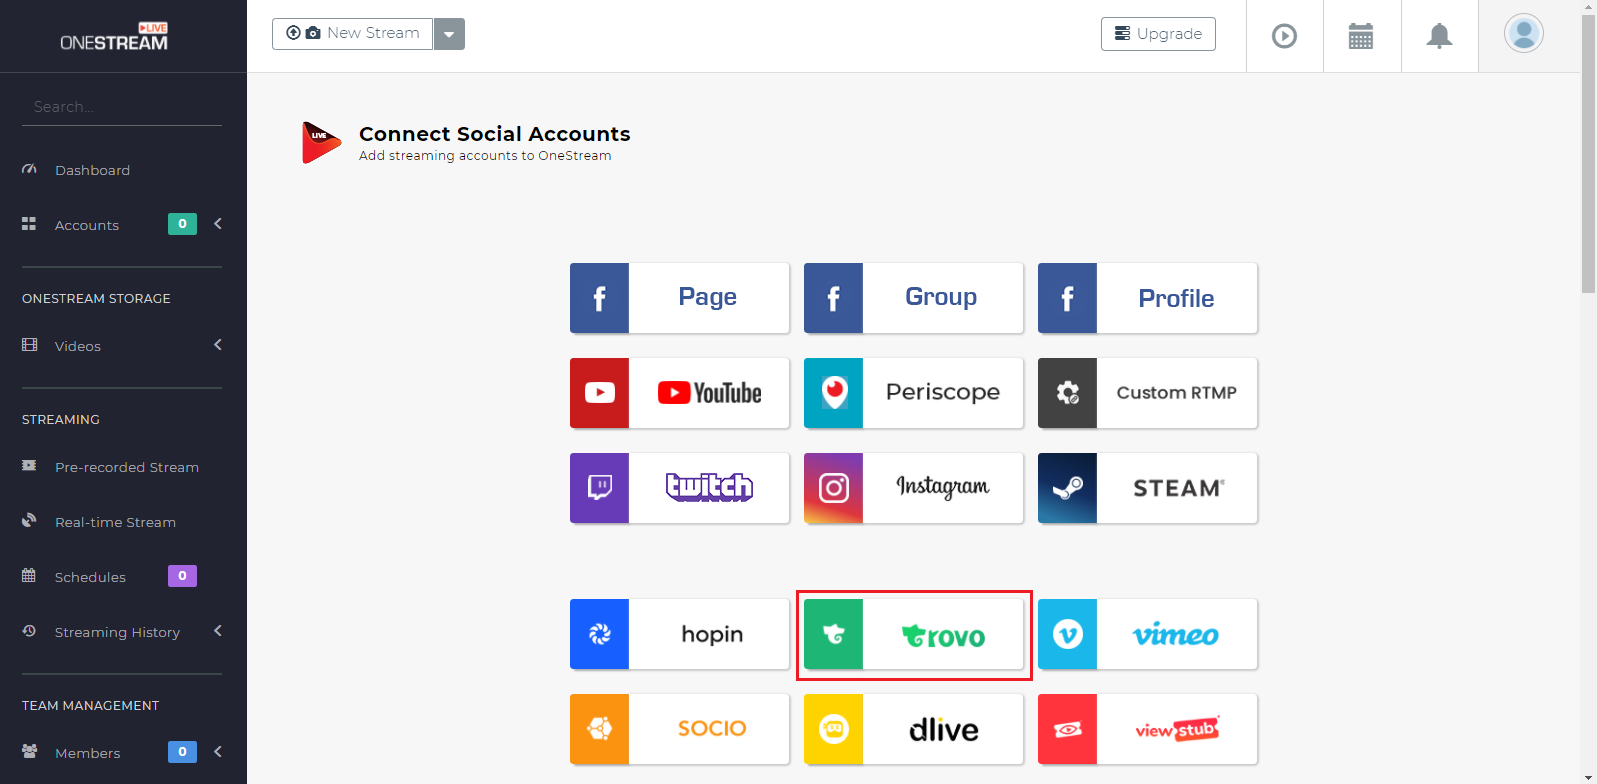
b) Add more accounts → Activate Real-time Streaming
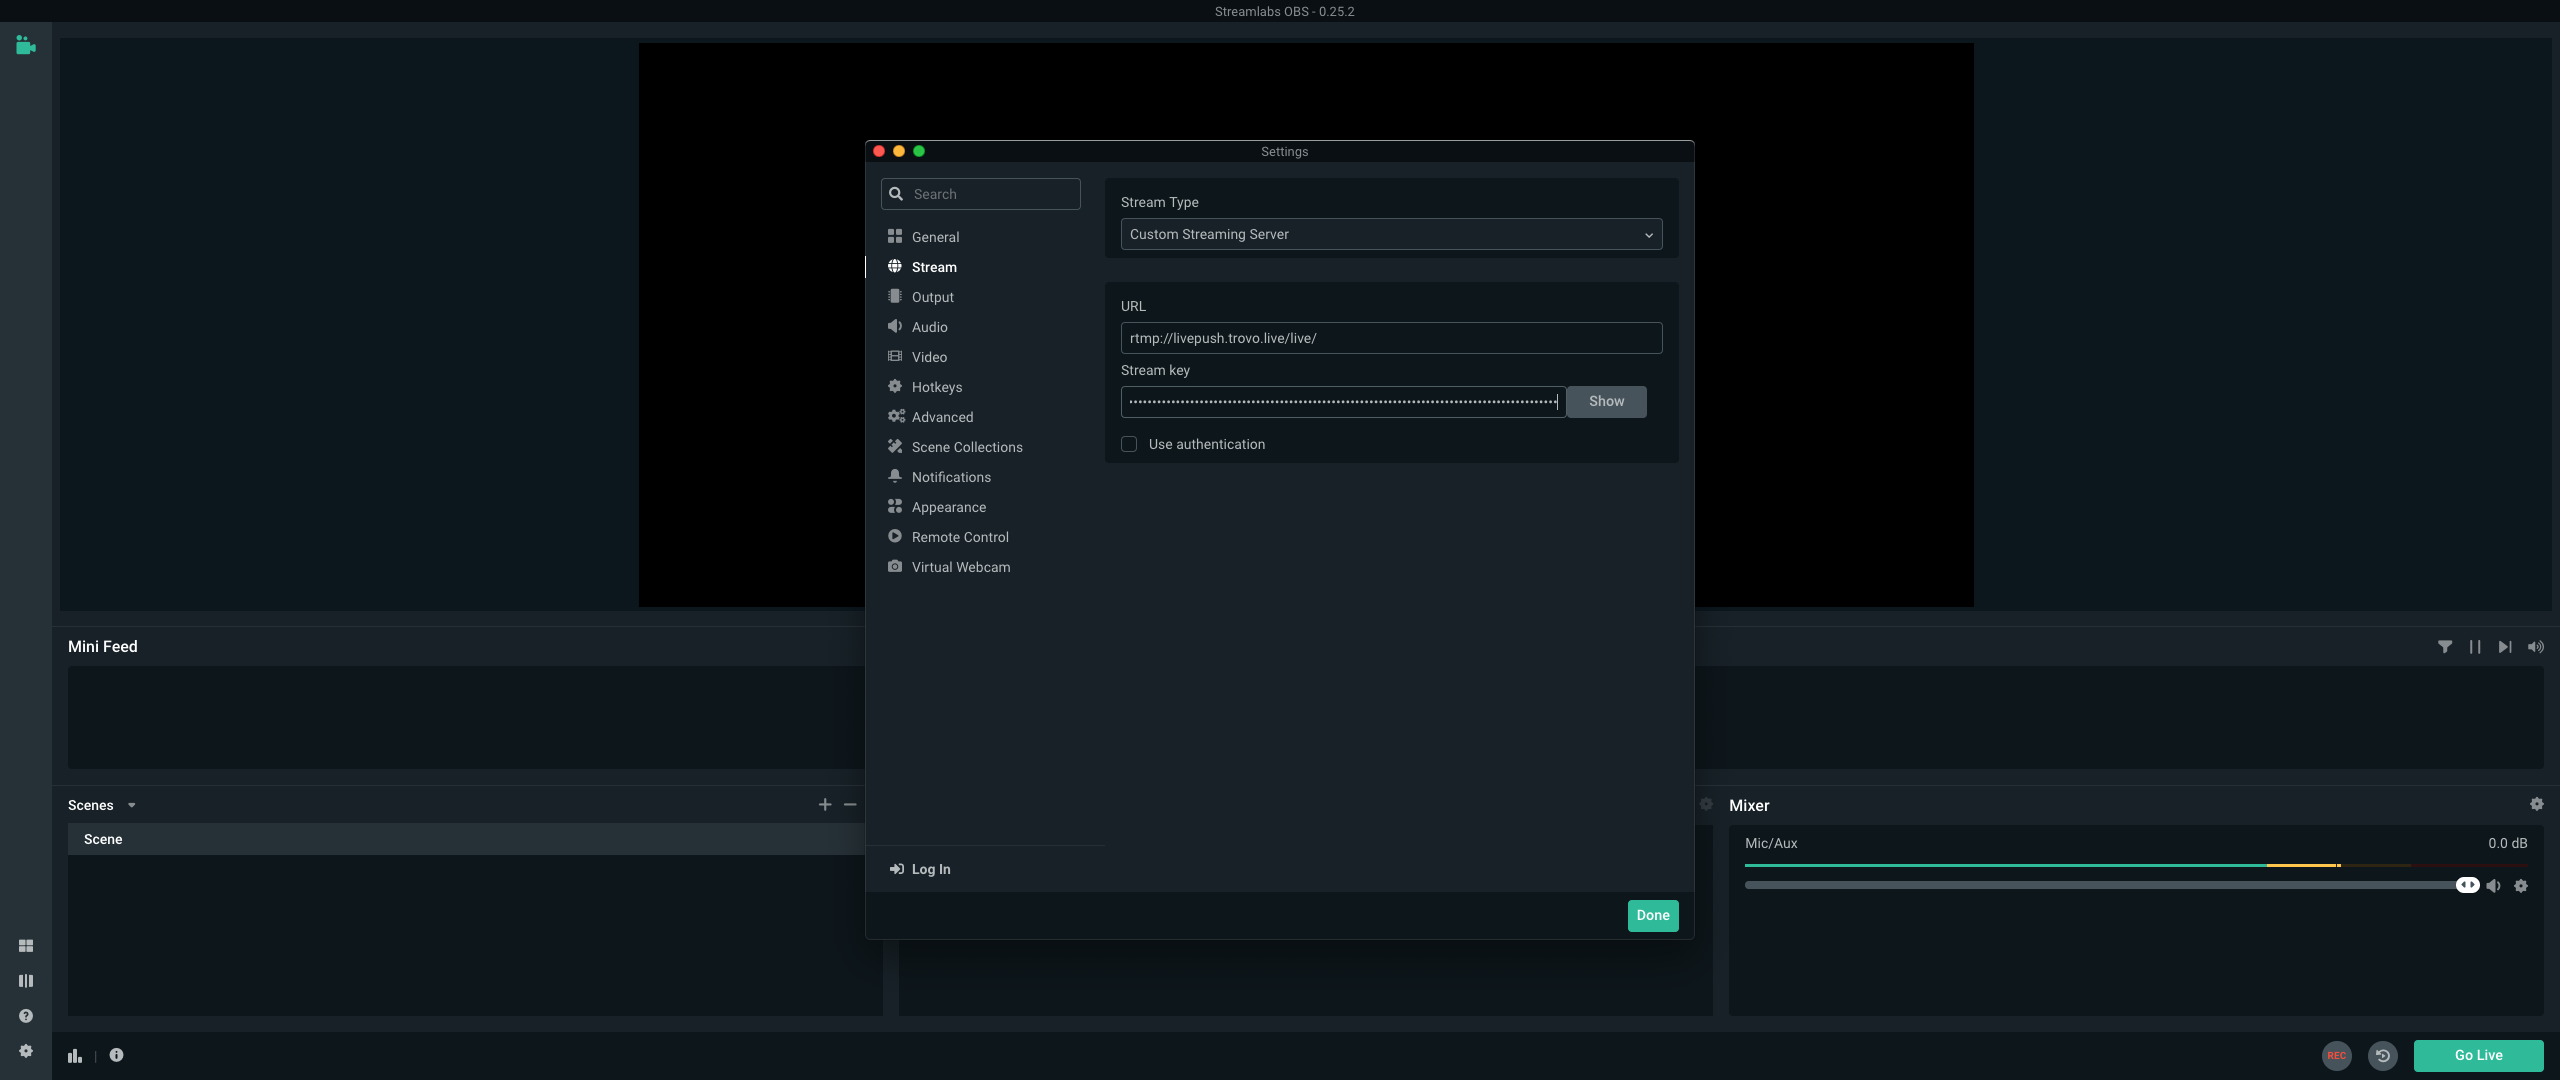
4) Streamlabs
Download: streamlabs.com
a) Preferences → Stream → Custom Streaming Server → Paste HostURL + Key → Done
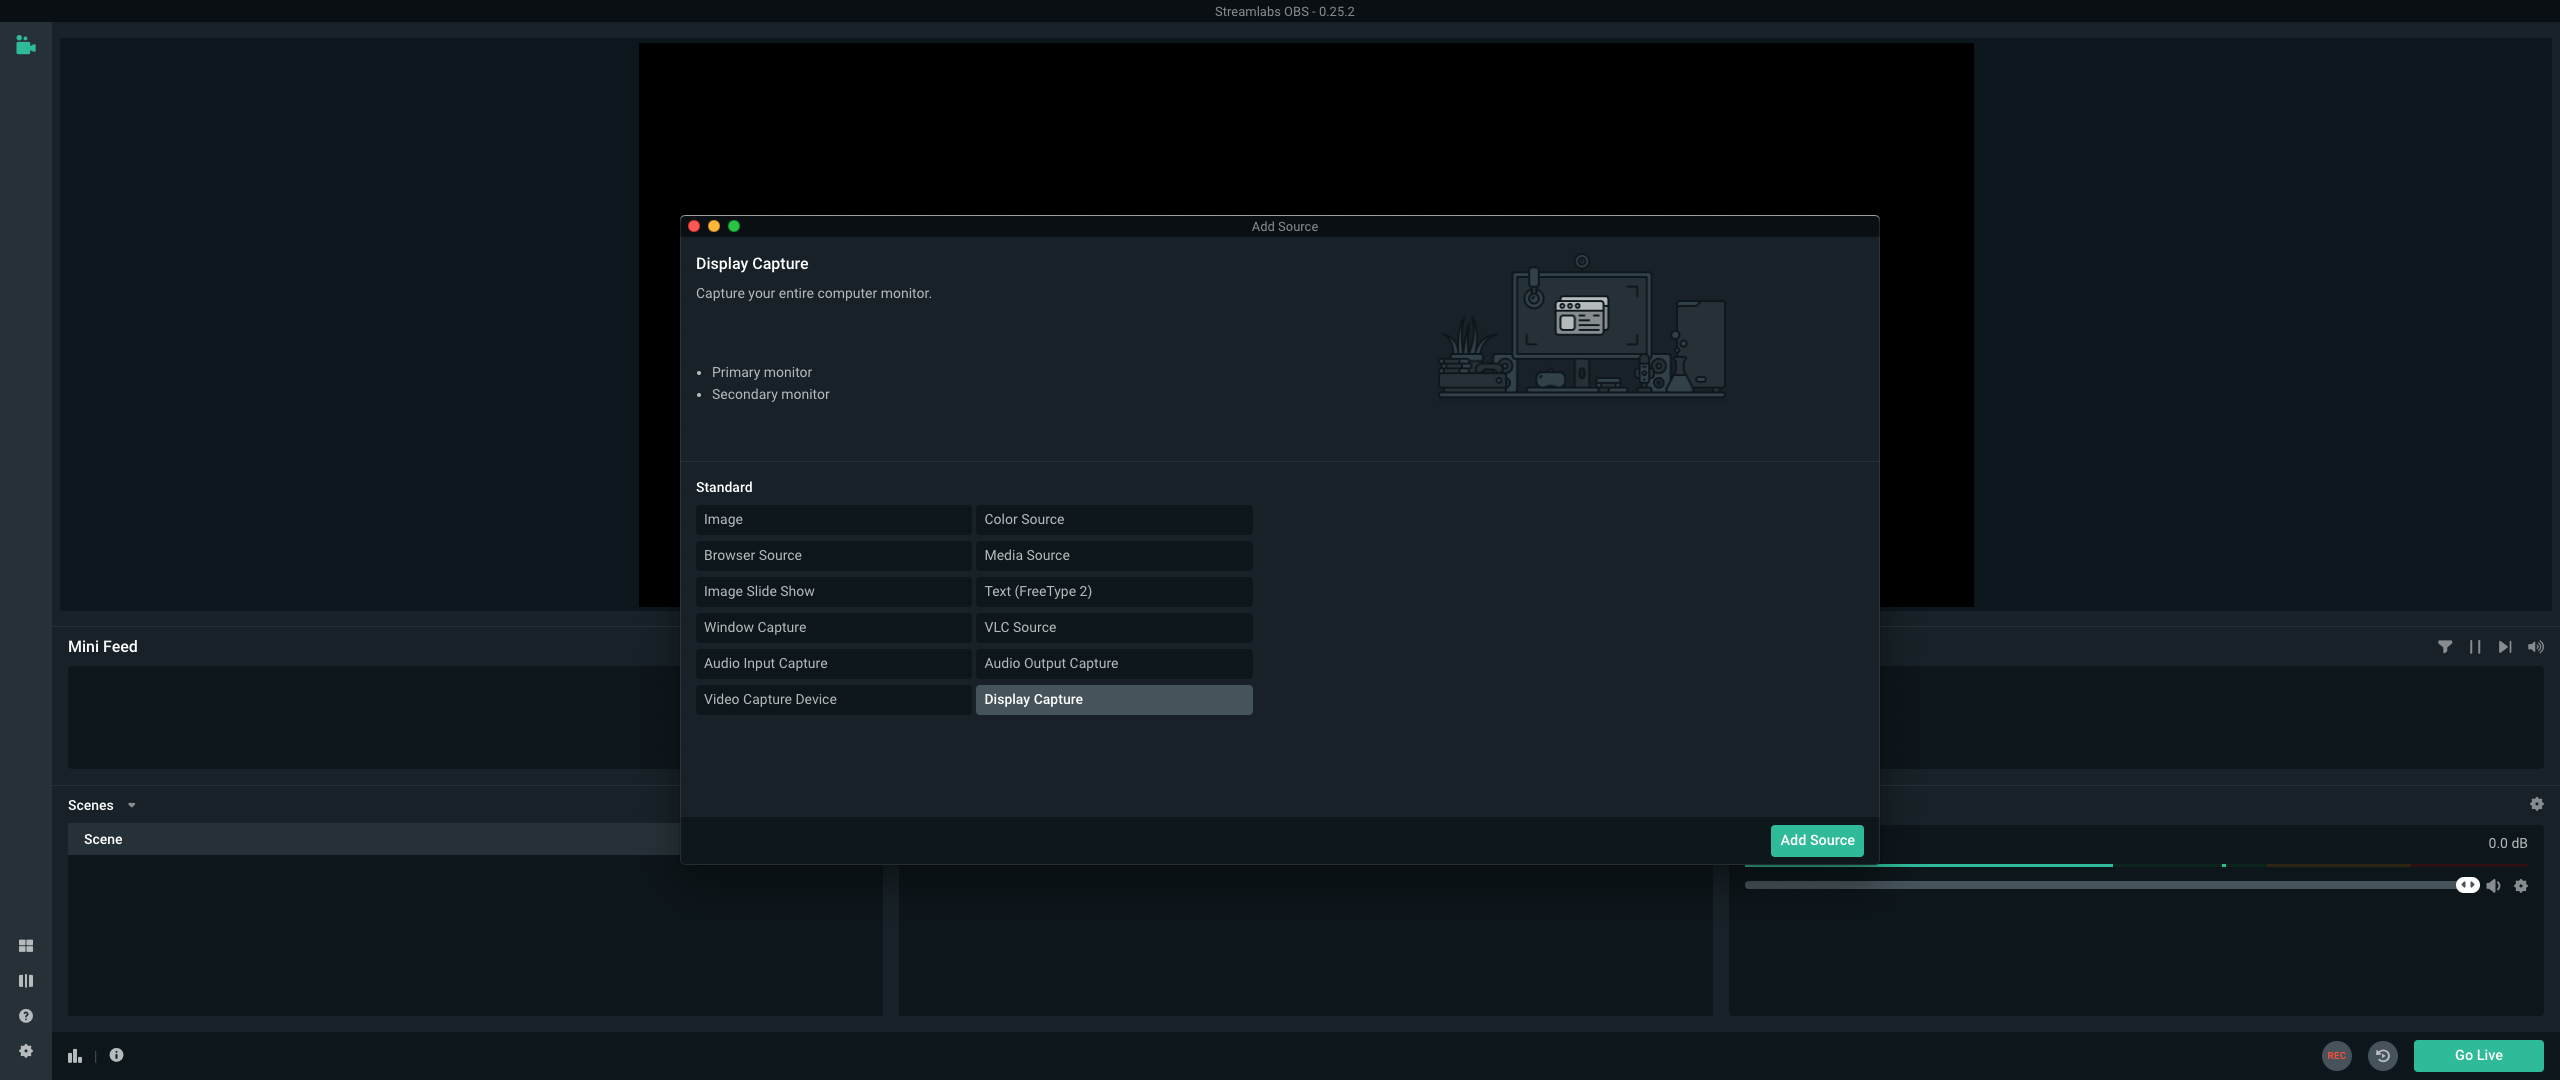
b) Sources → + → Display Capture
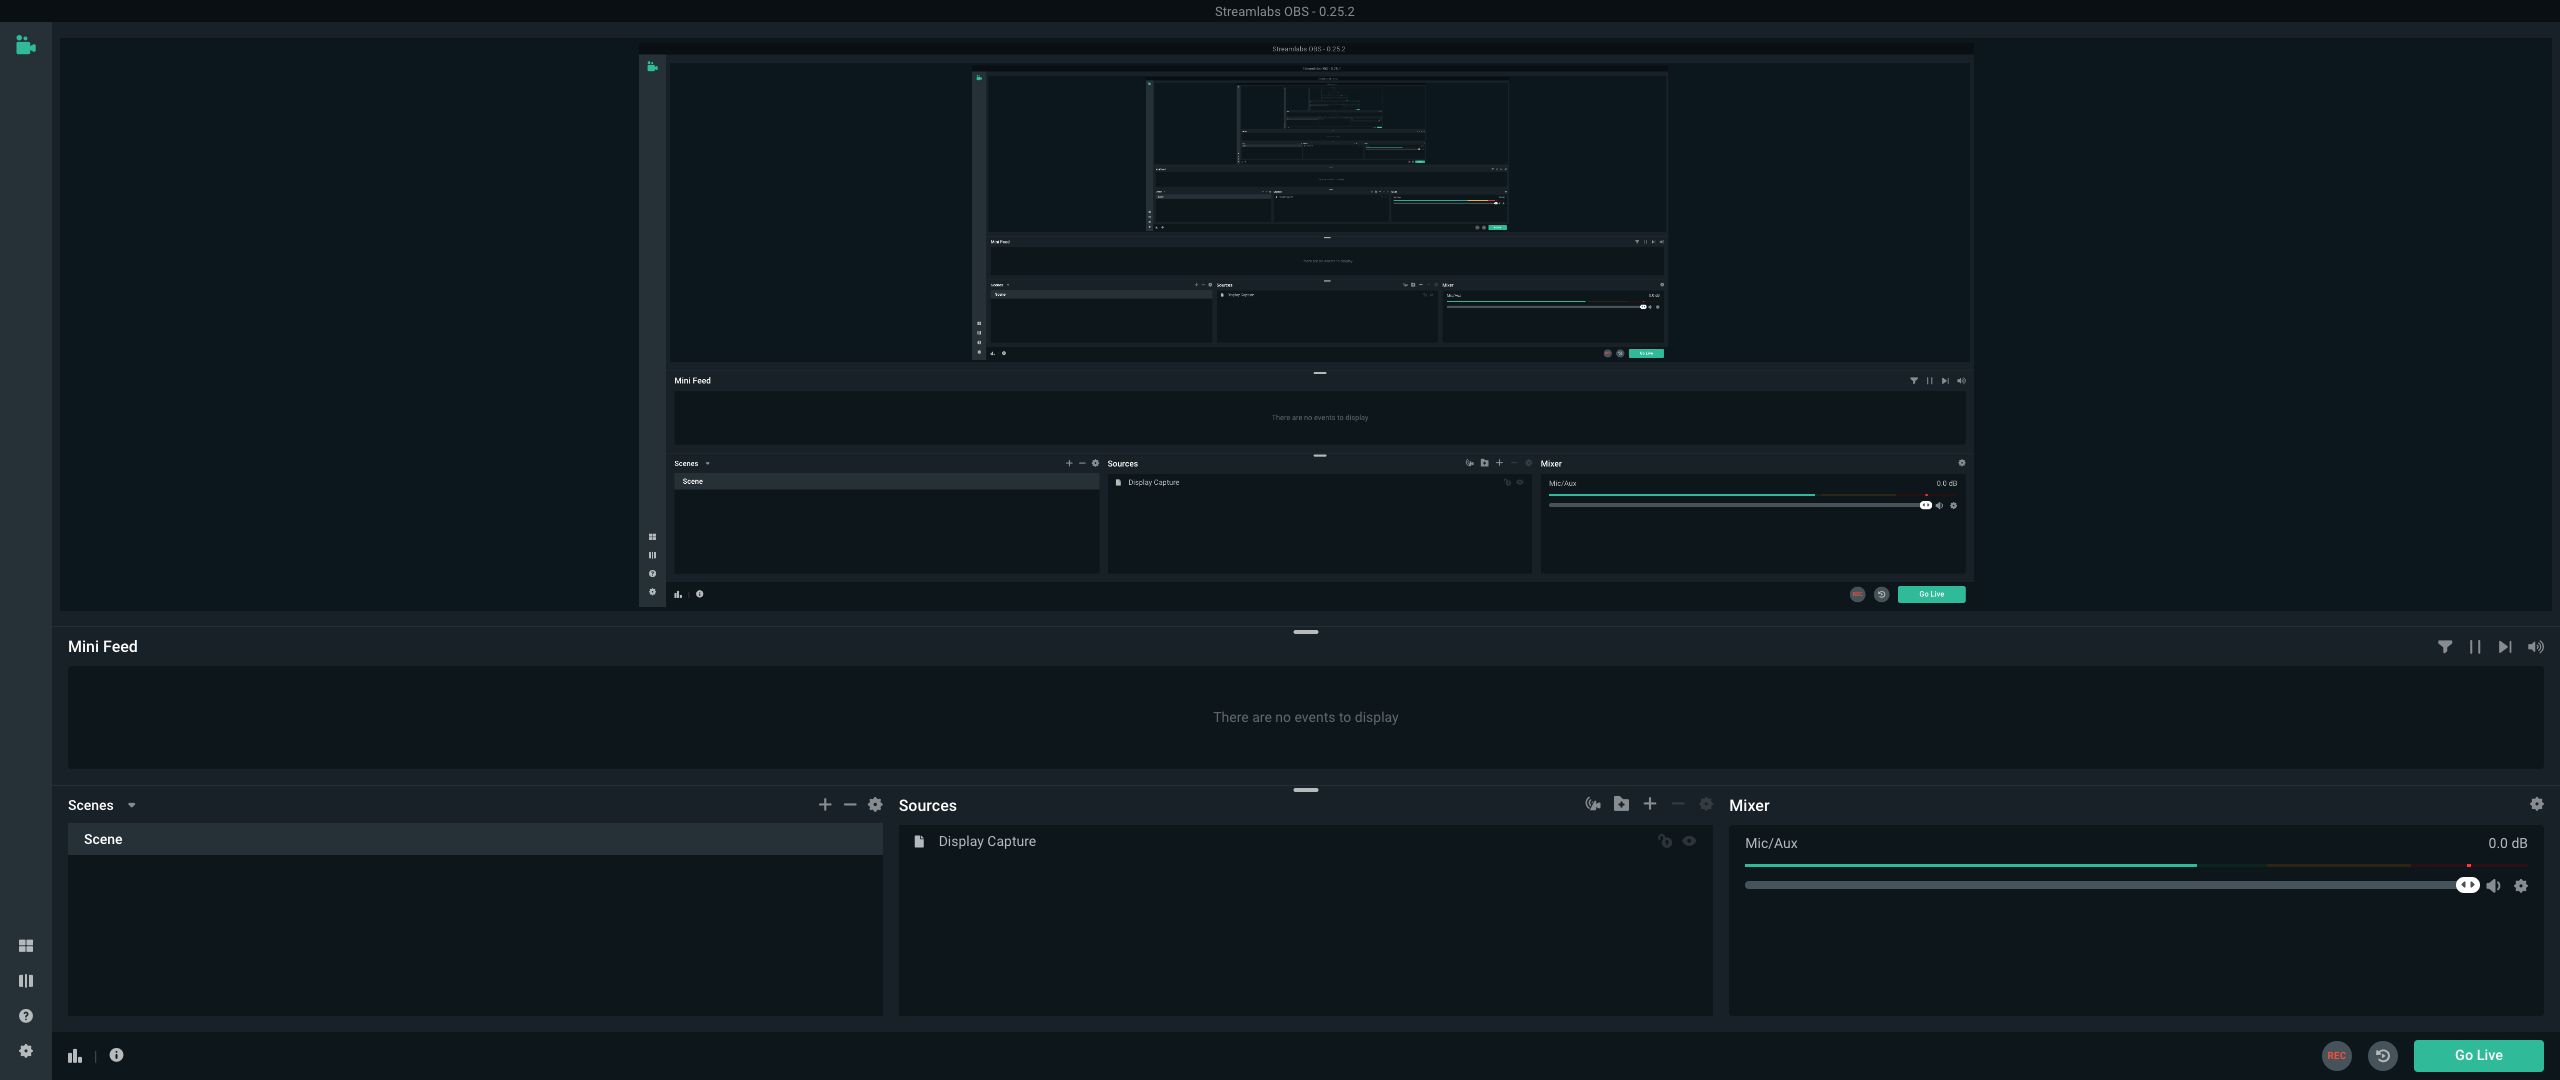
c) Click 'Go Live'
5) OBS.Live (Windows Only)
Download: streamelements.com/obslive
6) XSplit Gamecaster (Windows Only)
Download: gamecaster.com
Is everything clear?
Please read the content above carefully. If you have any questions, contact your Regional Admin via Discord.
Back to Top Continue to Next SectionReady to go live? Follow these steps and start streaming on Trovo today!
Trovo 101: Recommended Stream Settings
1. Recommended Stream Settings
Here are the optimal settings for most streamers:

You can stream at 720p, 30fps with the highest stable bitrate. Higher resolution = sharper video. Higher framerate = smoother motion in fast games.
Warning: Higher settings increase bandwidth use and may cause lag if your internet can't handle it.
2. Recommended Bitrate
- (1) Set bitrate between 1000–10,000 kbps based on resolution & framerate.
- (2) Higher bitrate = better quality, but uses more upload bandwidth.
- (3) Test your upload speed at: https://testmy.net/upload
- Never use more than 75% of your upload speed.
Optimal Bitrate per Resolution (for Viewers)
| Resolution | Recommended Bitrate |
|---|---|
| 360p | < 1,000 kbps |
| 480p | 1,000 – 2,000 kbps |
| 720p | 2,000 – 4,000 kbps |
| 1080p | 4,000 – 6,000 kbps |
| 1080p+ (Subs Only) | 6,000 – 10,000 kbps |
Note: Viewer resolution depends on your actual bitrate. If network drops below 6,000 kbps, 1080p will not be available — even if you set 6,000 in OBS.
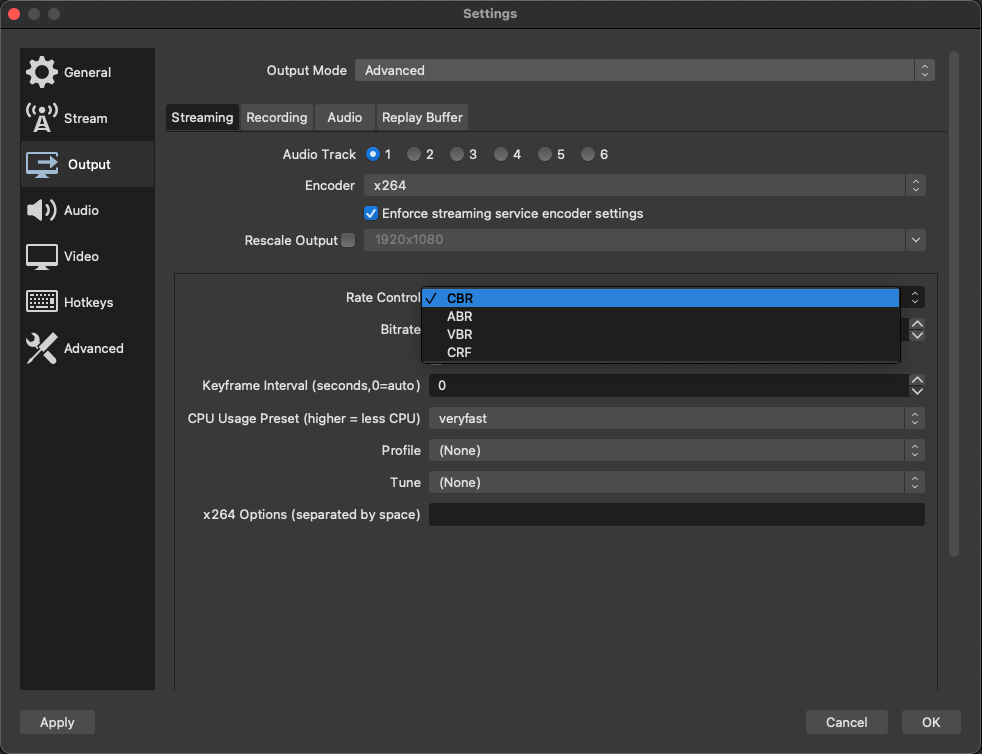
3. Recommended Bitrate Control Mode
Best Choice: CBR (Constant Bitrate)
- CBR keeps bitrate steady — faster recovery from drops.
- OBS automatically defaults to CBR.
- Avoid: ABR, VBR, CRF — they fluctuate and cause lag.
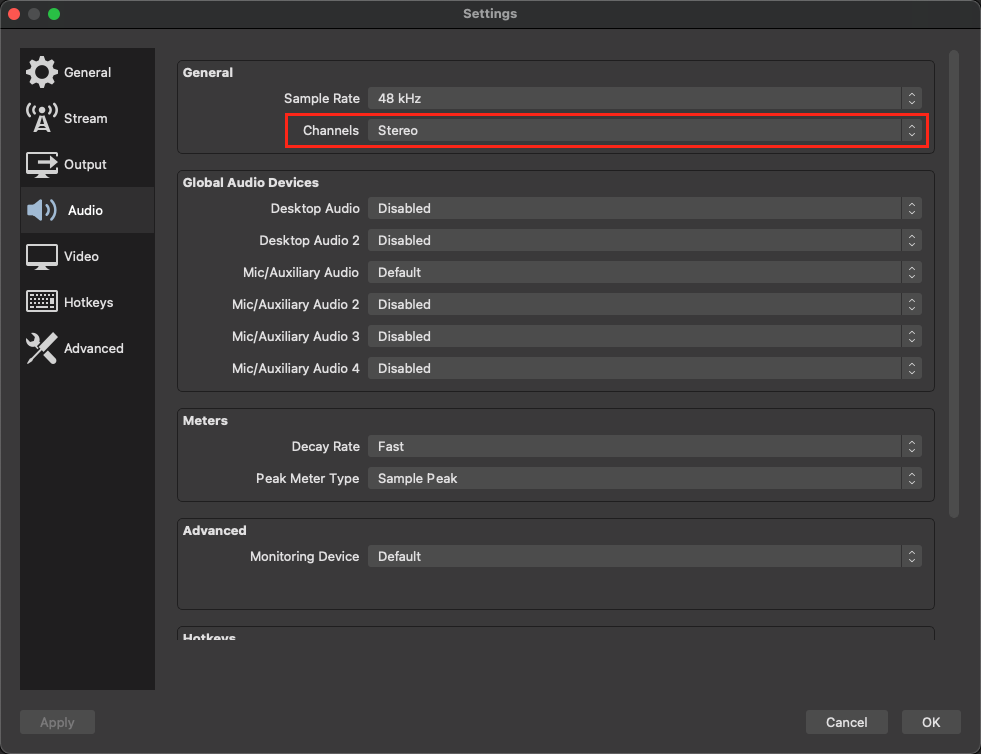
4. Recommended Audio Channels
Some mobile viewers report no sound. Fix it by setting audio to Stereo in OBS.
Is everything clear?
Please read the content above carefully. If you have any questions, contact your Regional Admin via Discord.
Back to Top Continue to Next SectionStable stream = happy viewers. Use CBR, test your upload, and go live with confidence!
Trovo 101: Chat Commands
Streamers and moderators can use chat commands to manage the channel and keep it safe.
Type / in the chatbox (on web) to see all available commands.
Use @ to mention a user: @Username
Command List
| Command | Description | Access | Usage |
|---|---|---|---|
| /mods | Shows list of moderators | All Users | /mods |
| /mod | Gives moderator status | Streamer Only | /mod username |
| /unmod | Removes moderator status | Streamer Only | /unmod username |
| /banned | Shows list of banned users | Streamer & Mods | /banned |
| /ban | Bans a user from chat | Streamer & Mods |
/ban username Permanent/ban username 300 5 min |
| /unban | Unbans a user | Streamer & Mods | /unban username |
How to Use Commands
- Type
/in chat dropdown appears - Type command + username (if needed)
- Press Enter
Pro Tip: Replace username with the actual name (no @ needed in commands).
Is everything clear?
Please read the content above carefully. If you have any questions, contact your Regional Admin via Discord.
Back to Top Continue to Next SectionKeep your chat safe and fun — use commands wisely!
Trovo 101: How to Send Go Live Notifications
Notifications are your **#1 way to pull viewers in** — every time you go live. Make them personal, fun, and effective!
On This Page
- 1. About Go Live Notifications
- 2. How to Send Live Notifications
- 3. Frequently Asked Questions
1. About Go Live Notifications
- You must be LIVE to send a notification.
- Send one every stream — don’t skip!
- Followers get notifications based on where they are:
- On Trovo website? → Only web notification
- Off-site? → Email + App Push
- Limit: 1 notification every 4 hours — no need to restart stream.
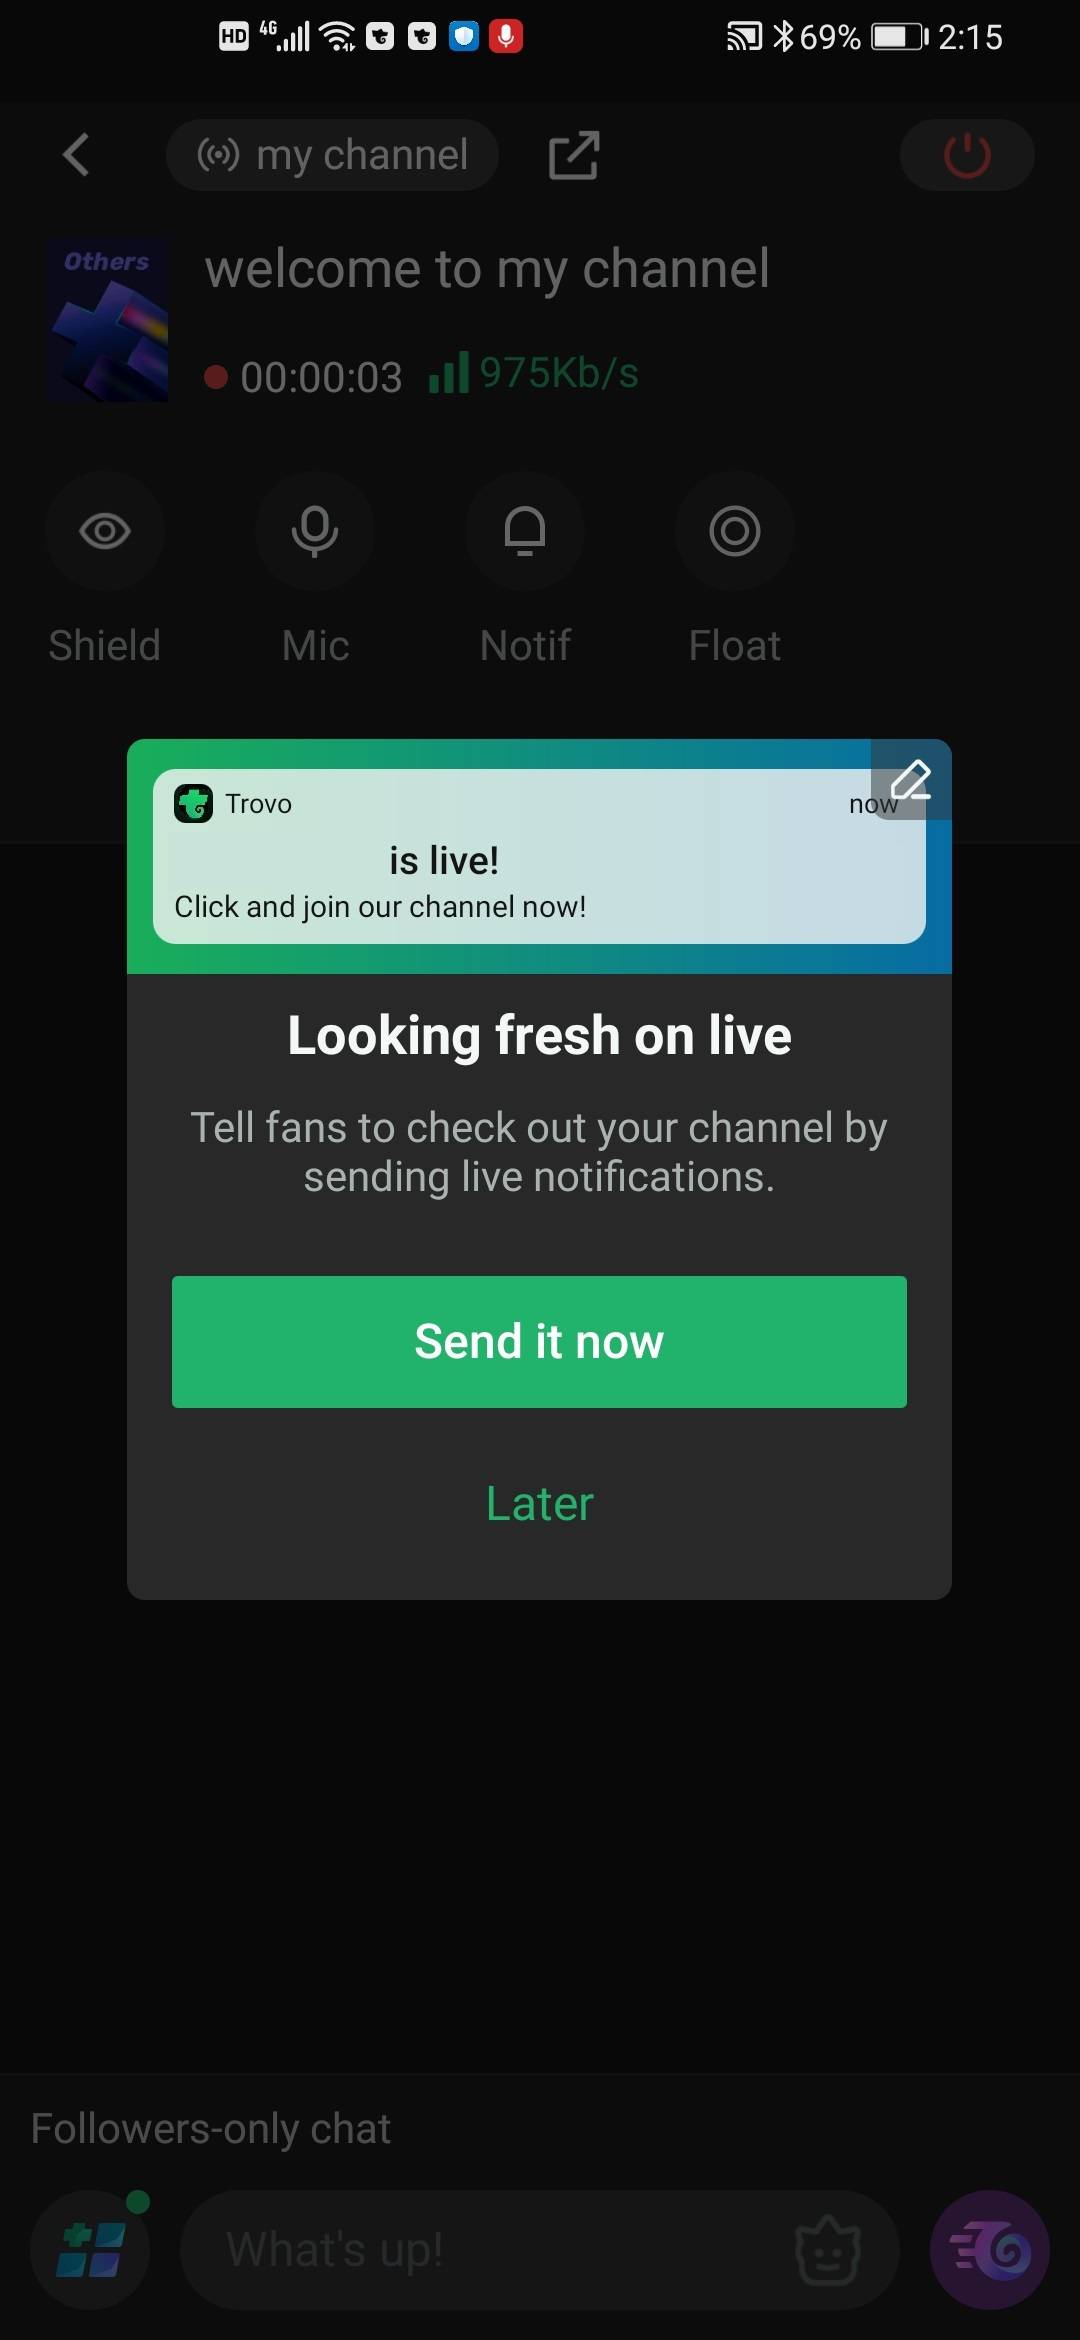
2. How to Send Live Notifications
- Click your profile picture → Go to Creator Studio
- On the left panel, click "Stream"
- Find the Live Notification section
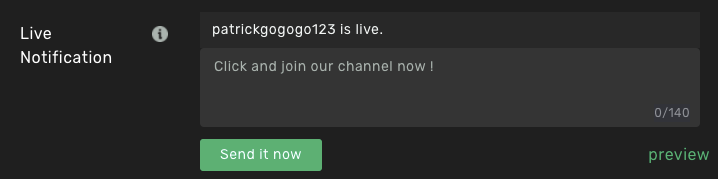
- Go live → Notification auto-sends to enabled followers
- Customize it! Type your message → Click "Save and send"

Pro Tip: Use emojis, hype, or today’s game! Example:LIVE NOW! Fortnite Duos with YOU! Drop in! #Trovo
3. Frequently Asked Questions
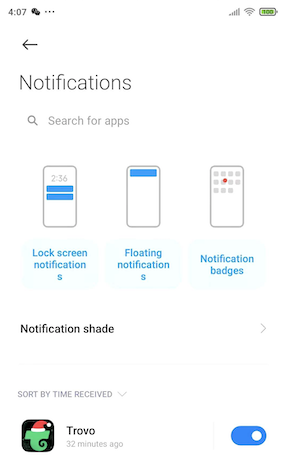
Q1: Why can't I receive notifications?
Check both:
- System notification settings (phone/browser)
- Trovo app/website notification settings
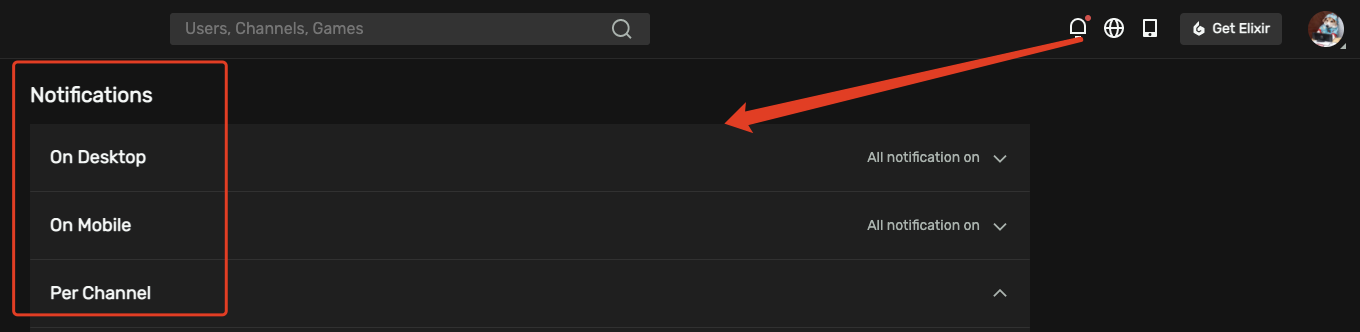
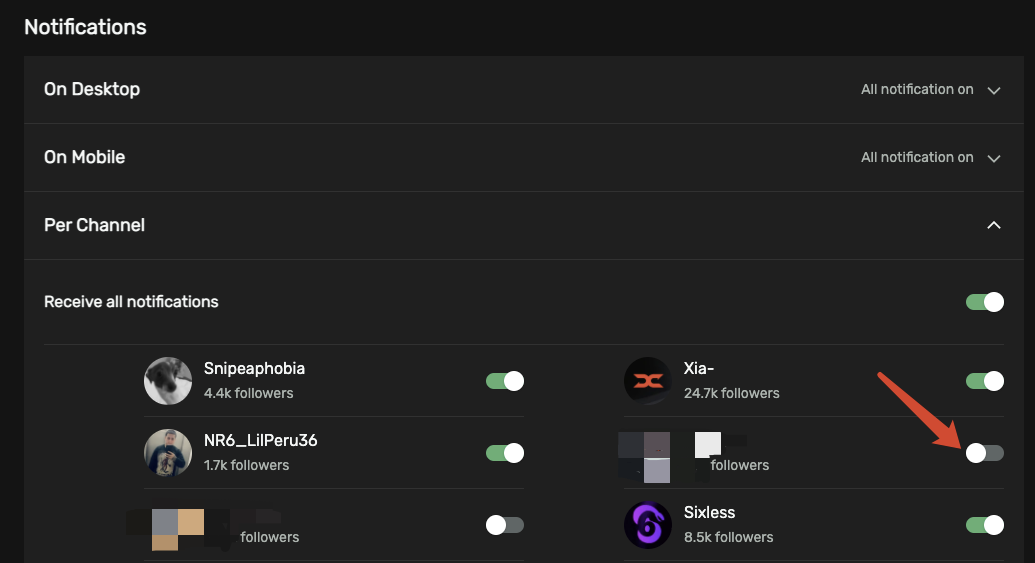
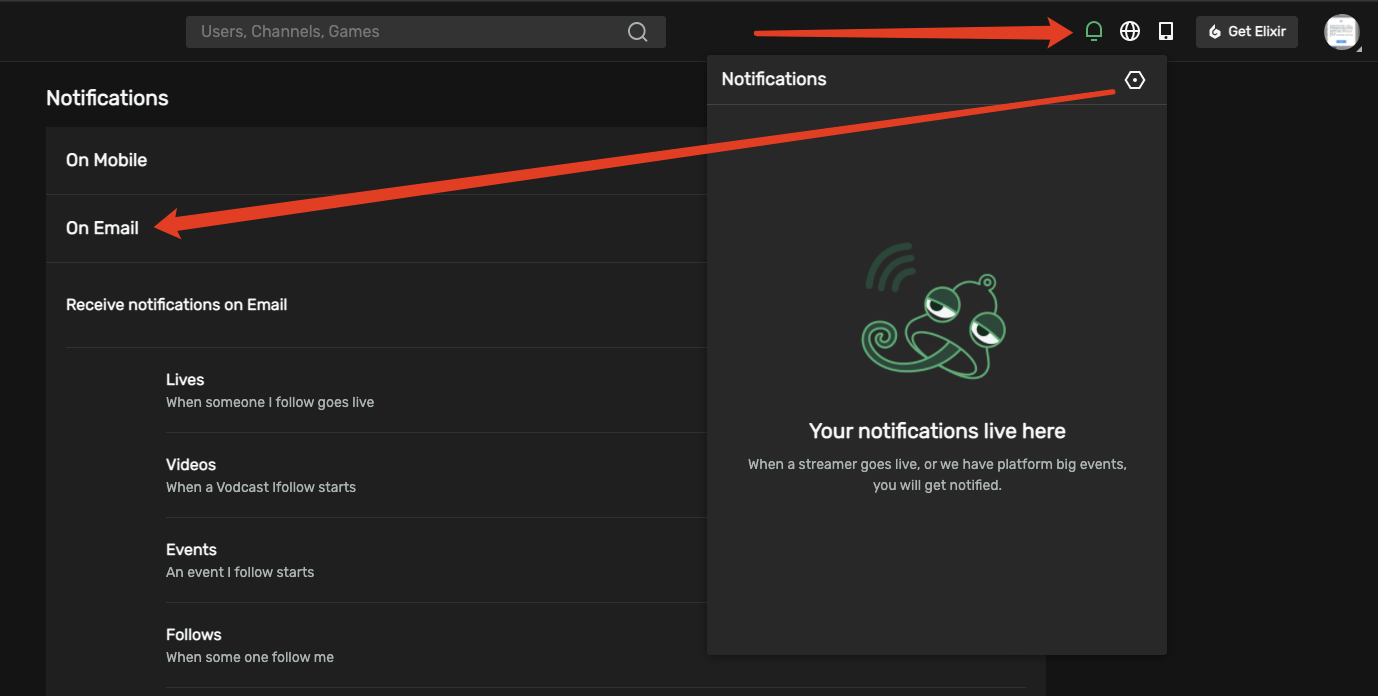
Q2: How to stop getting a streamer’s notifications?
Go to: Notifications → Per Channel → Turn OFF
Q3: What if I leave the notification box empty?
Trovo sends a default message. You can edit or remove anytime!
Q4: How to stop email notifications?
Go to: Notifications → Email → Turn OFF
Is everything clear?
Please read the content above carefully. If you have any questions, contact your Regional Admin via Discord.
Back to Top Continue to Next SectionNever go live in silence — send that notification and fill your chat!
Trovo 101: Layout Edit & Add Overlays on Mobile Go-Live
Add **professional overlays** directly from your **phone** while streaming on the Trovo App — no PC needed!
1. Web URL Overlays – What Are They?
Web overlays are **live widgets** (alerts, follower goals, chat boxes, etc.) hosted as URLs from platforms like:
- streamelements.com → Login with Trovo
- kappamon.com → Login with Trovo
Example Overlay URLs:
https://stream.kappamon.com/v/3c2e3306-...https://streamelements.com/overlay/60e67...
Result on stream:
2. How to Access Layout Editor
Before Going Live
Avatar → Go Live → Advanced Settings → Layout Edit
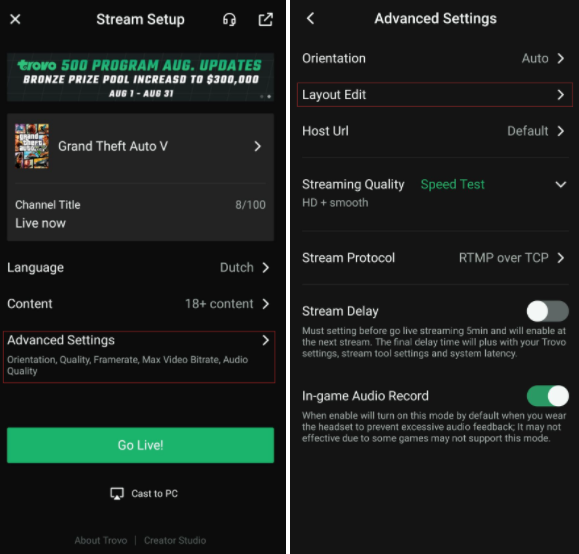
While Live
Avatar → Go Live / Unhost → Layout
3. Add & Edit Overlays
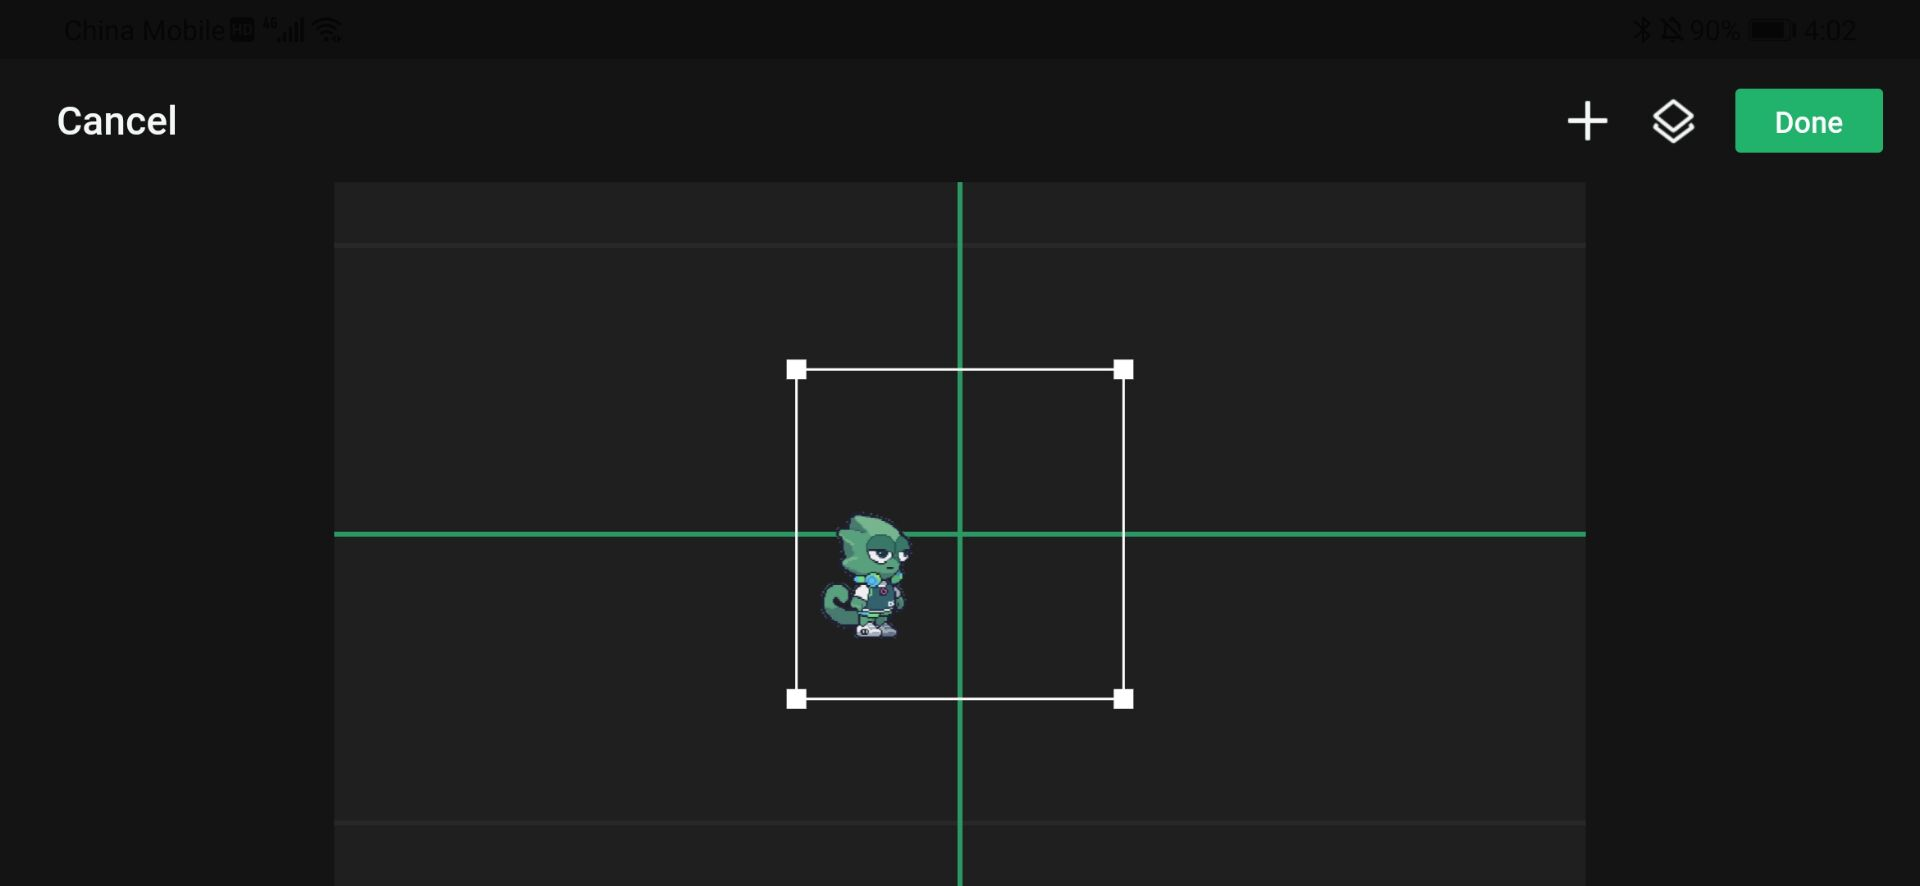
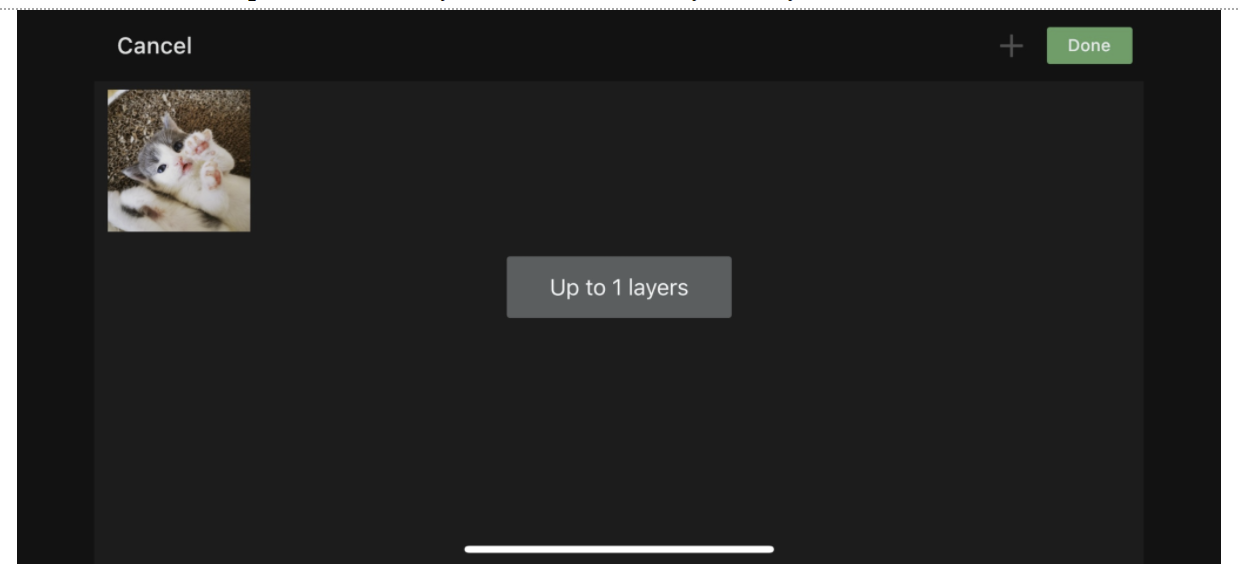
You’ll see a **live canvas** of your stream. Add up to:
- Android: 5 overlays
- iOS: 1 overlay
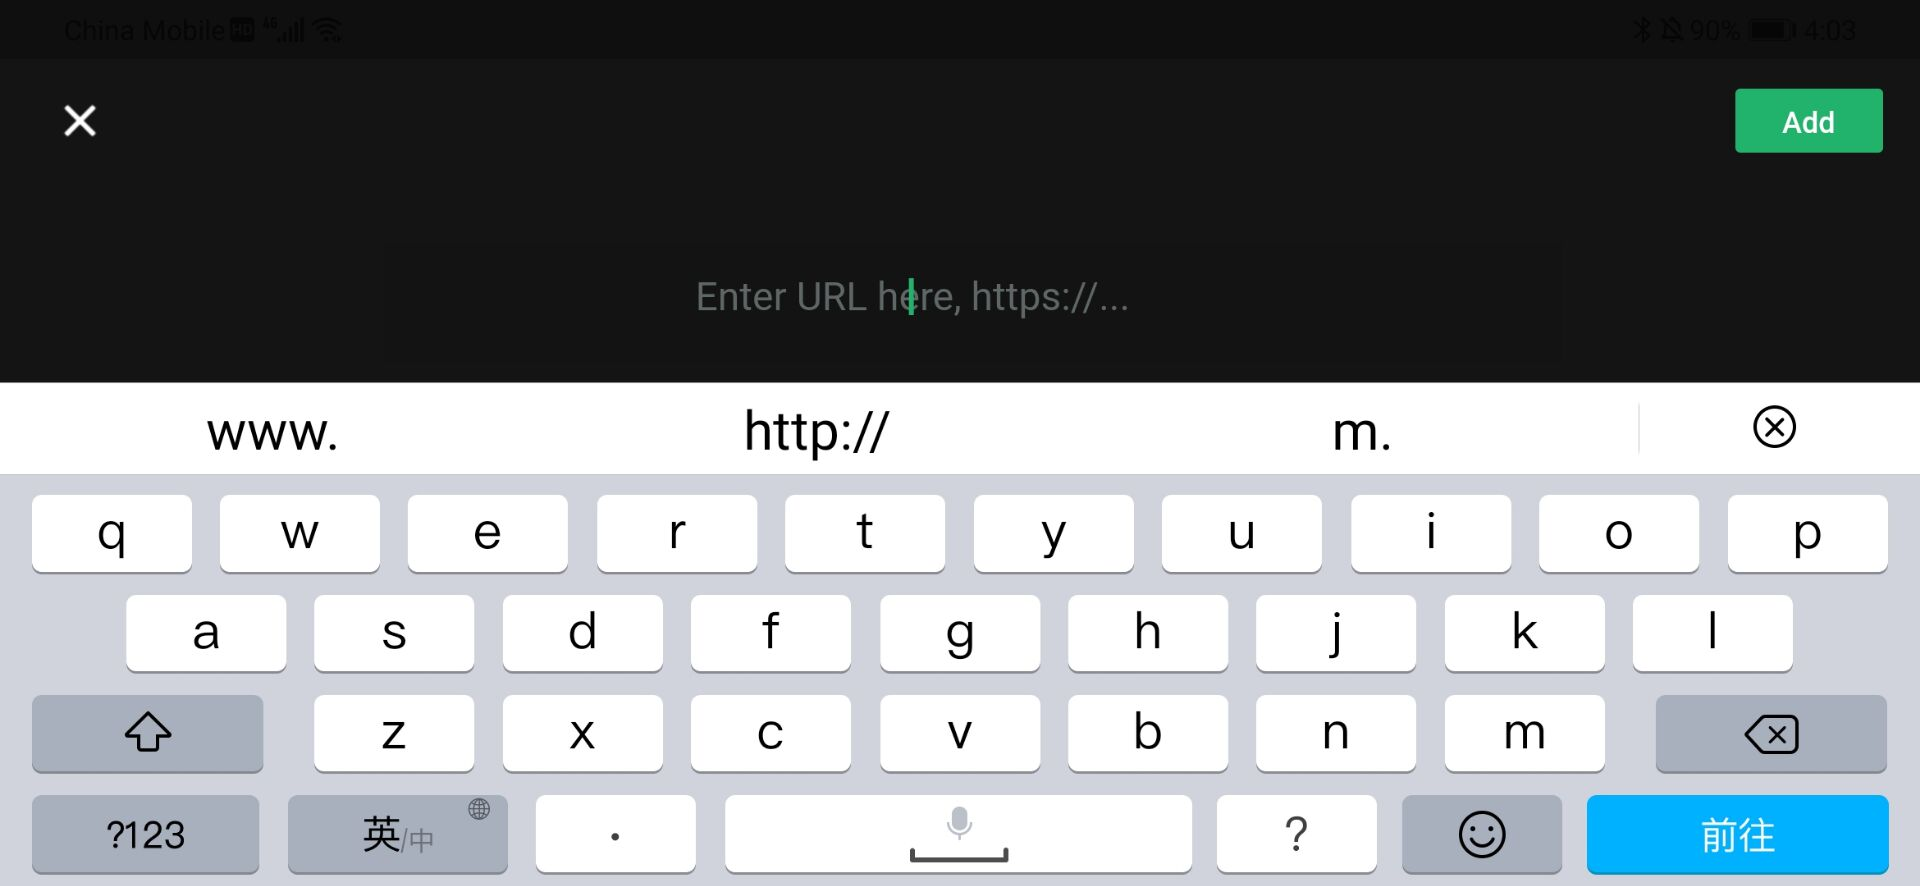
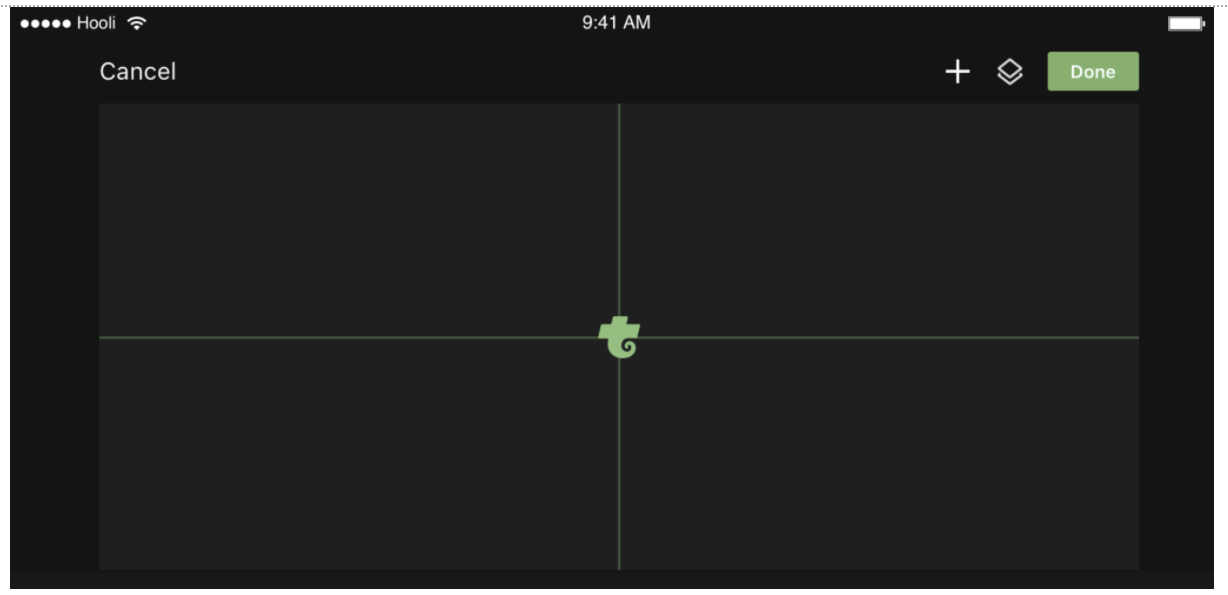
Step 1: Add Overlay
Paste your **overlay URL** → Click Add (appears in 1–2 sec)
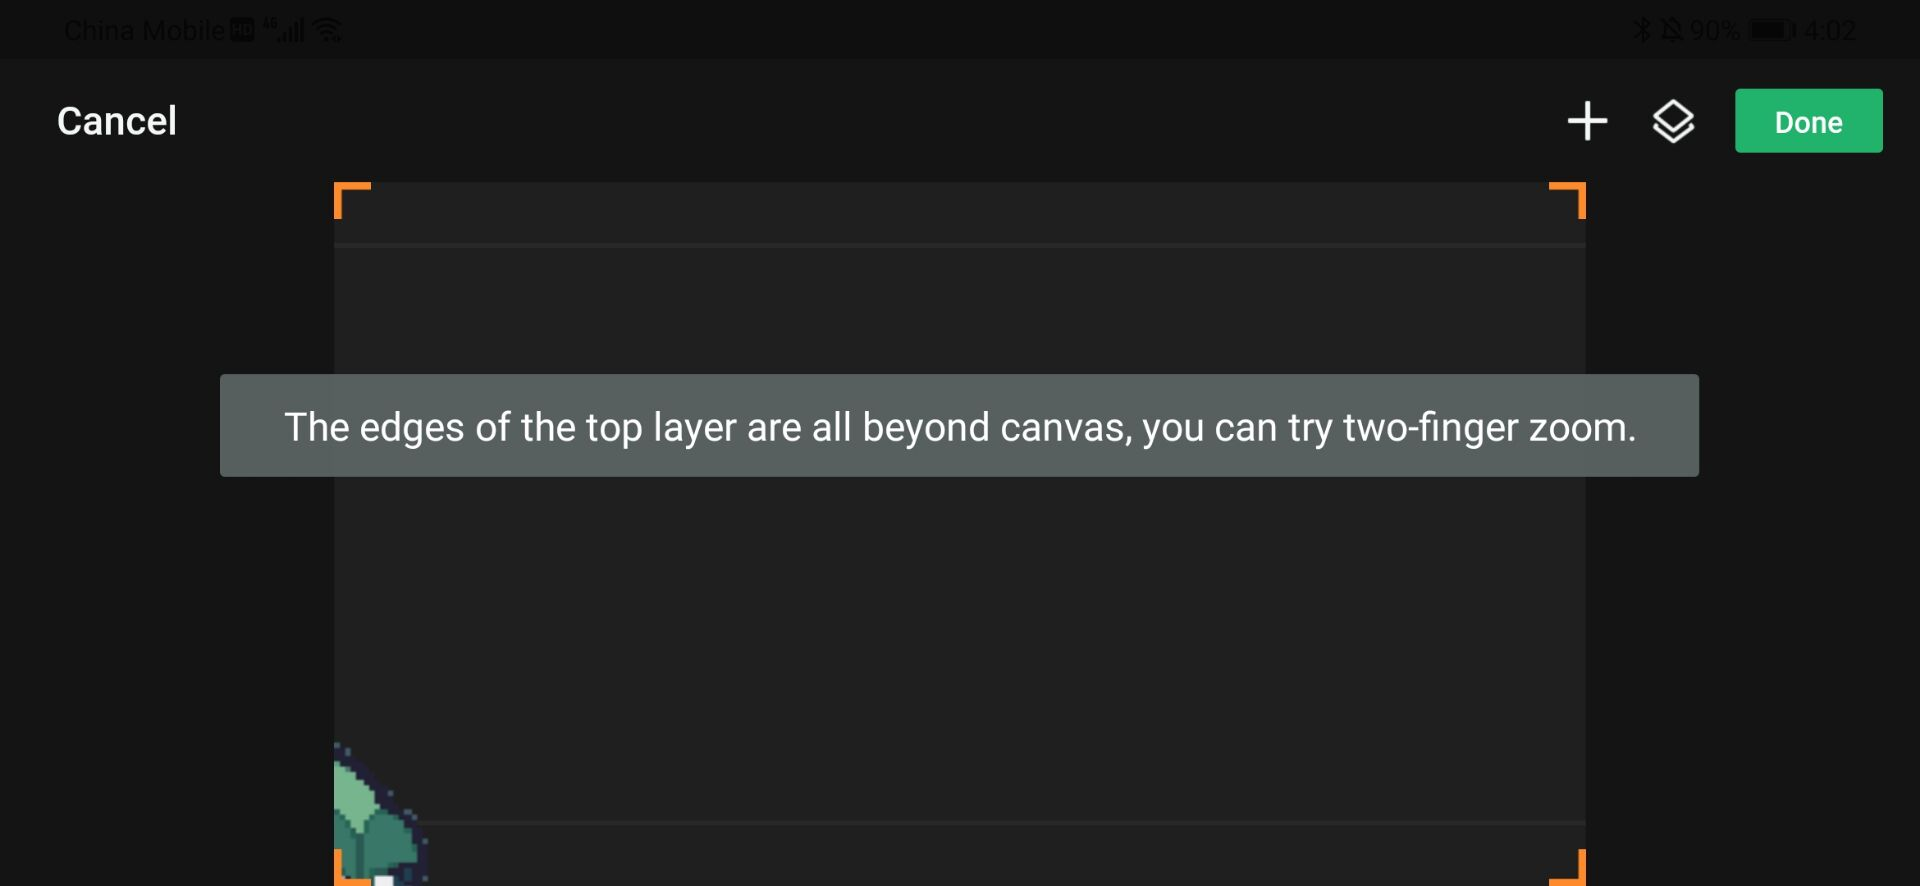
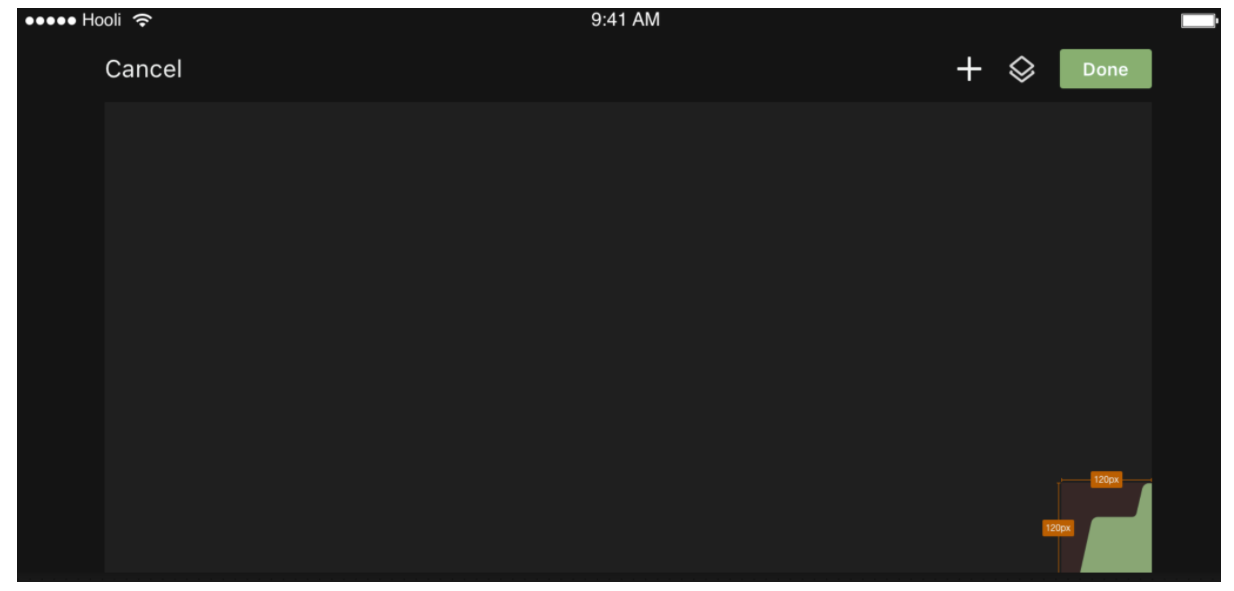
Step 2: Resize & Move
- Two-finger pinch to zoom
- Drag corners to resize (up to 2x canvas)
- Orange warning if out of bounds
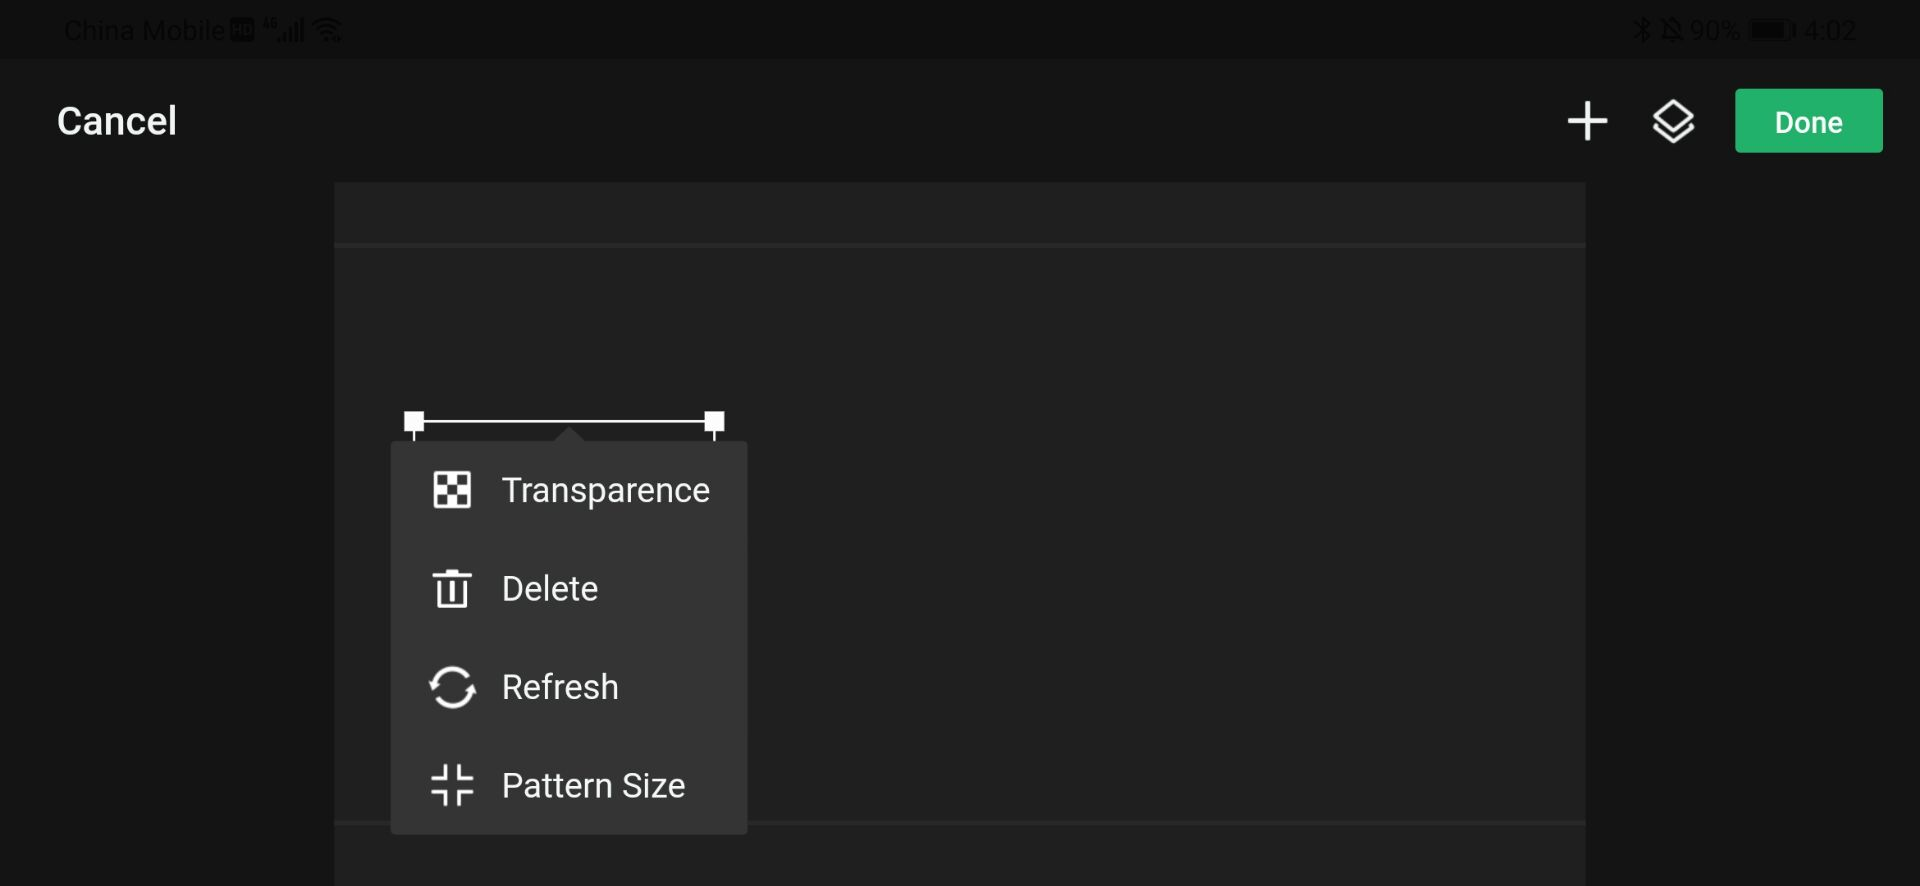
Step 3: Edit Overlay
Tap overlay → Edit box appears:
- Transparency: 0% – 100%
- Delete
- Refresh (e.g., reset timer)
- Pattern Size: Scale down to 50% (fix PC-sized overlays)
4. Pro Features
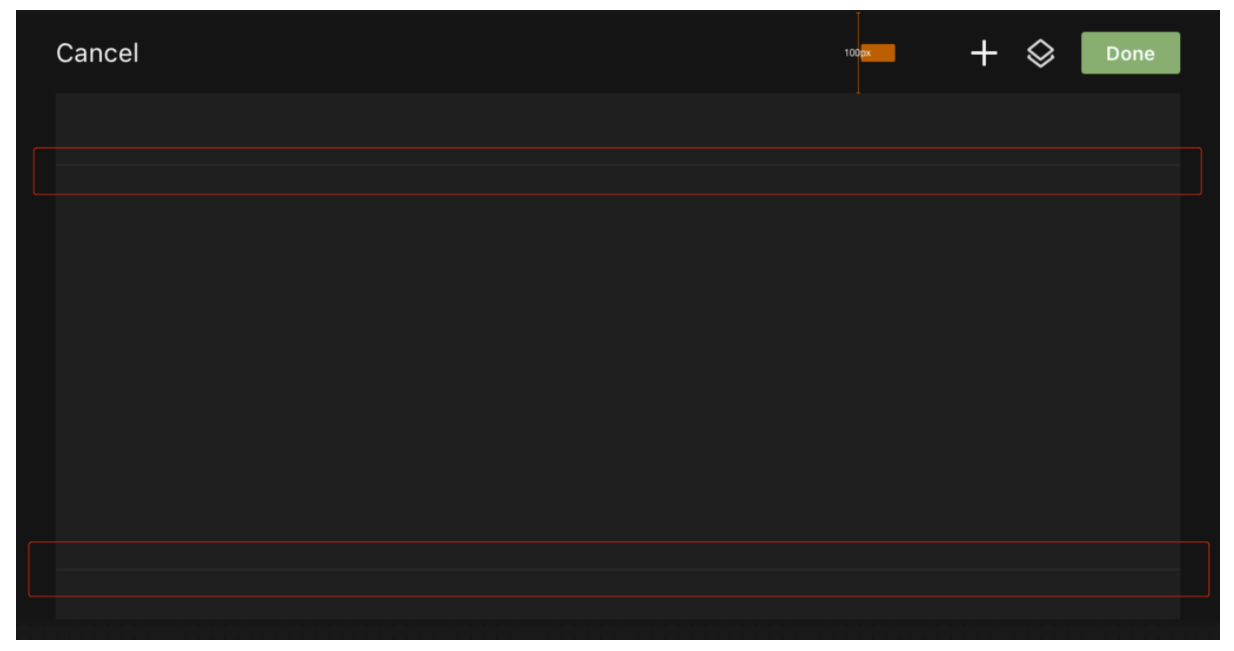
Alignment Guides
Centerline guides + vibration when aligned
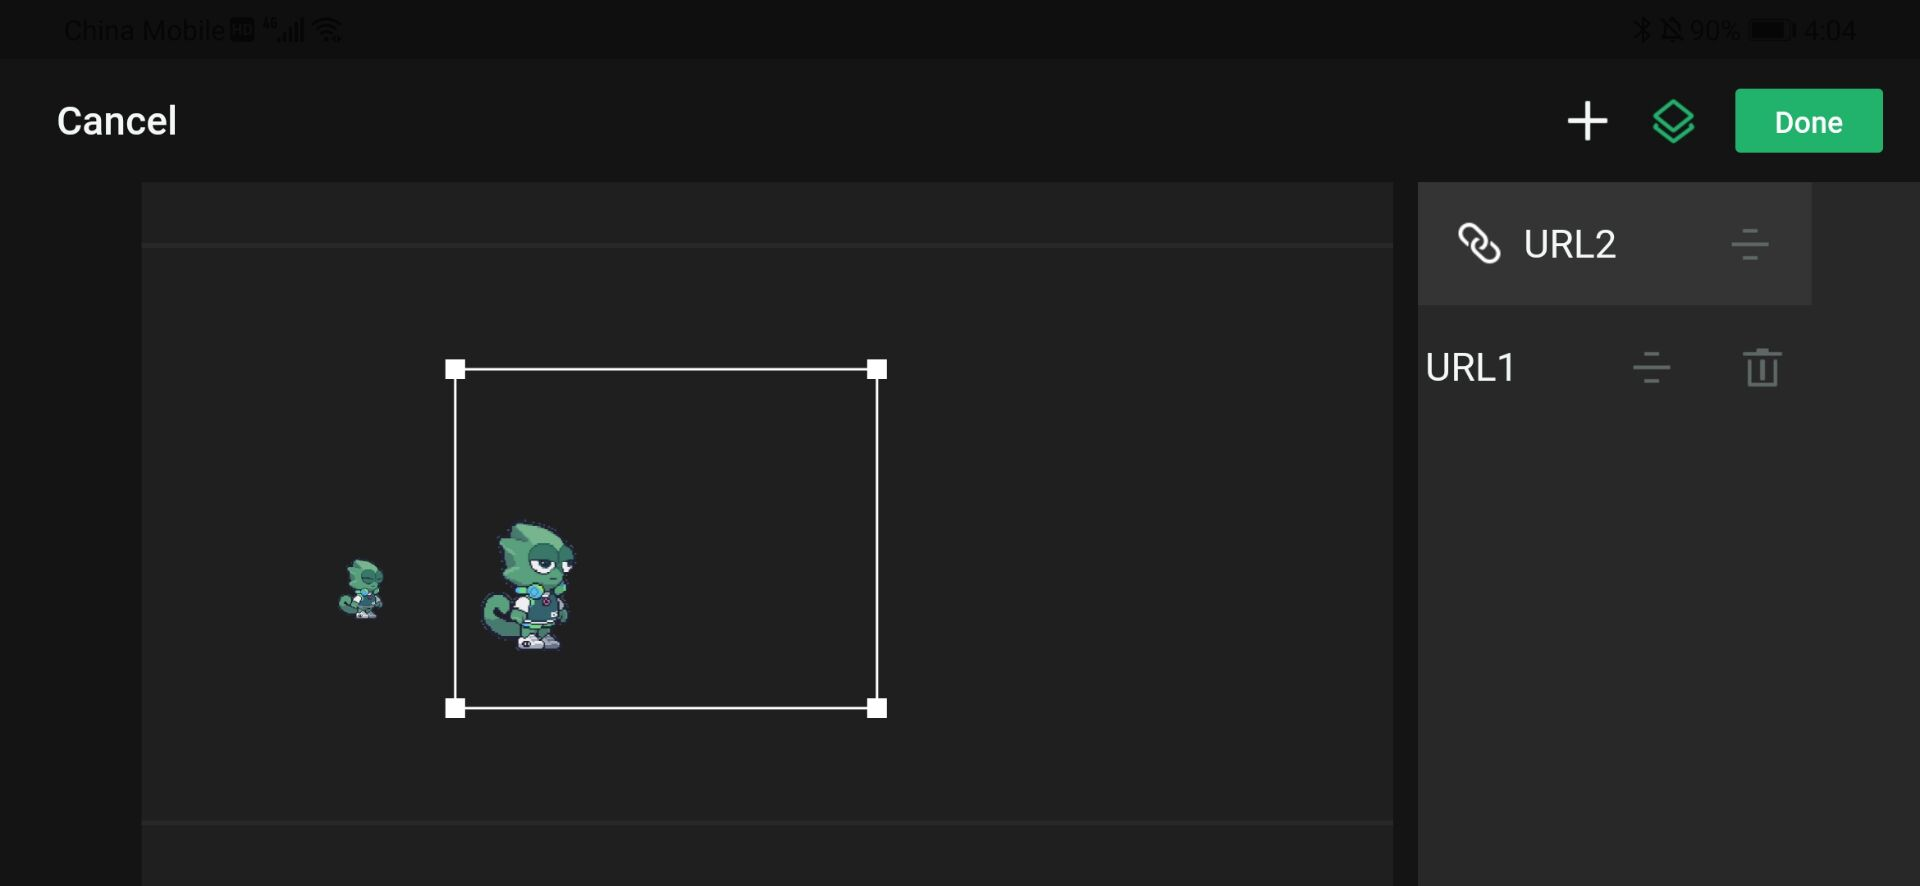
Android: Layer Order
Tap Layer (top-right) → Drag to reorder
Swipe left → Delete
iOS Limitations
| 1 Overlay Only | No “Layer” menu |
| Landscape Only | Set: Advanced → Orientation → Auto or Landscape Turn OFF phone’s Portrait Lock |
| iOS Version |
|
Adjustment between layers:
For some Android phones, there may be more than one overlay (As for the limit on the number of overlays, the current number is 5 for Android and 1 for iOS). You can adjust the relationship between overlays by clicking the "layer" entry in the upper right corner.
The sidebar shows the order of the overlays, and the overlays located at the top of the list will be on top of the other overlays. Press and hold any one to drag to sort.
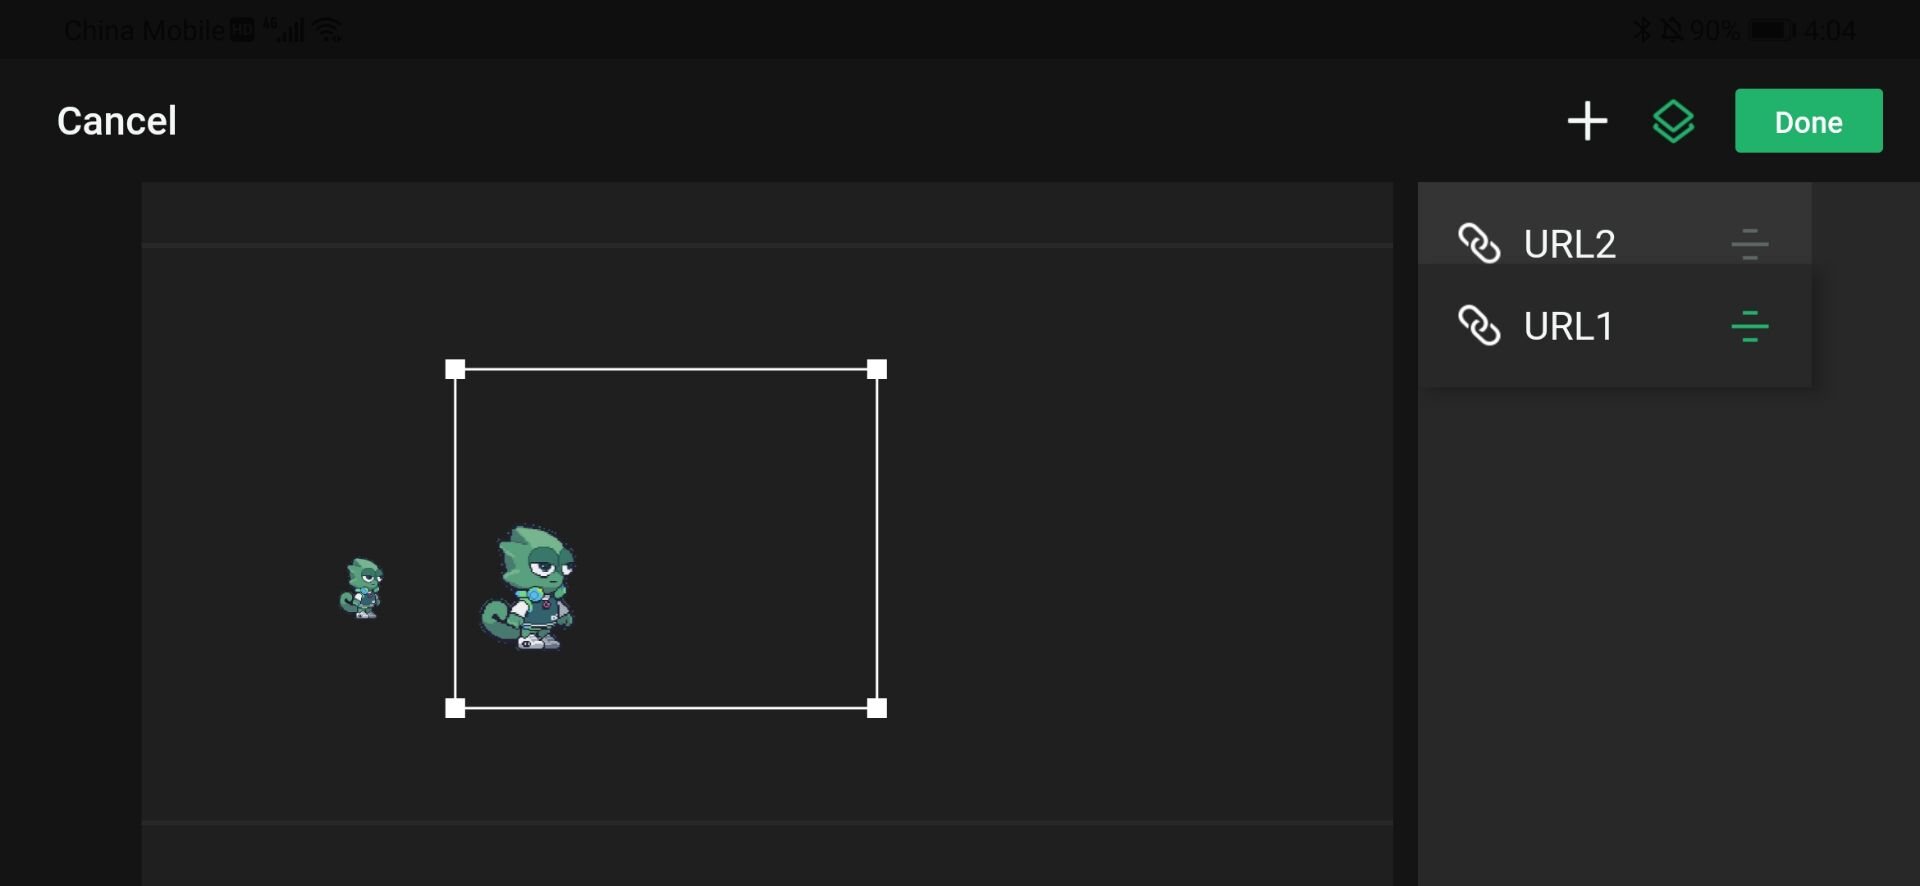
Swipe any one to the left and click to delete.
iOS System Restriction Statement
For iOS, there is up to one overlay so there is no entry of “layer”.
For iOS, the overlay can only be displayed in your channel in landscape mode, and it will not be displayed in portrait mode. Please adjust “Advanced Settings-Orientation” to “Auto” and turn off the "Portrait Orientation Lock" of the phone hardware, or directly adjust “Advanced Settings-Orientation” to “Landscape” mode.
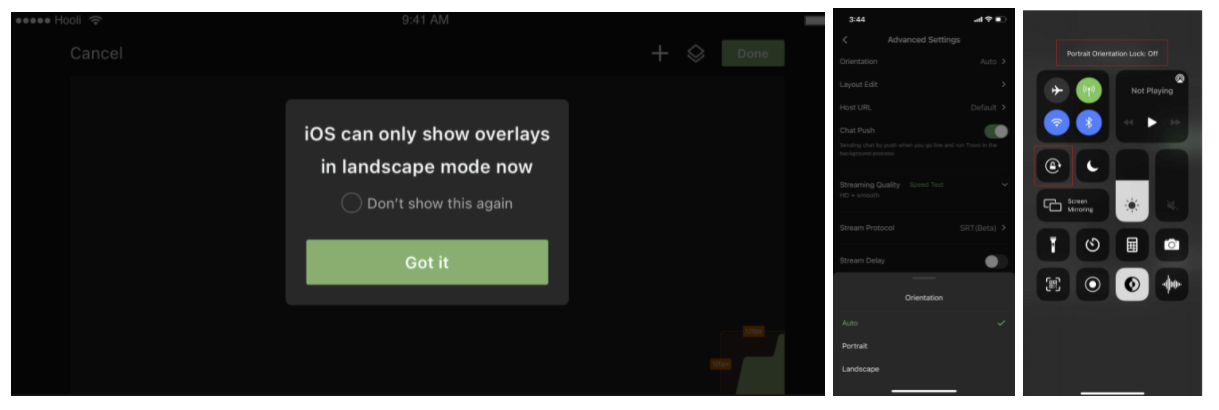
For iOS, if the system version is below 13.0, this requirement cannot be used; if the system version is between 13.0 ~14.3, the display may be incomplete; if the system version is higher than or equal to 14.3, it can be displayed completely.
Is everything clear?
Please read the content above carefully. If you have any questions, contact your Regional Admin via Discord.
Back to Top Continue to Next SectionGo mobile, go pro — overlays in your pocket!